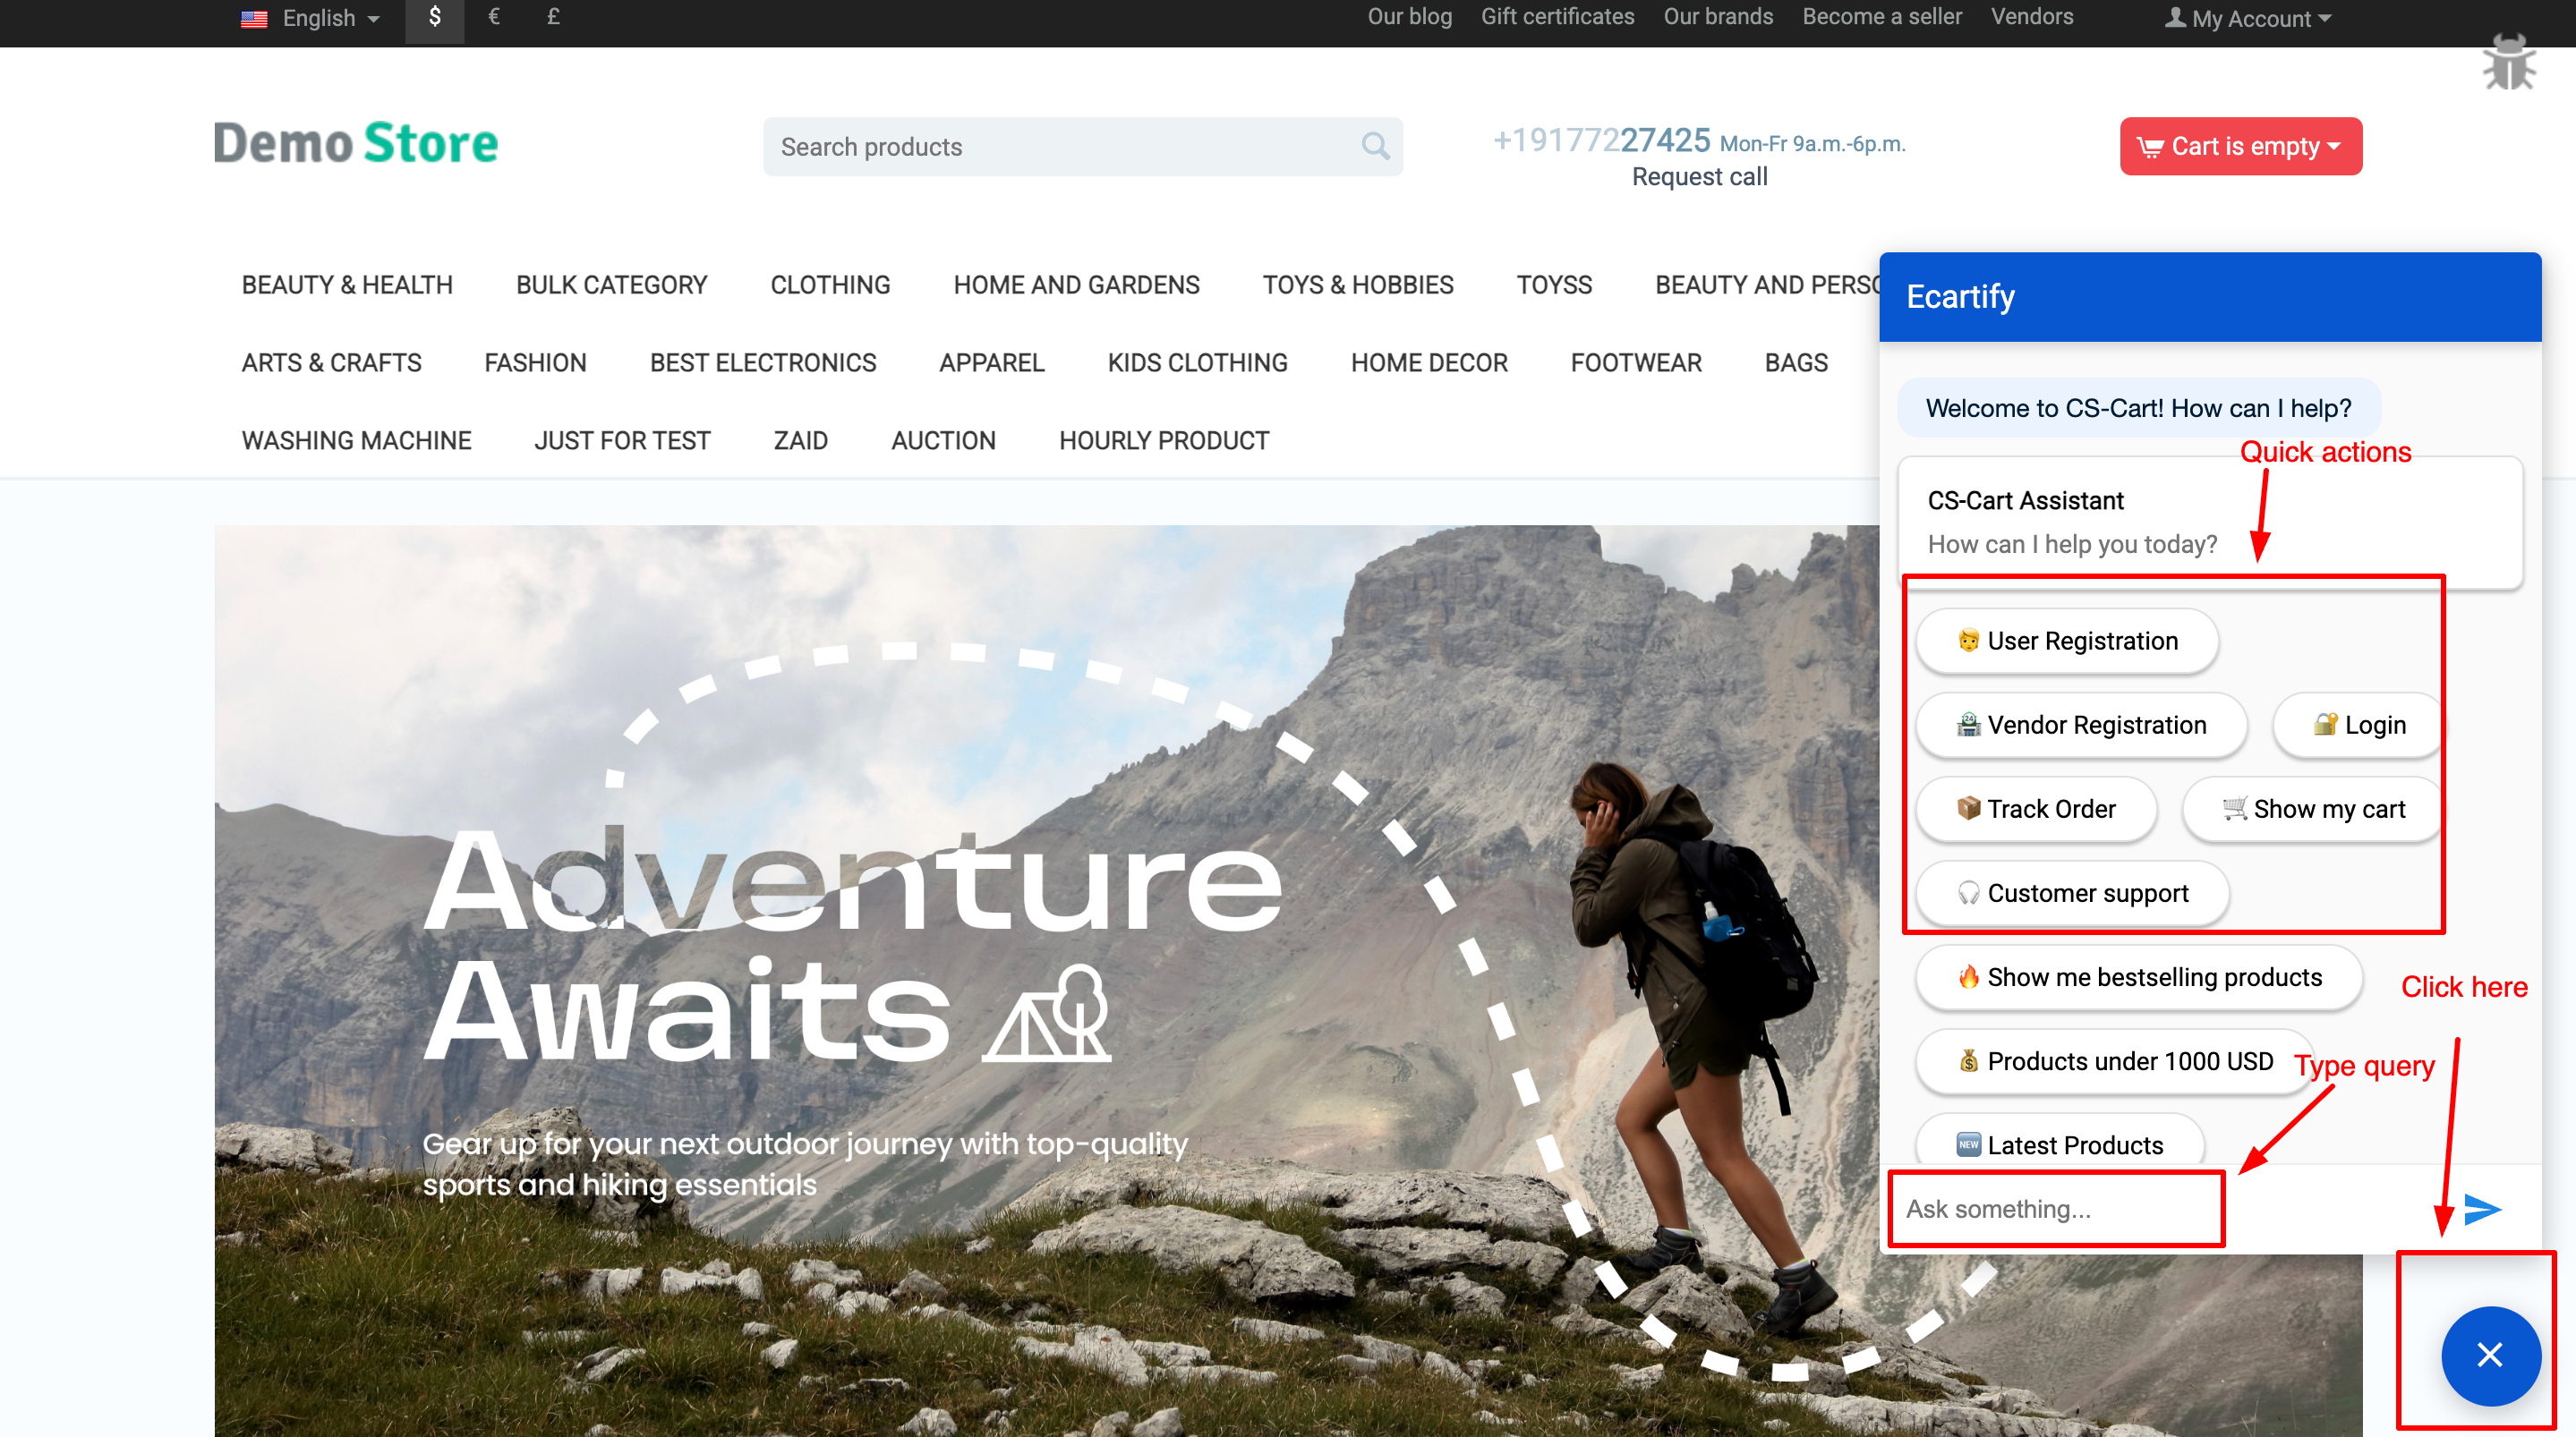
AI Companion helps you automate customer journeys and store operations using a smart Dialogflow-powered chatbot. From user and vendor registrations to real-time order tracking and personalized product recommendations like "Bestsellers" or "Products under $1000," this addon transforms your store into an interactive shopping hub. Reduce support tickets and boost conversions with a bot that truly understands your store's data.
AI Assistant – The Conversational Commerce & Business Automation Engine for CS-Cart
AI Assistant supercharges your CS-Cart store with powerful conversational AI. Automate your entire store journey—from User & Vendor registrations to real-time Order Tracking and Cart management—using Dialogflow’s smart engine.
Go beyond basic chat with action-driven search: instantly show Bestsellers, Latest Products, or custom filters like "Products under $1000" directly in the chat. With a built-in Custom Knowledge Base, your bot learns your business to provide 24/7 expert support. One assistant. Complete automation for modern CS-Cart marketplaces.
Key Features of AI Assistant
Smart Conversational AI Engine:
Powered by Google Dialogflow, providing human-like interaction. Automate complex queries and guide customers through your store with a fully customizable Knowledge Base.
Automated User & Vendor Onboarding: Simplify your marketplace operations with built-in flows for User Registration, Vendor Signups, and seamless Account Login directly within the chat interface.
Real-Time Shopping Actions:
Go beyond simple chat—users can instantly use commands like "Show my cart" or "Track my order" to get live updates without leaving the current page.
Advanced Product Discovery: Boost sales with AI-driven filters. Let customers find exactly what they need with queries like "Bestselling products," "Latest arrivals," or price-specific searches like "Products under 1000 USD."
Works on All CS-Cart Setups: Fully compatible with CS-Cart, Multi-Vendor, and Ultimate editions. Works perfectly with any theme, hosting, or custom modification
Easy Installation: No technical expertise required—connect your Dialogflow Agent ID and get your AI Assistant live in just a few minutes.
Step-by-Step Setup Guide
Step 1: Install the Addon
Installing the AI Assistant Addon is simple:
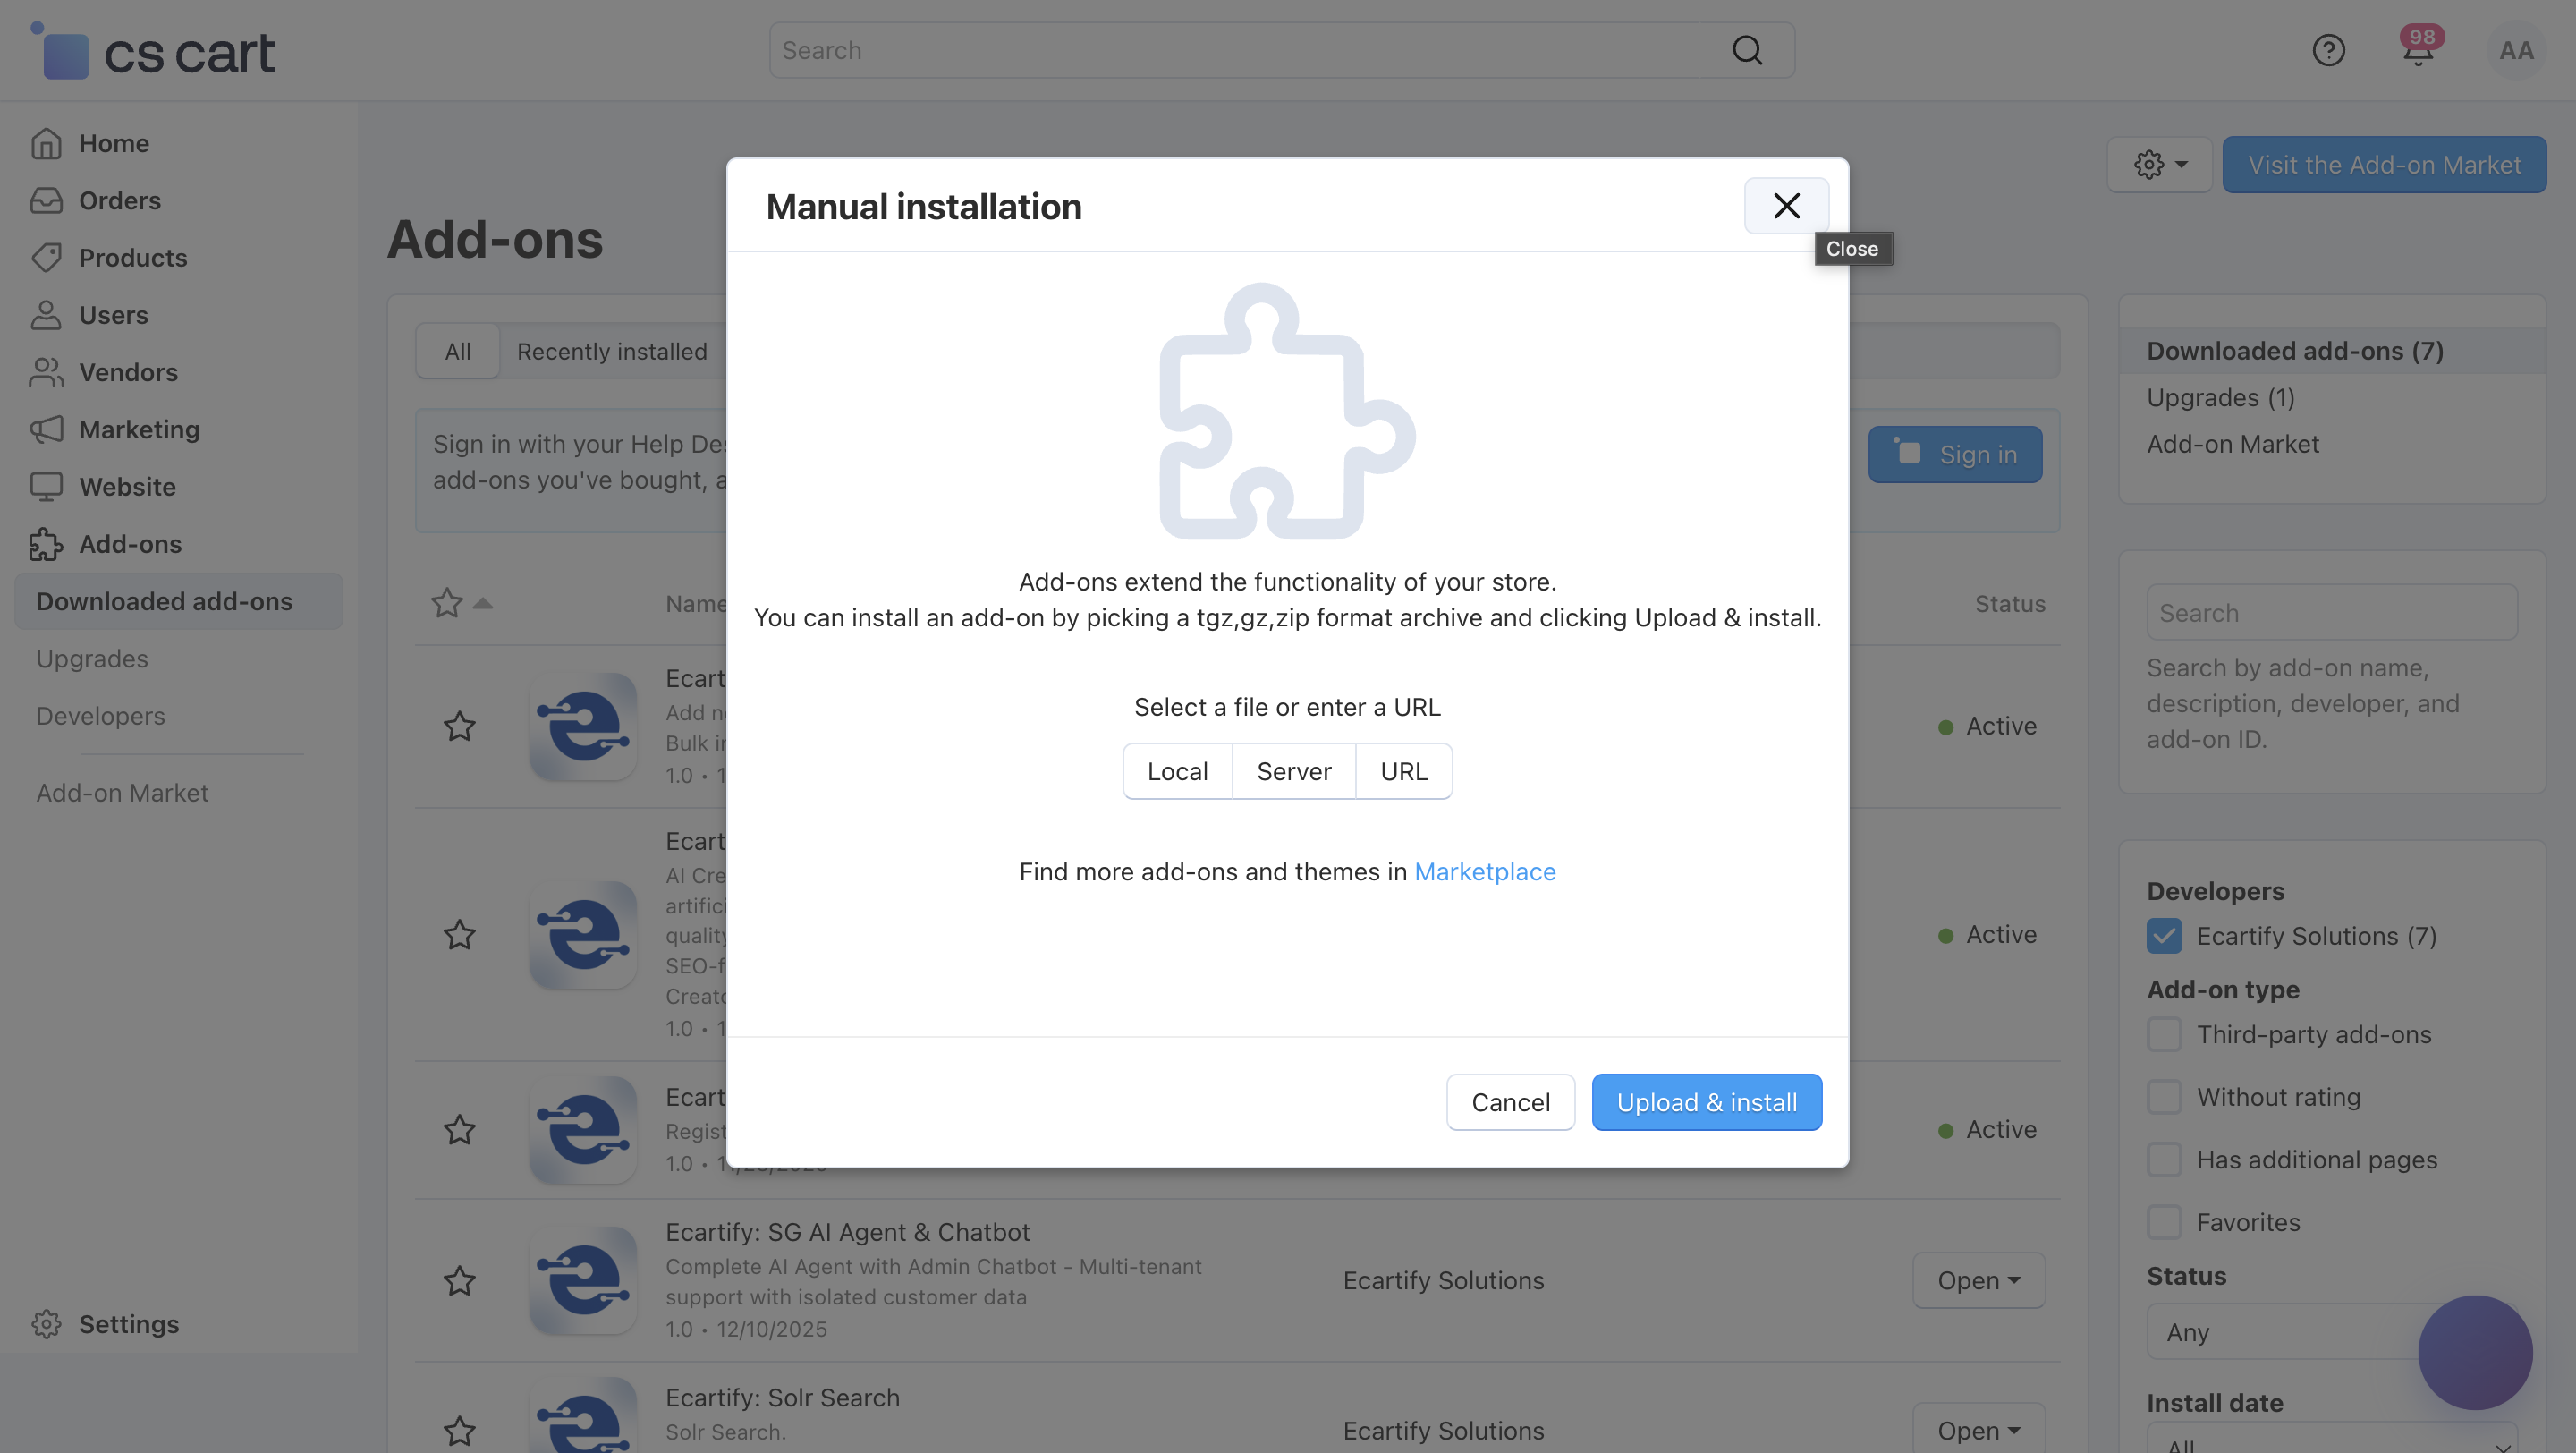
Login to your CS-Cart admin panel.
Go To Add-ons → Manage add-ons→ Click on ⚙️ gear icon→ Manual installation
Upload the provided ZIP file of the addon.
Once uploaded, the addon will appear under CS-Cart - Add-ons.
Now click on the AI Assistant add-on and add the required settings.
This process takes only a few minutes and requires no coding knowledge.
Step 2: Configure the Settings
After installing the add-on, you need to connect your store with Google Dialogflow. Follow these simple steps to get your AI Assistant ready:
i) Create a Dialogflow Account:
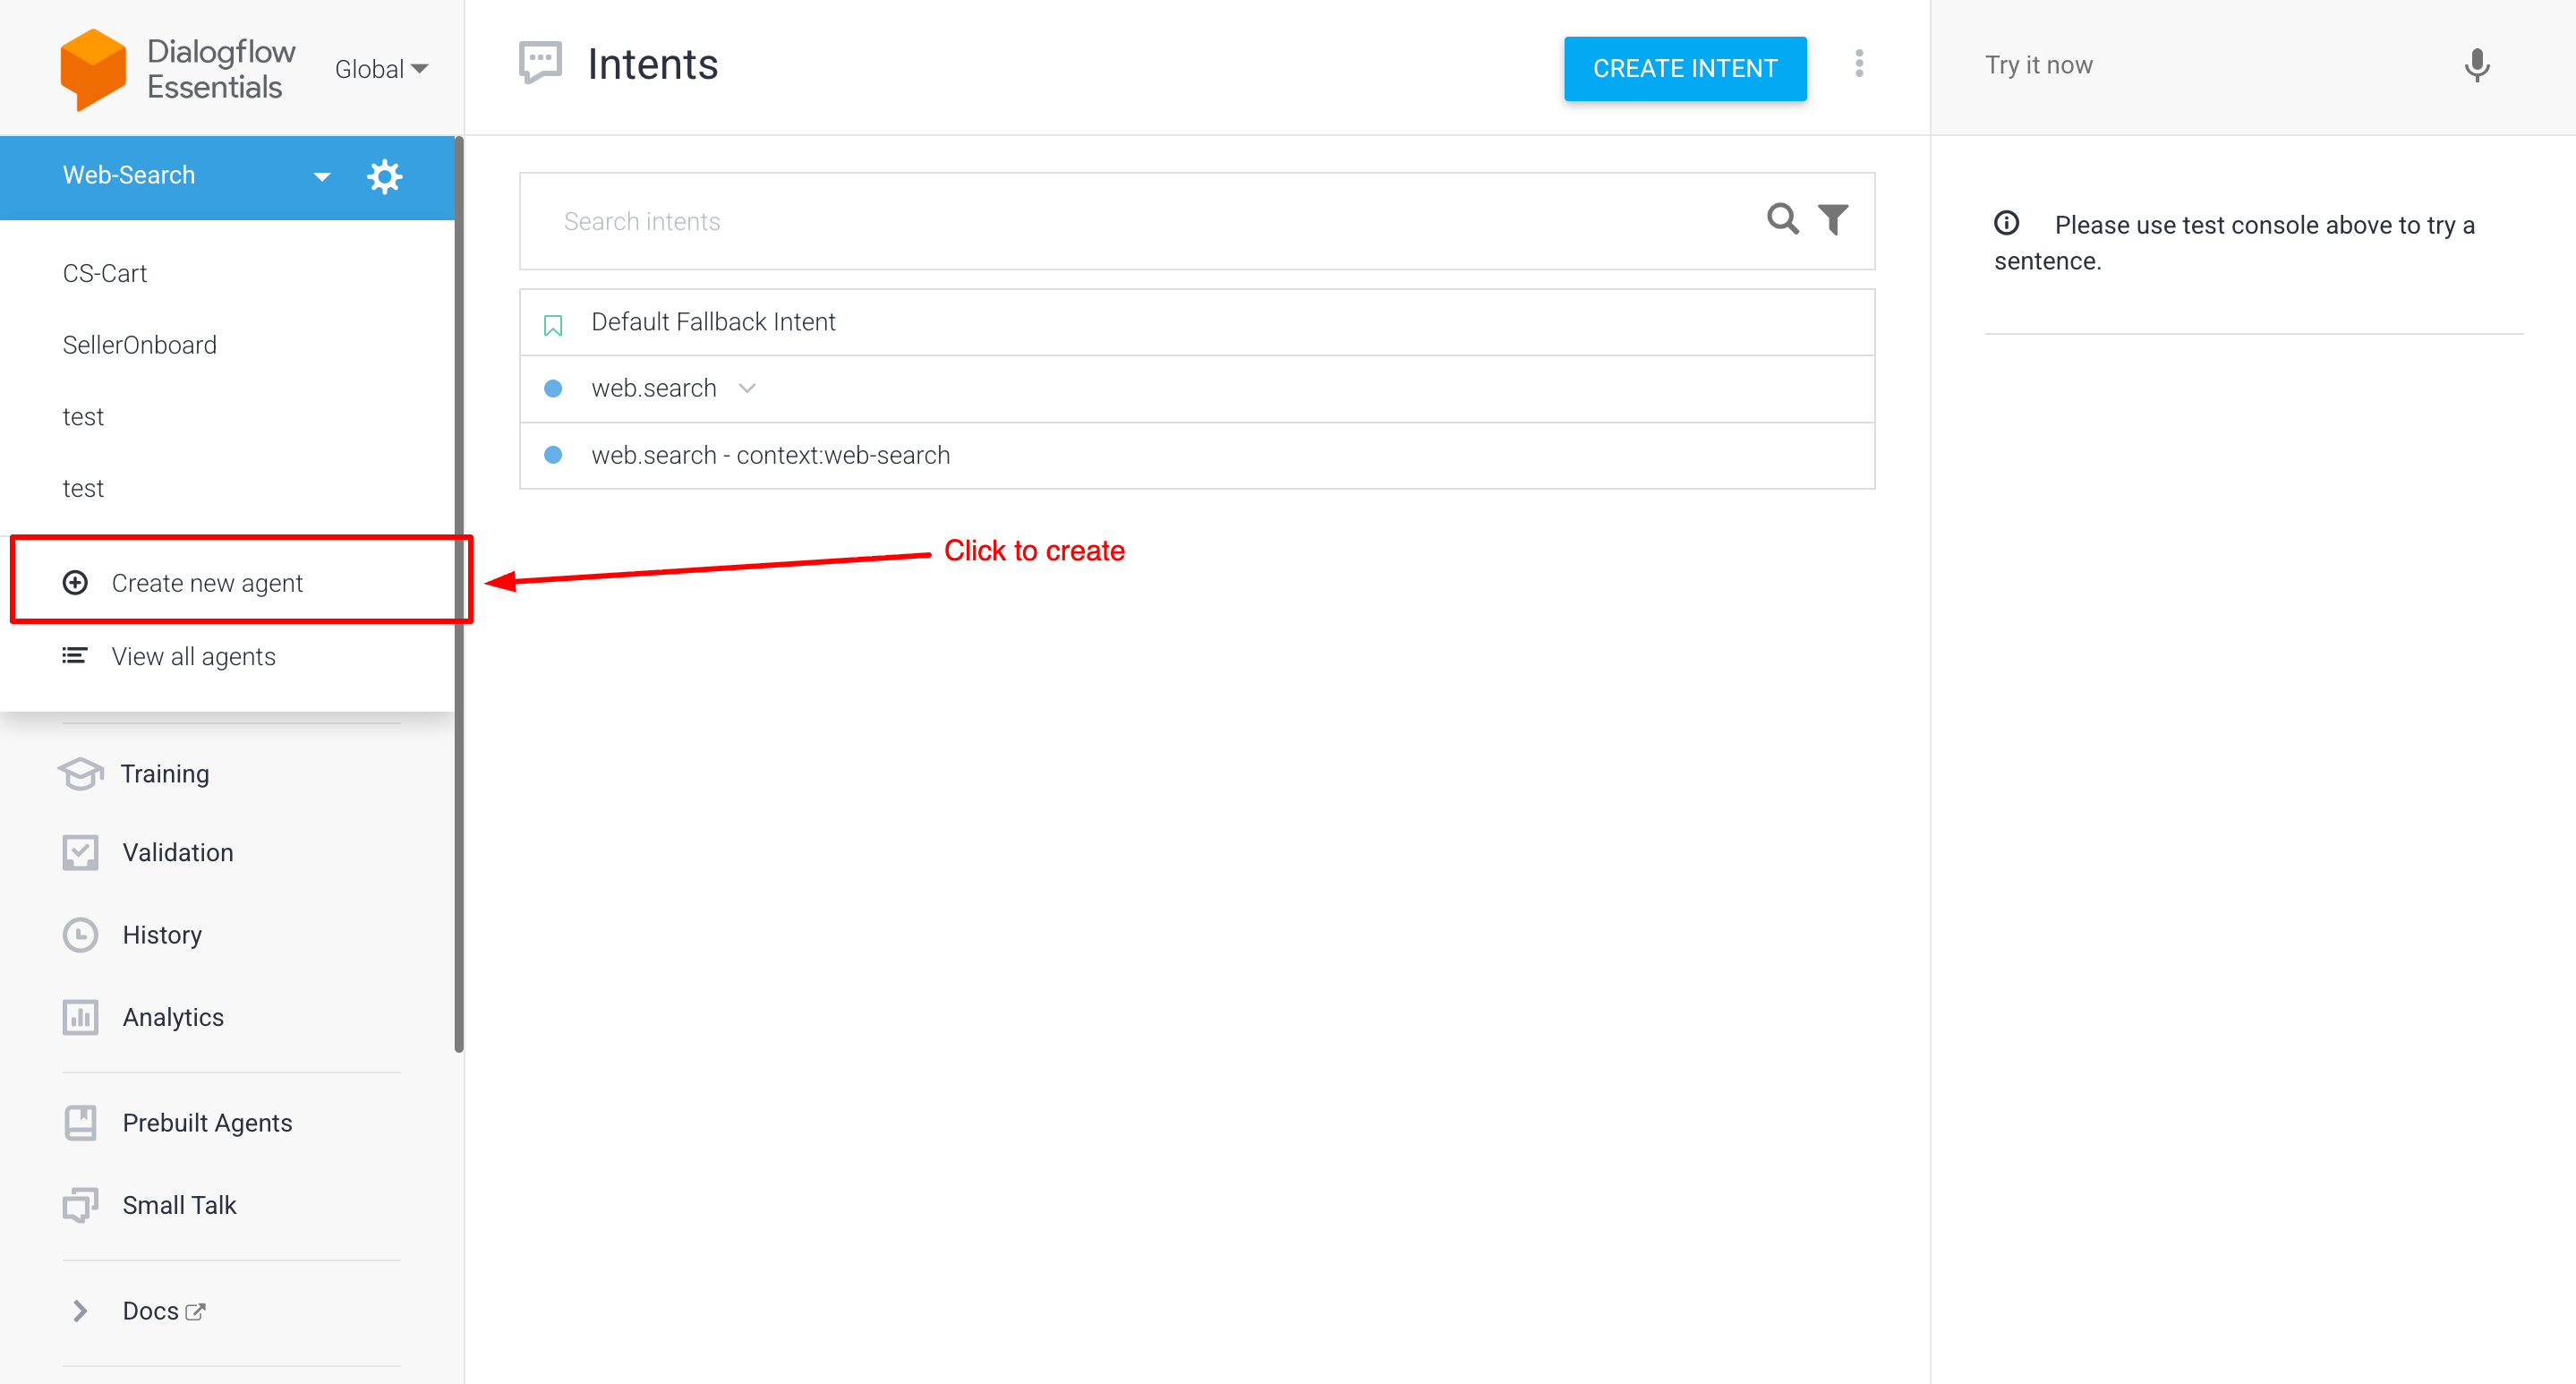
Visit the Dialogflow Console and create a new Project/Agent for your store. This will be the "brain" of your assistant.
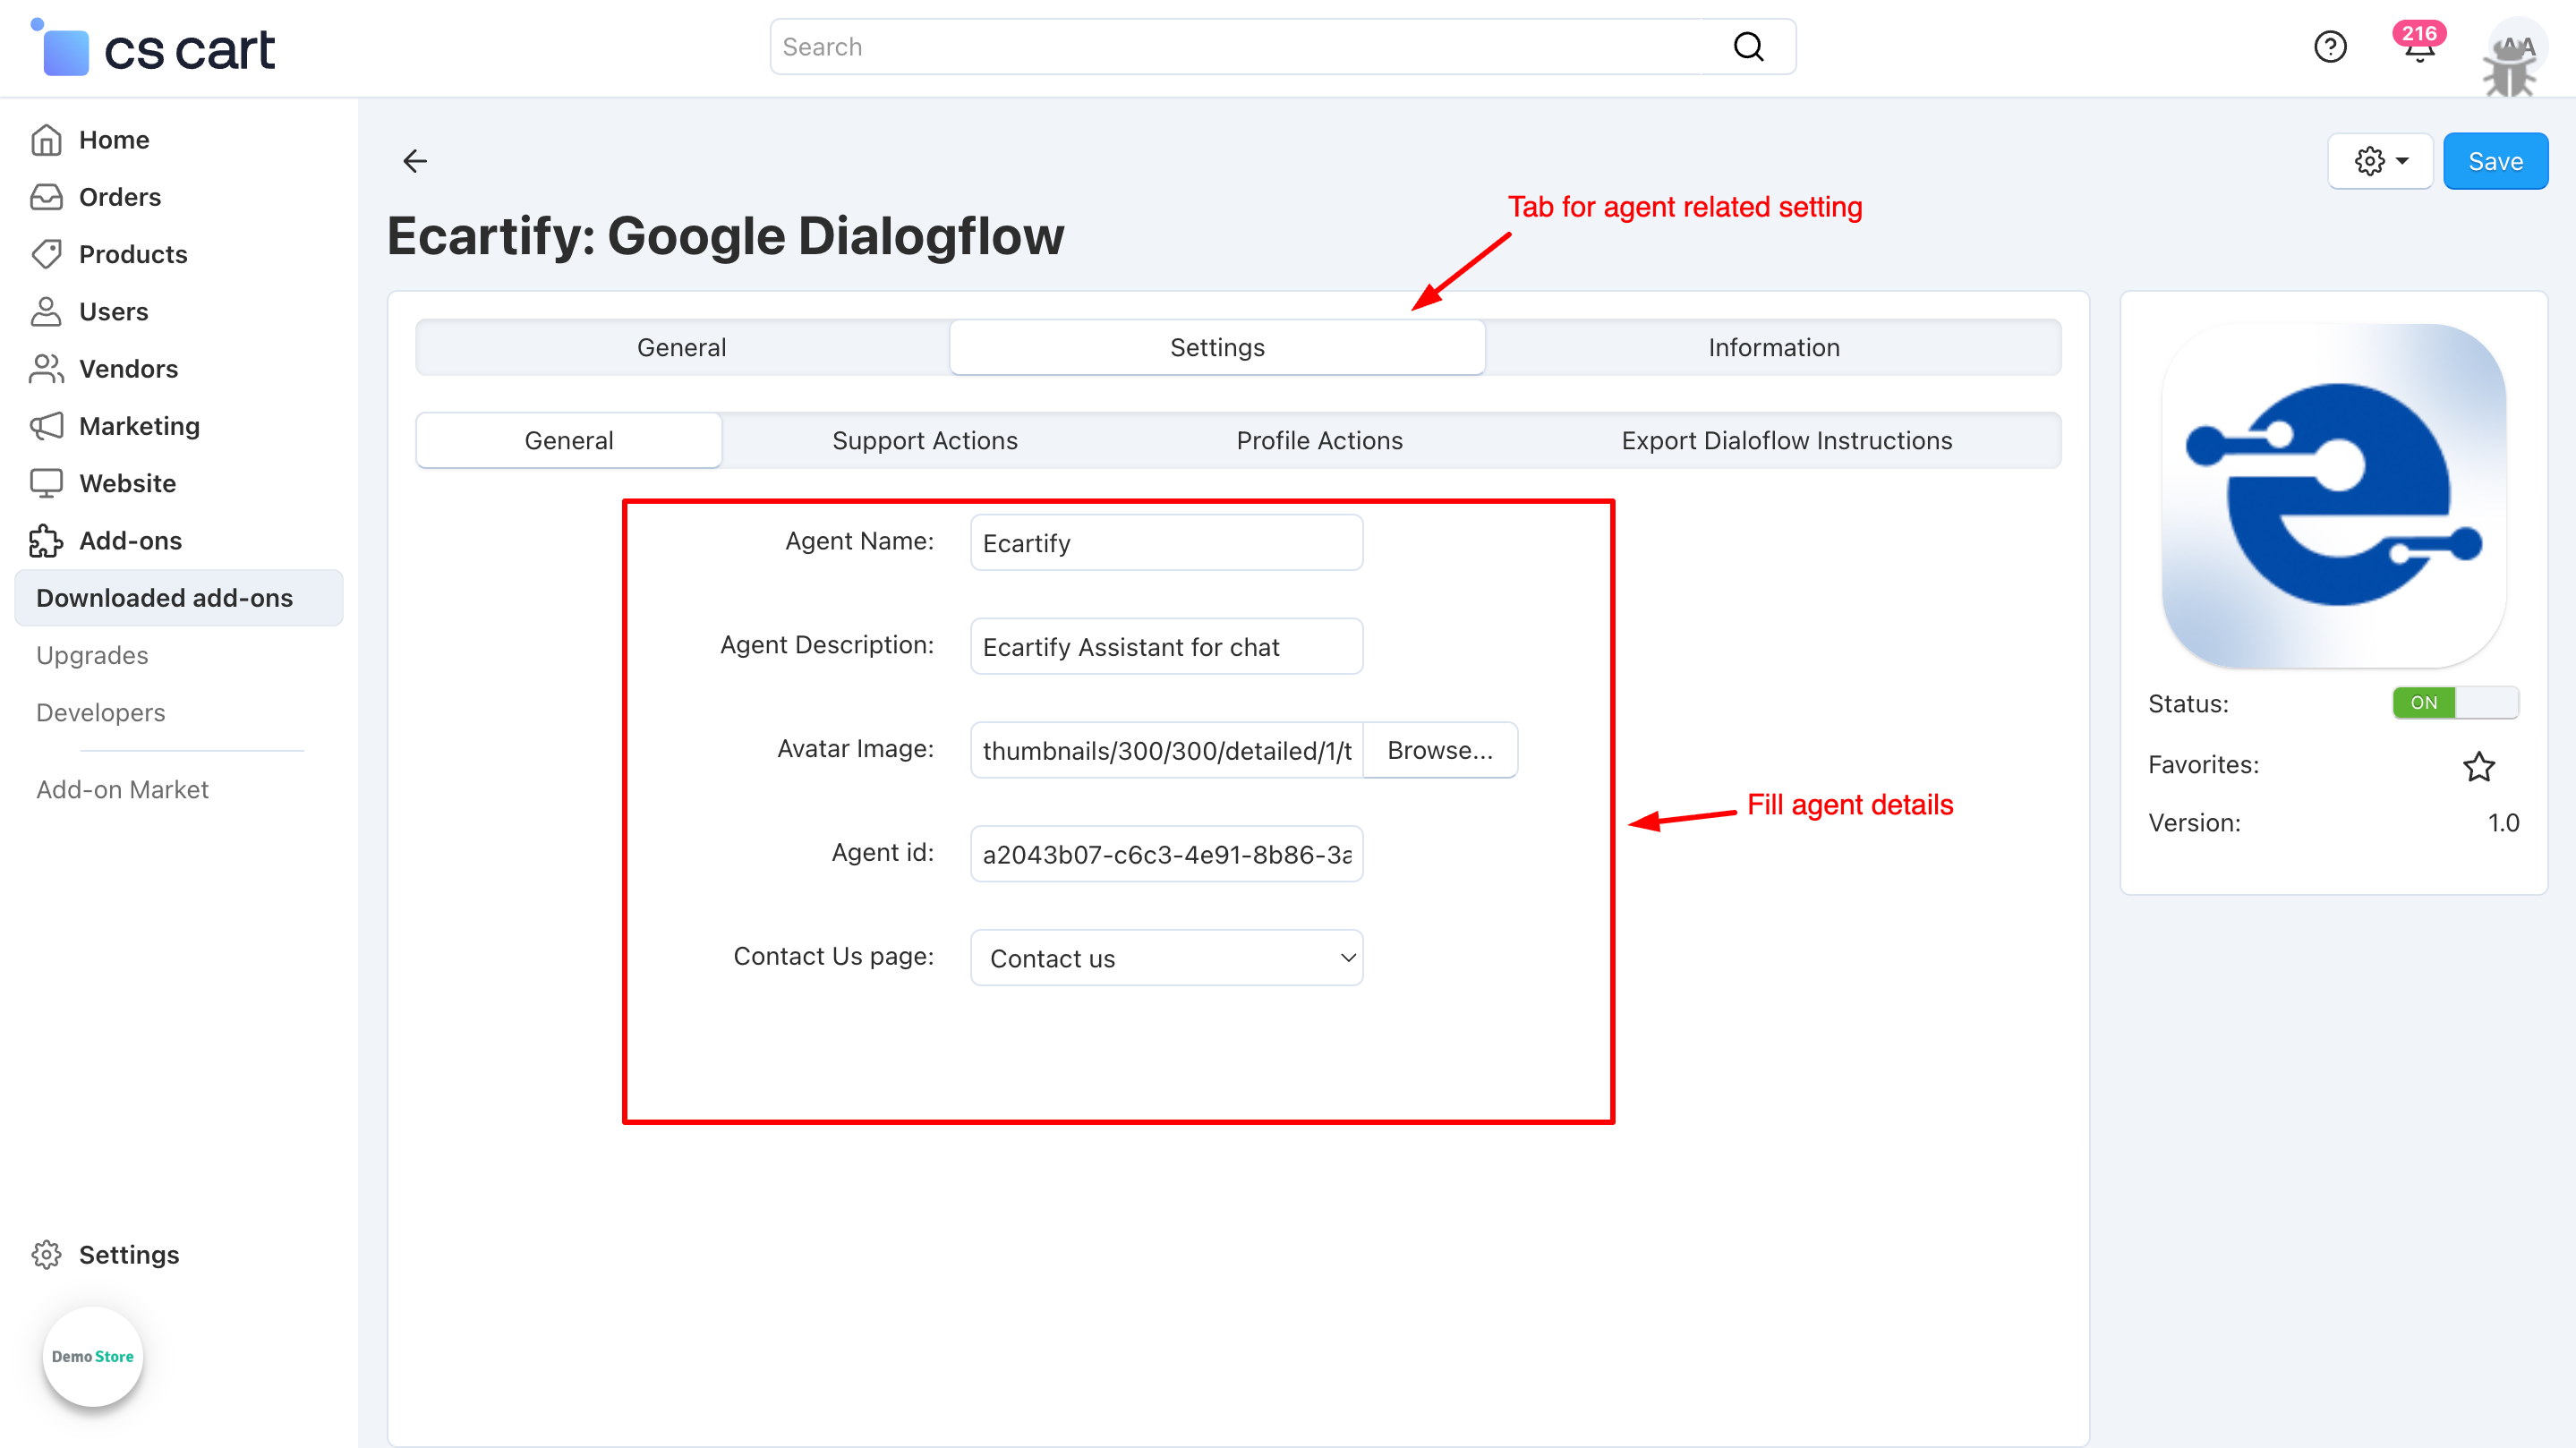
Click "Create Agent": Locate and click the "Create Agent" button on your dashboard to start the configuration.
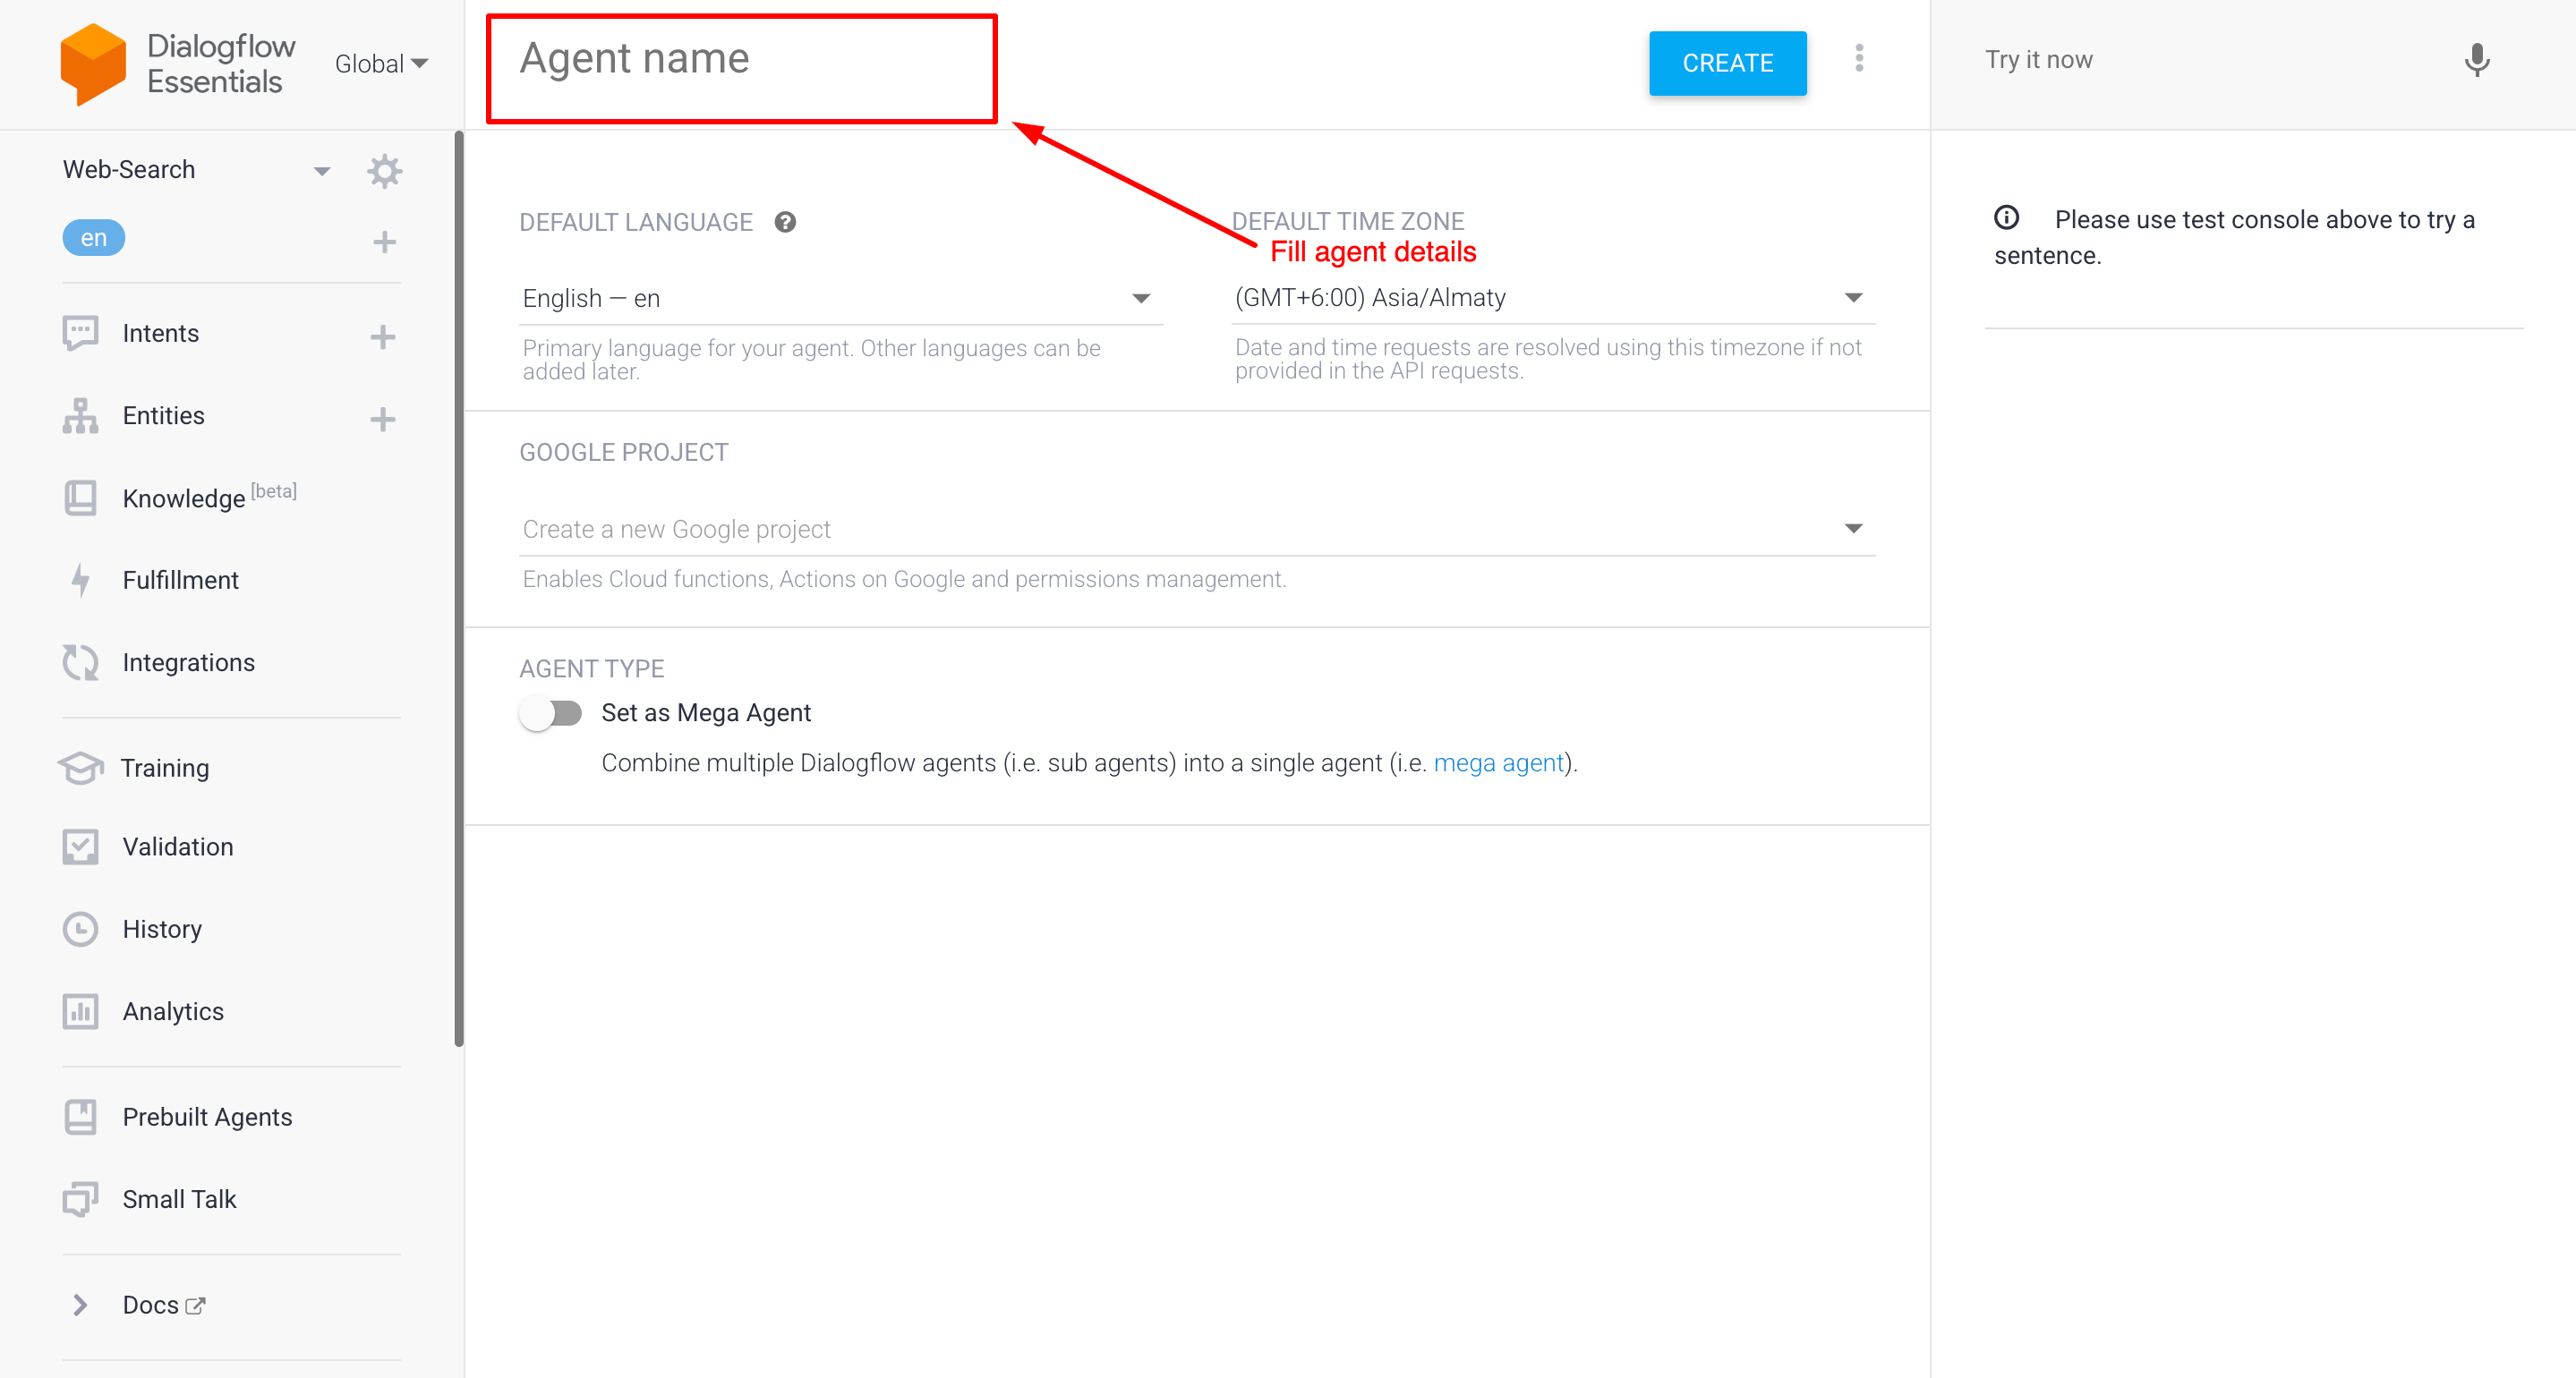
Configure Settings: Fill the basic details related to the agent.
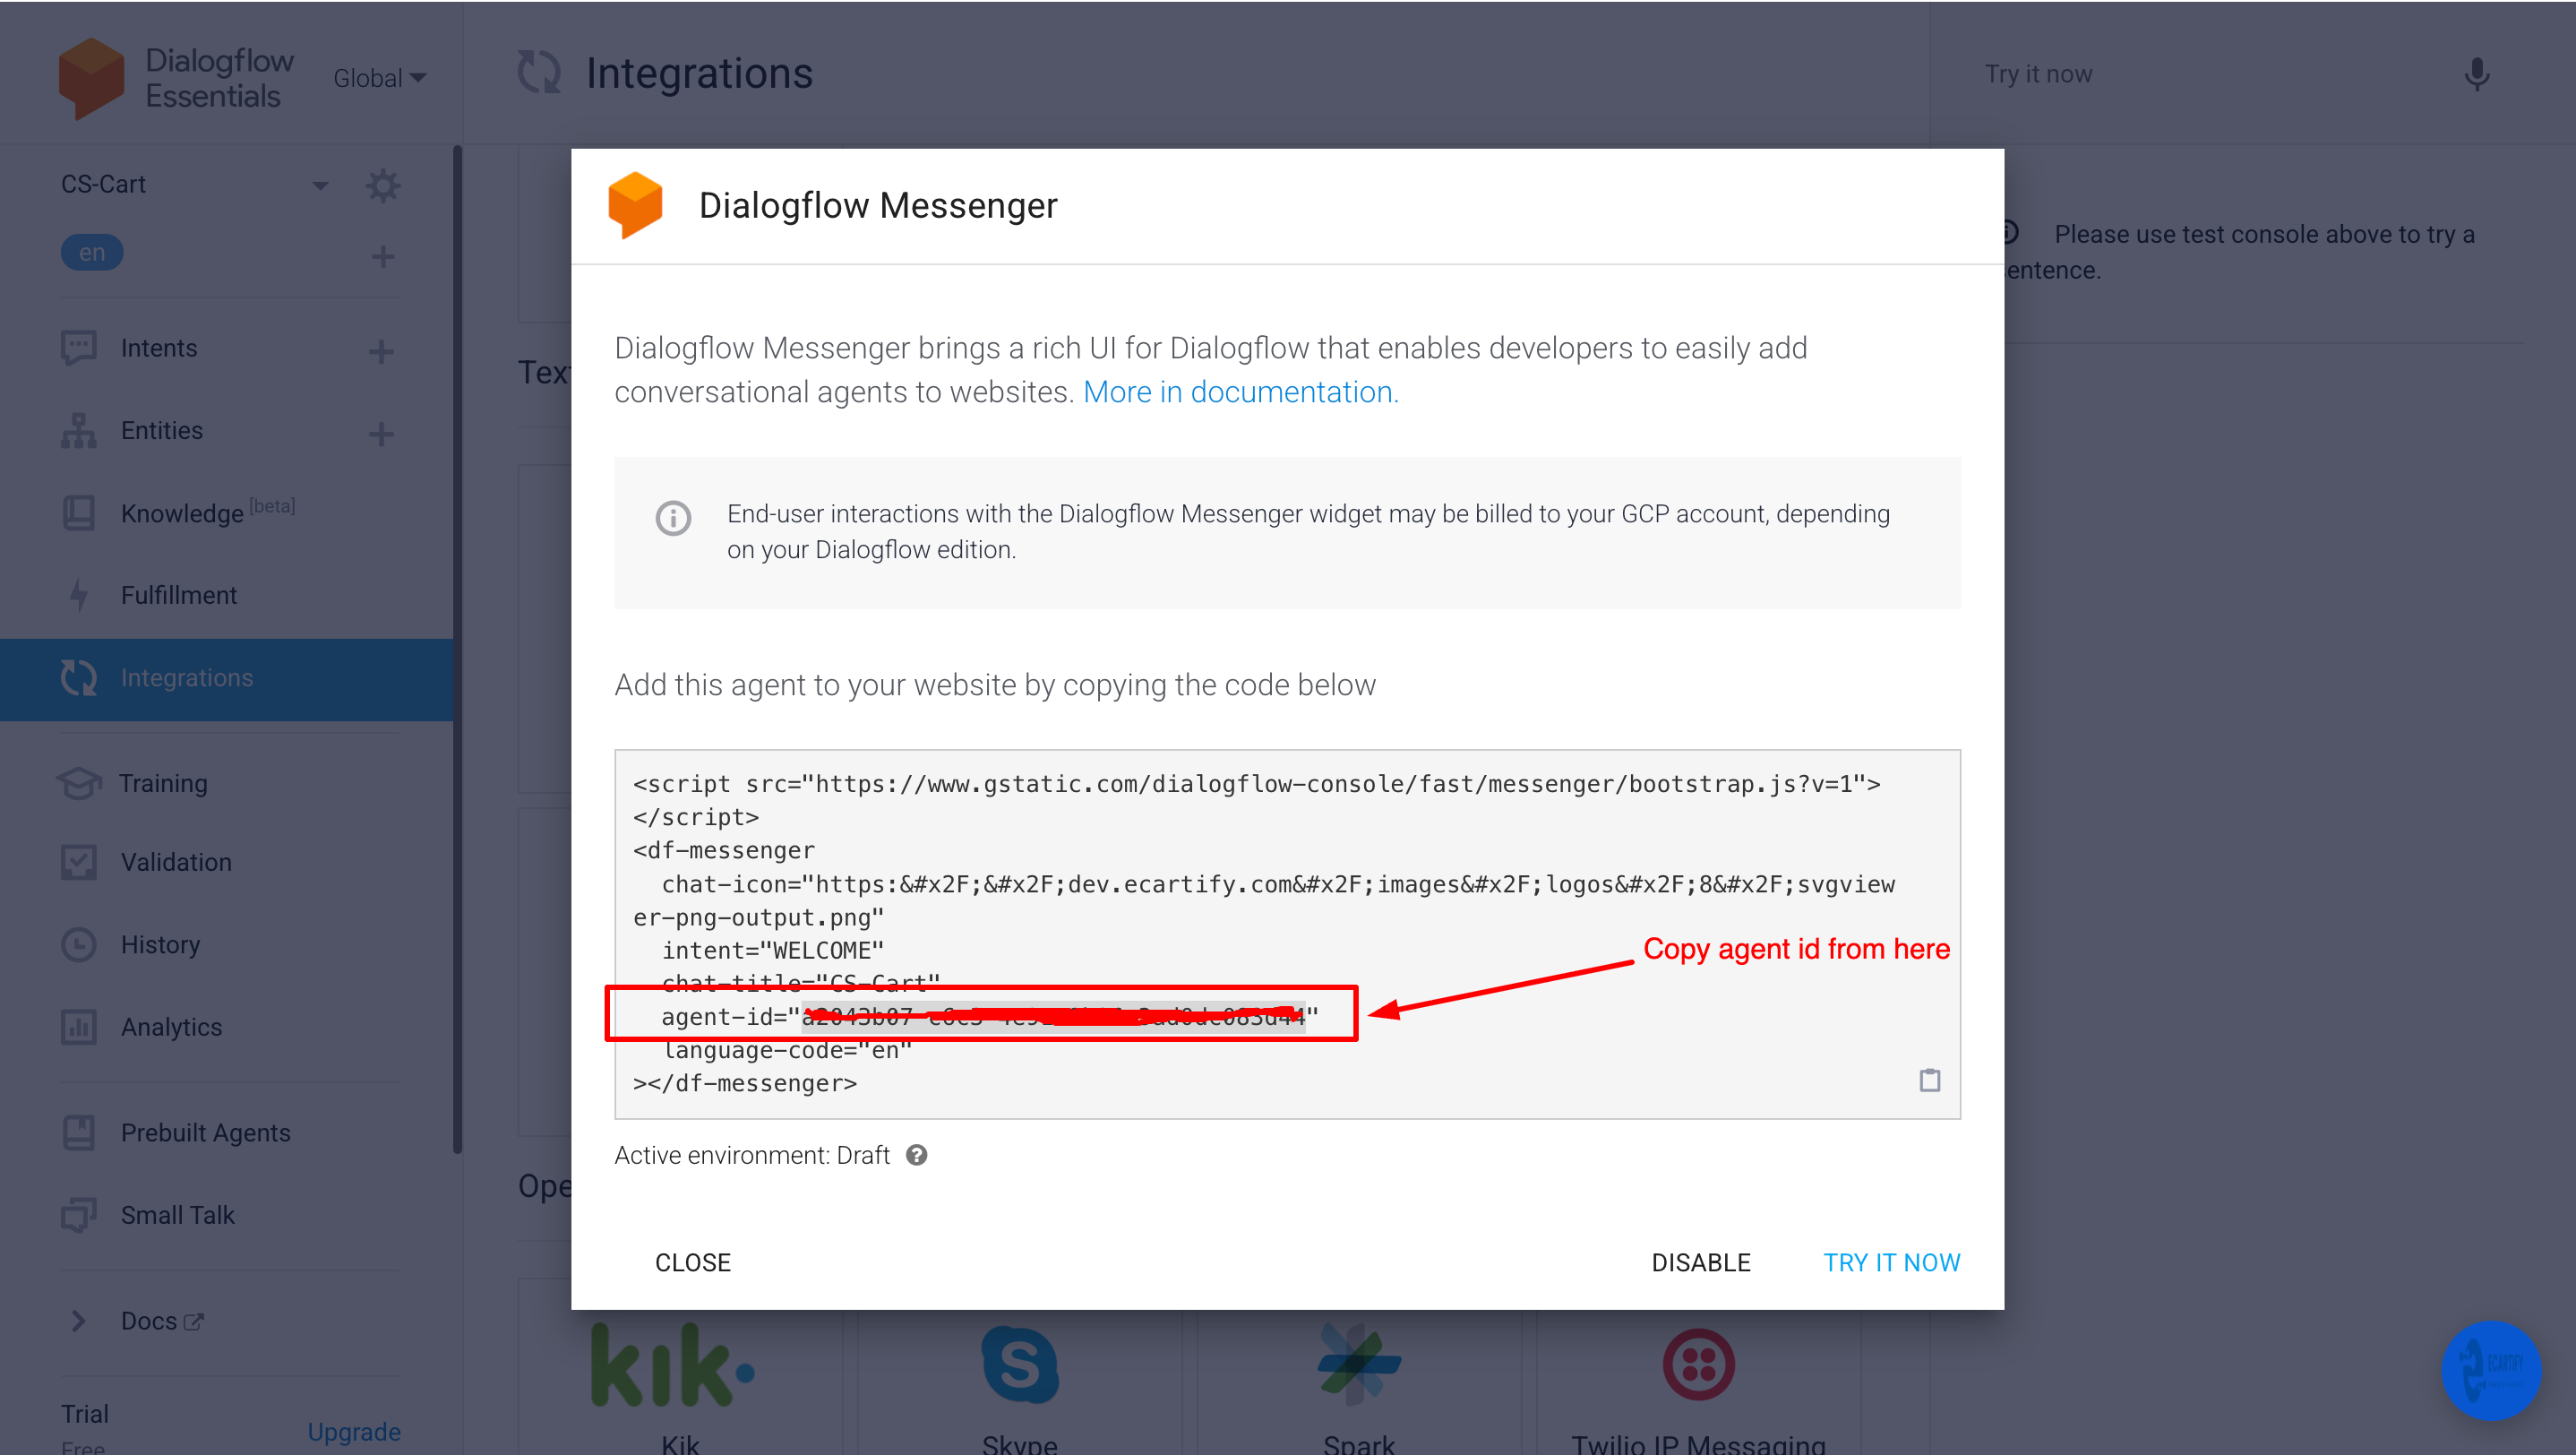
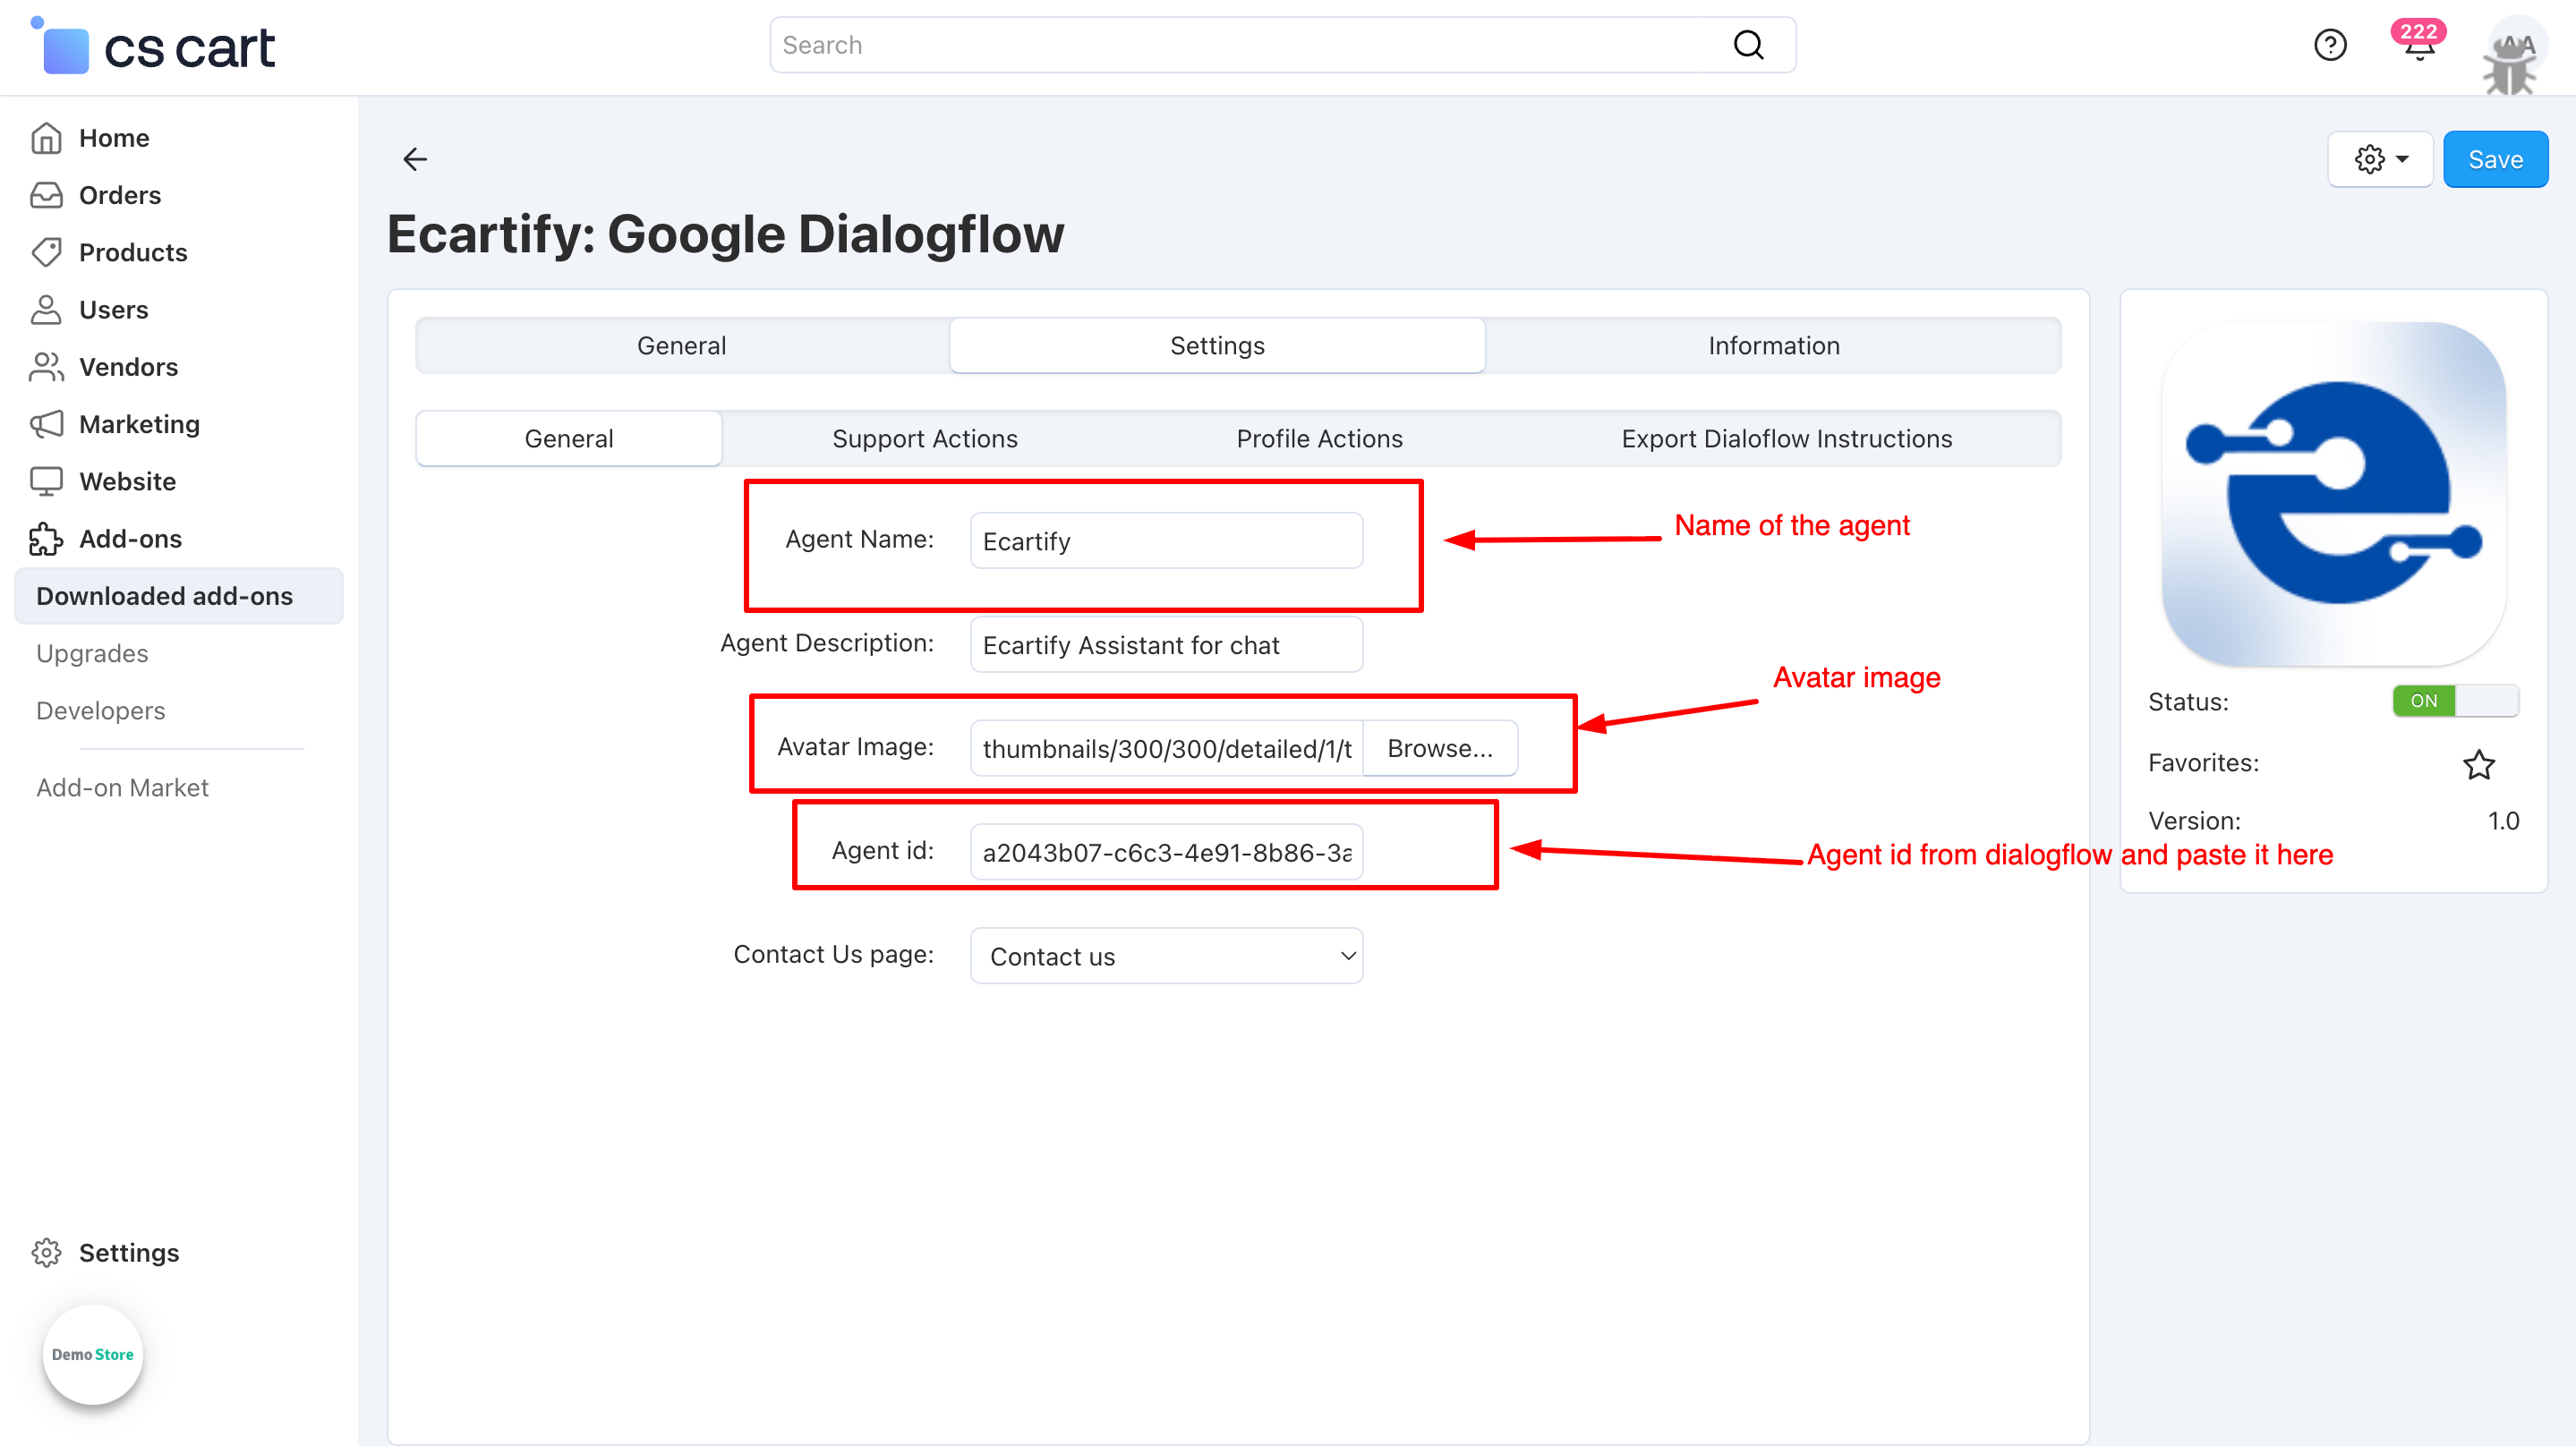
ii) Copy agent id from dialogflow
To connect your specific bot to CS-Cart, you need to provide the unique ID:
Copy Agent ID from Dialogflow: Go to your Dialogflow Console, click on the Settings gear icon (⚙️) next to your agent's name, and copy the "Project ID" or "Agent ID" displayed there.
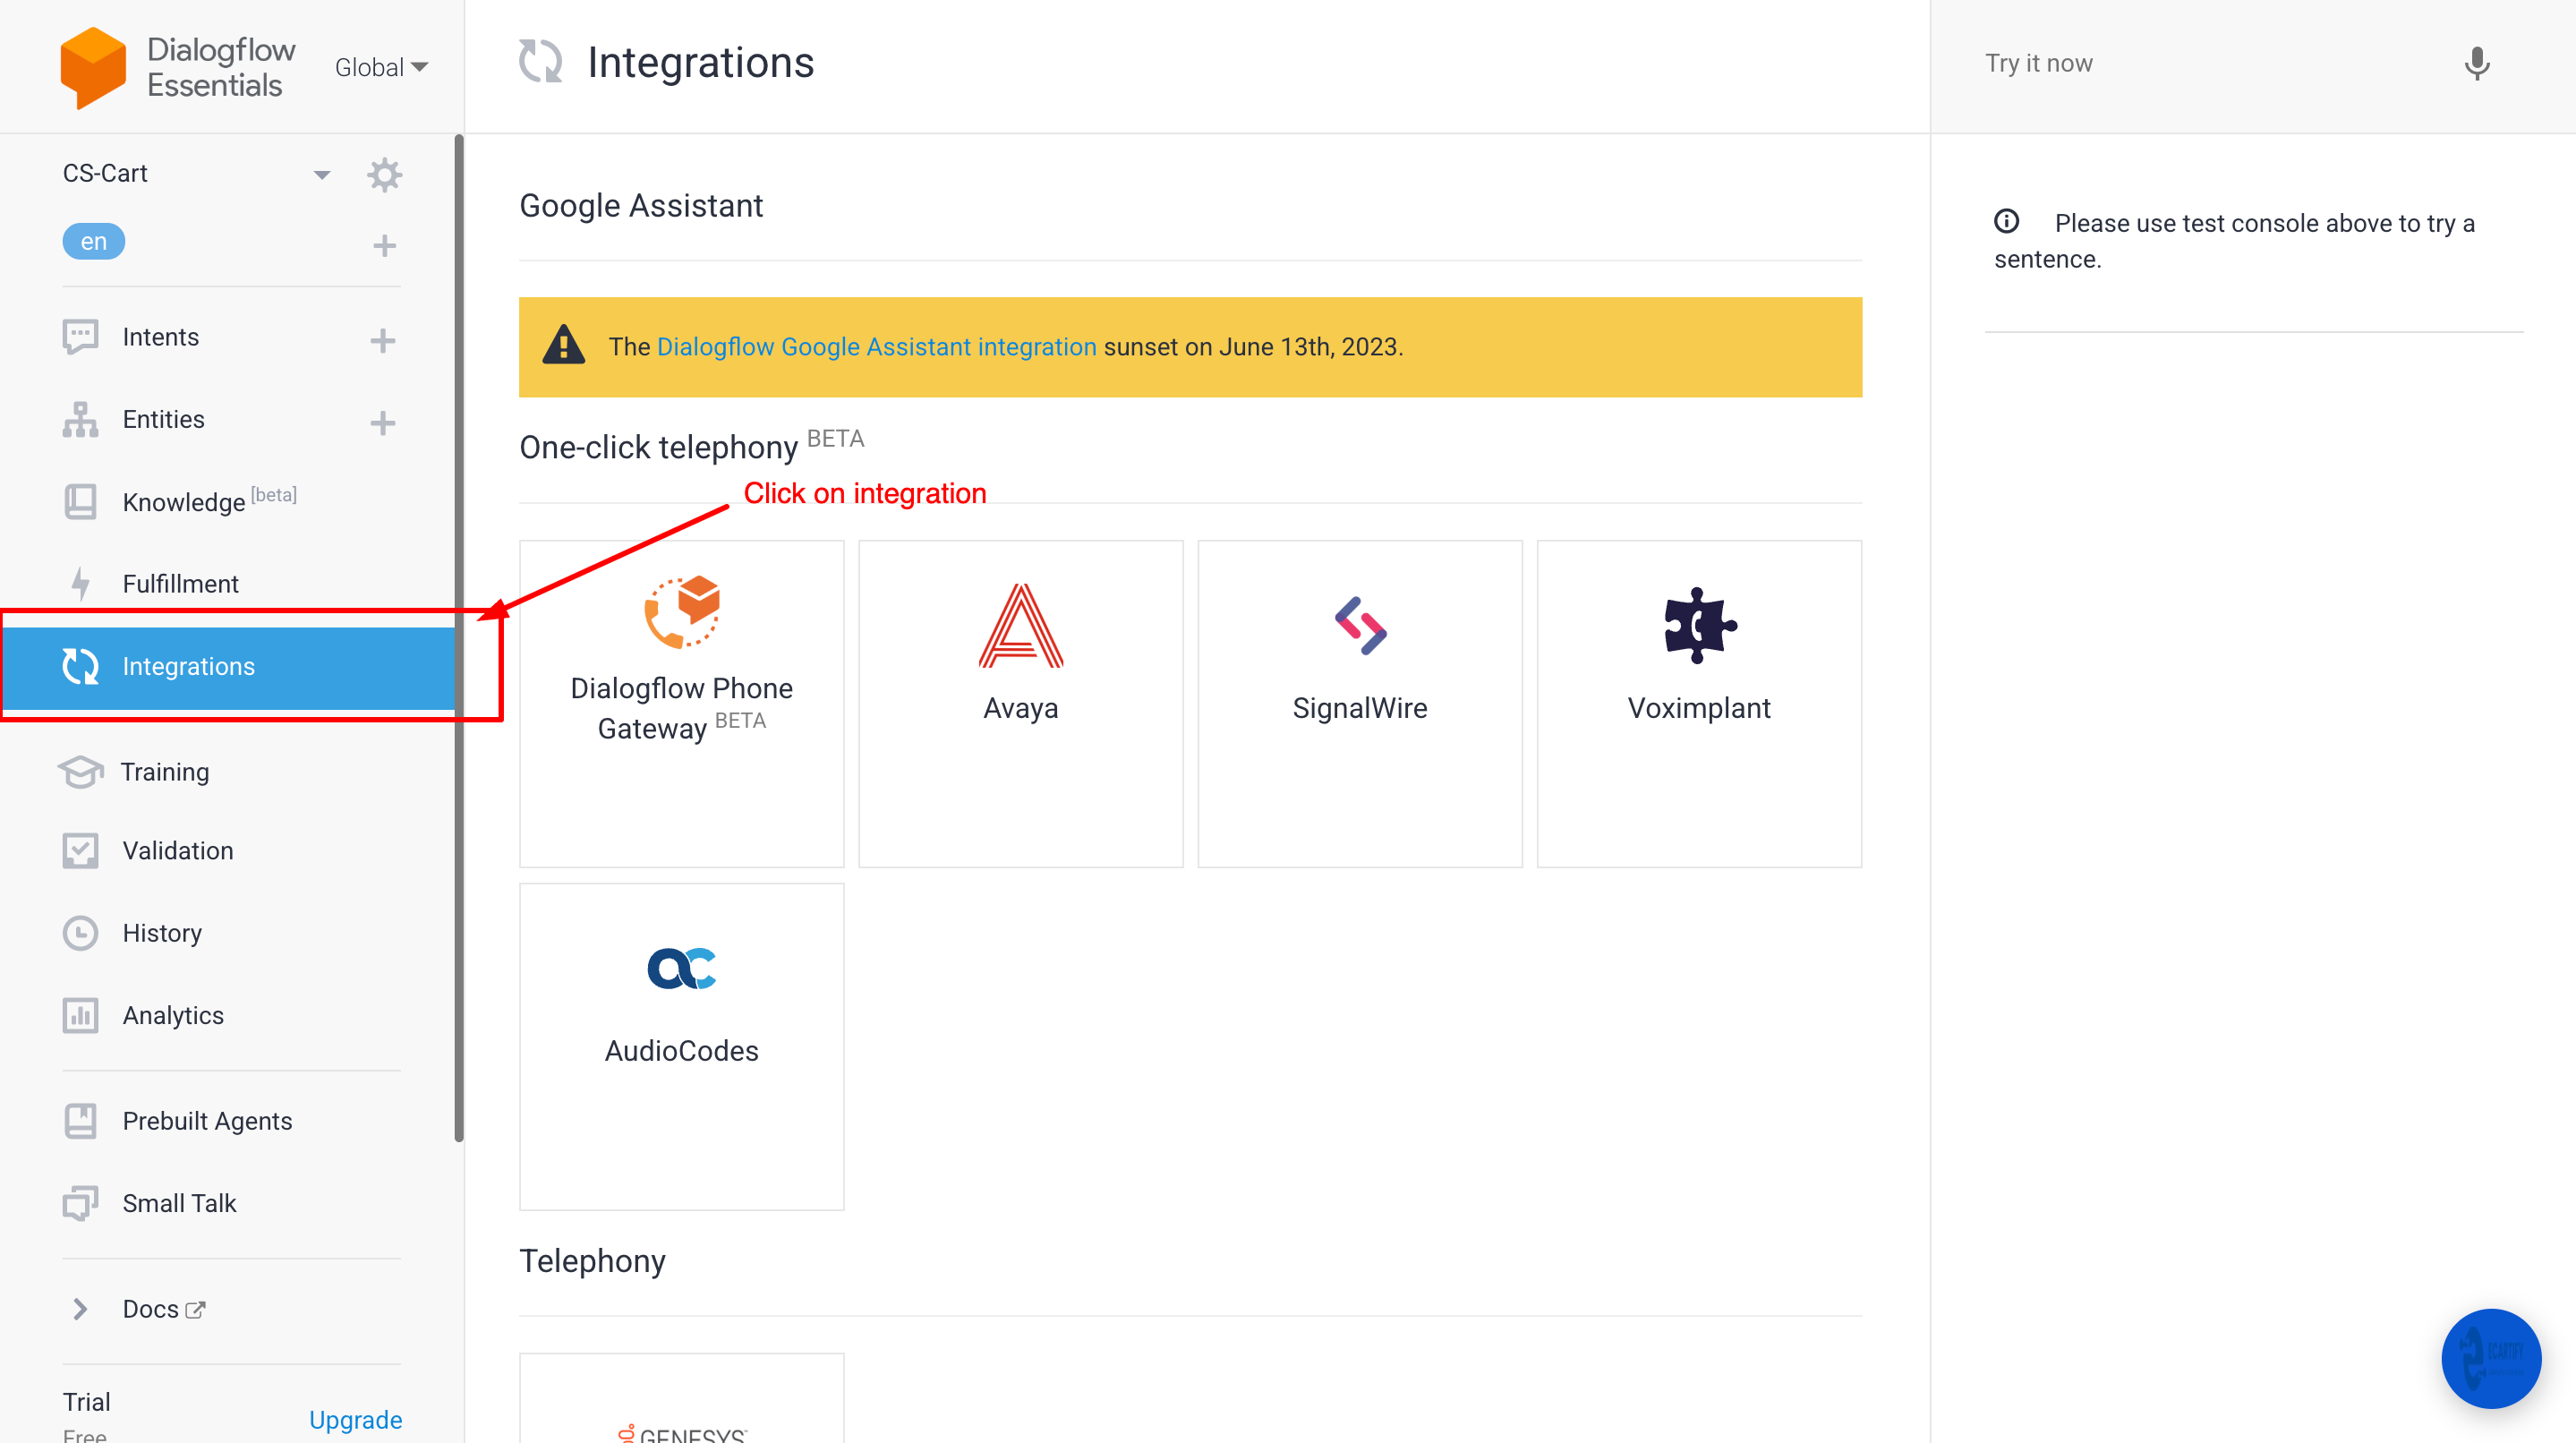
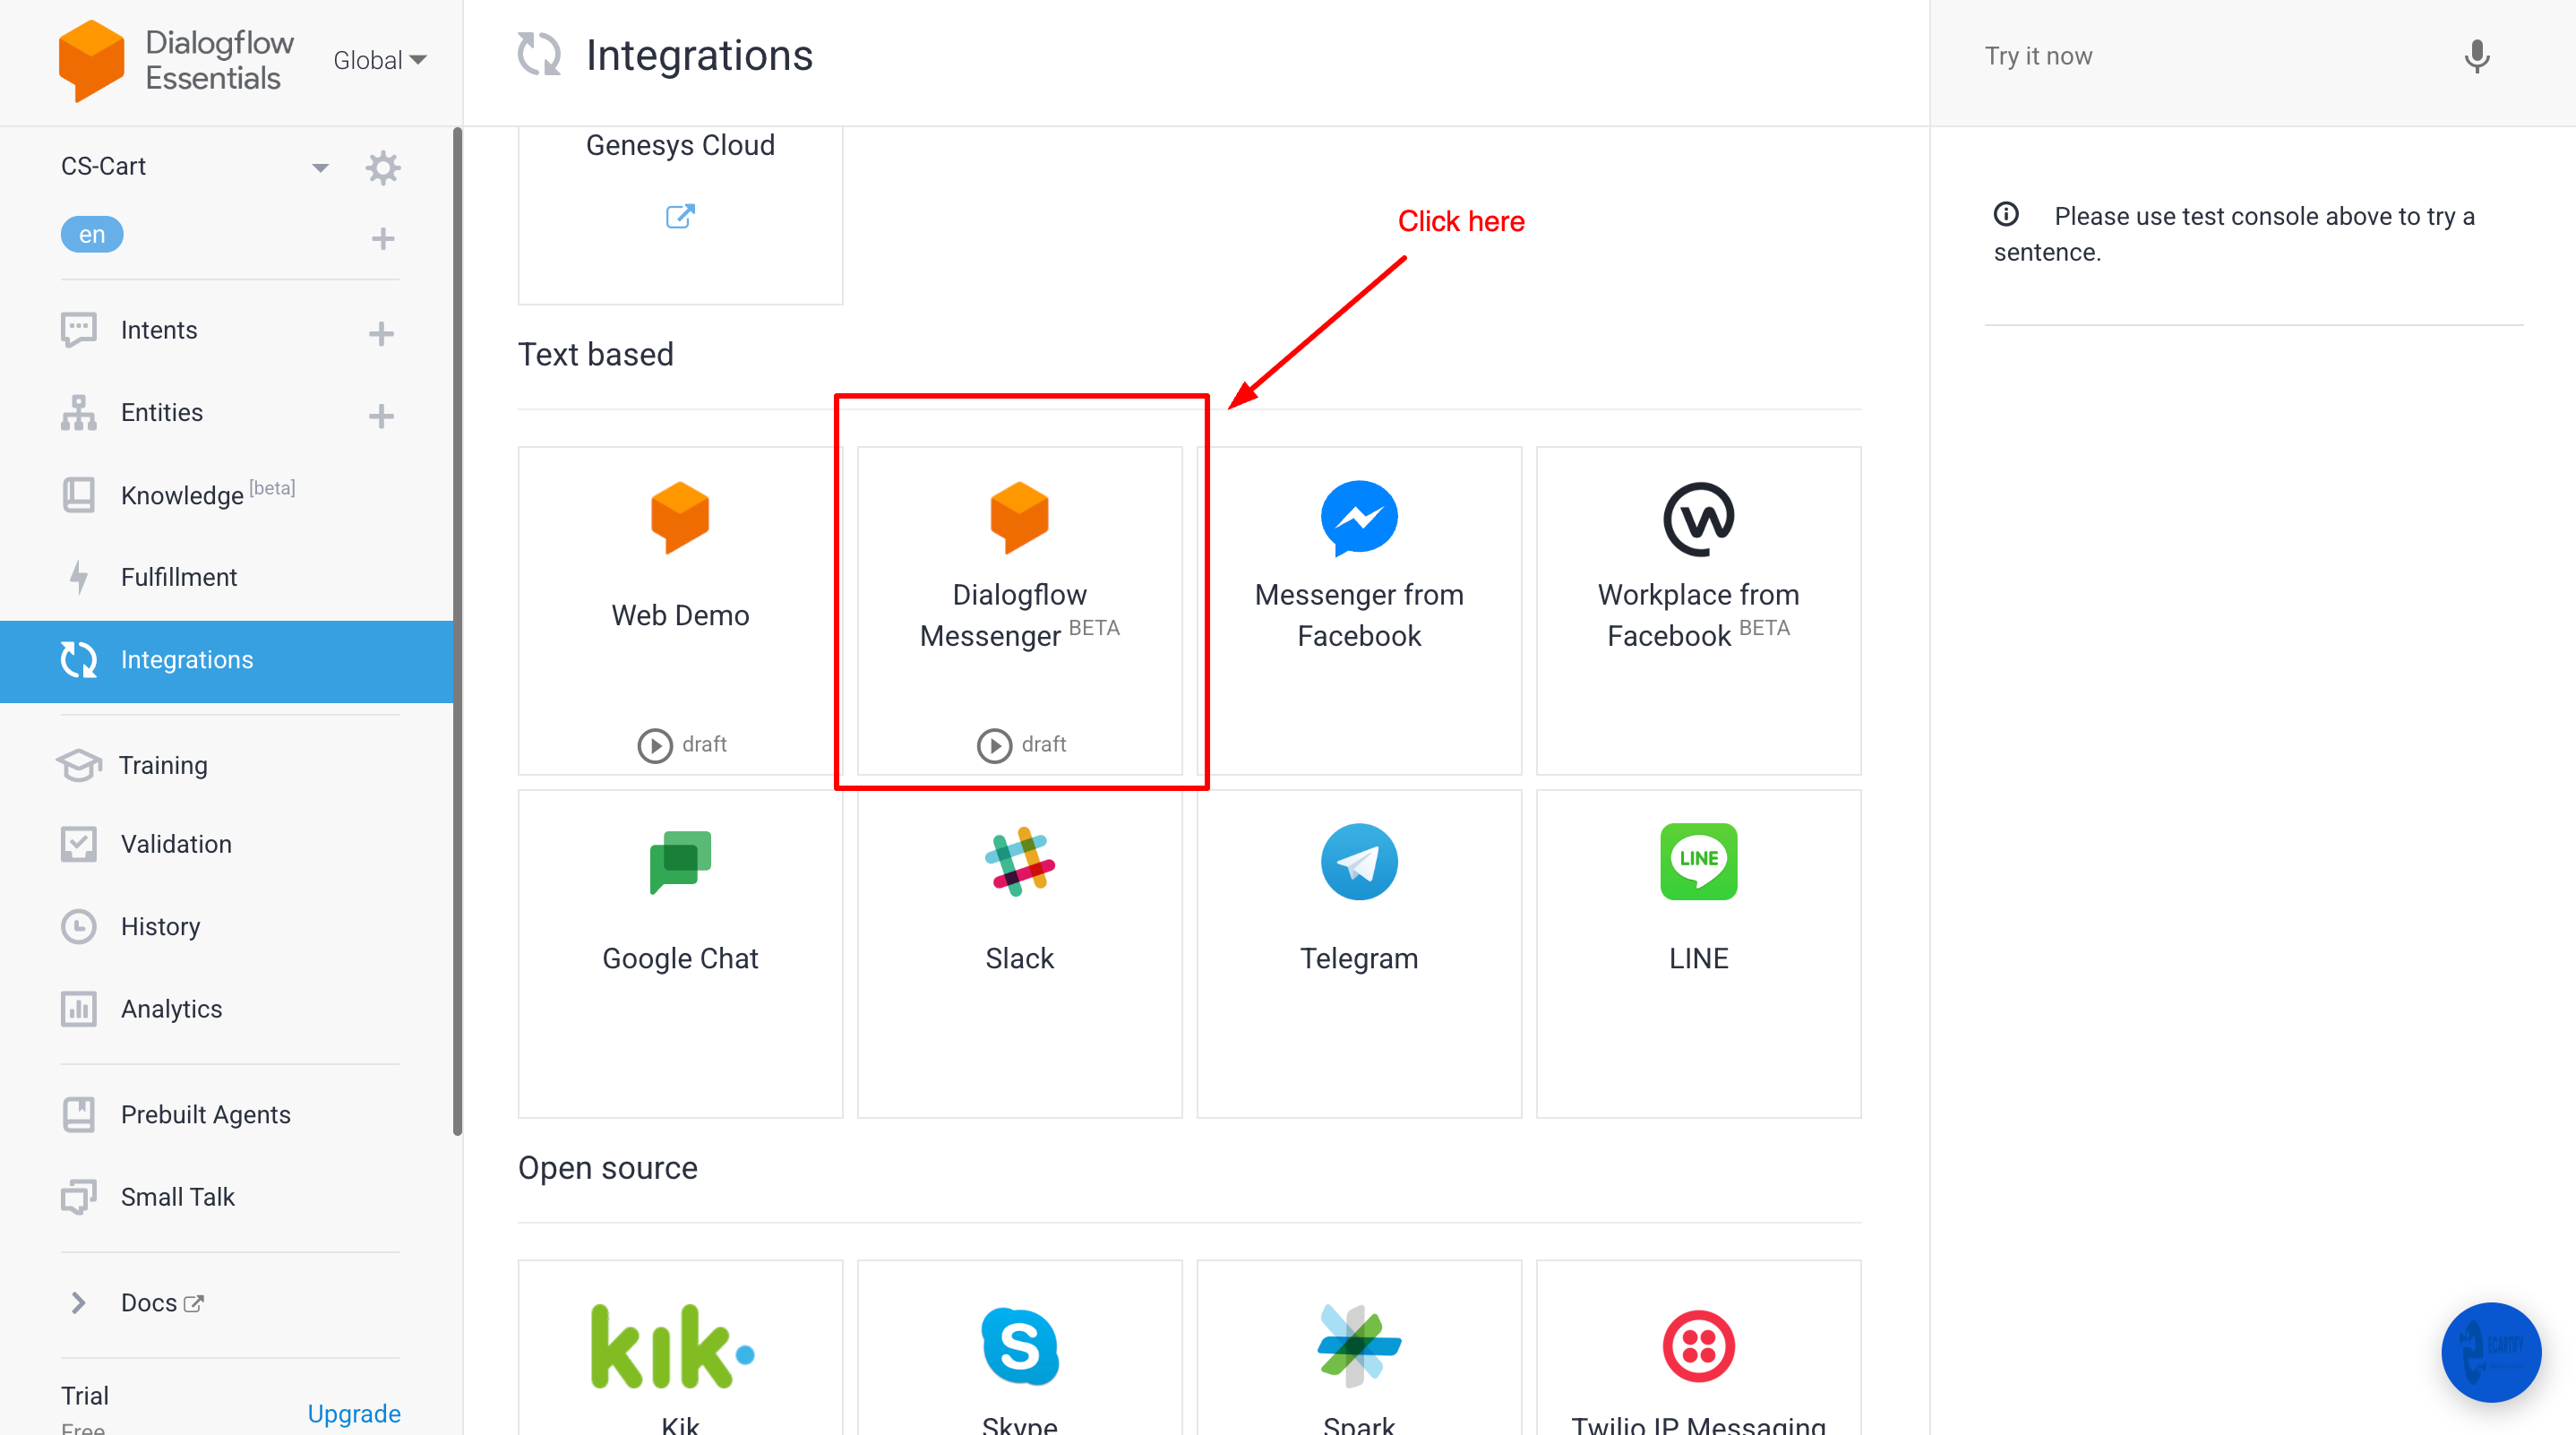
Click on Dialogflow Messanger
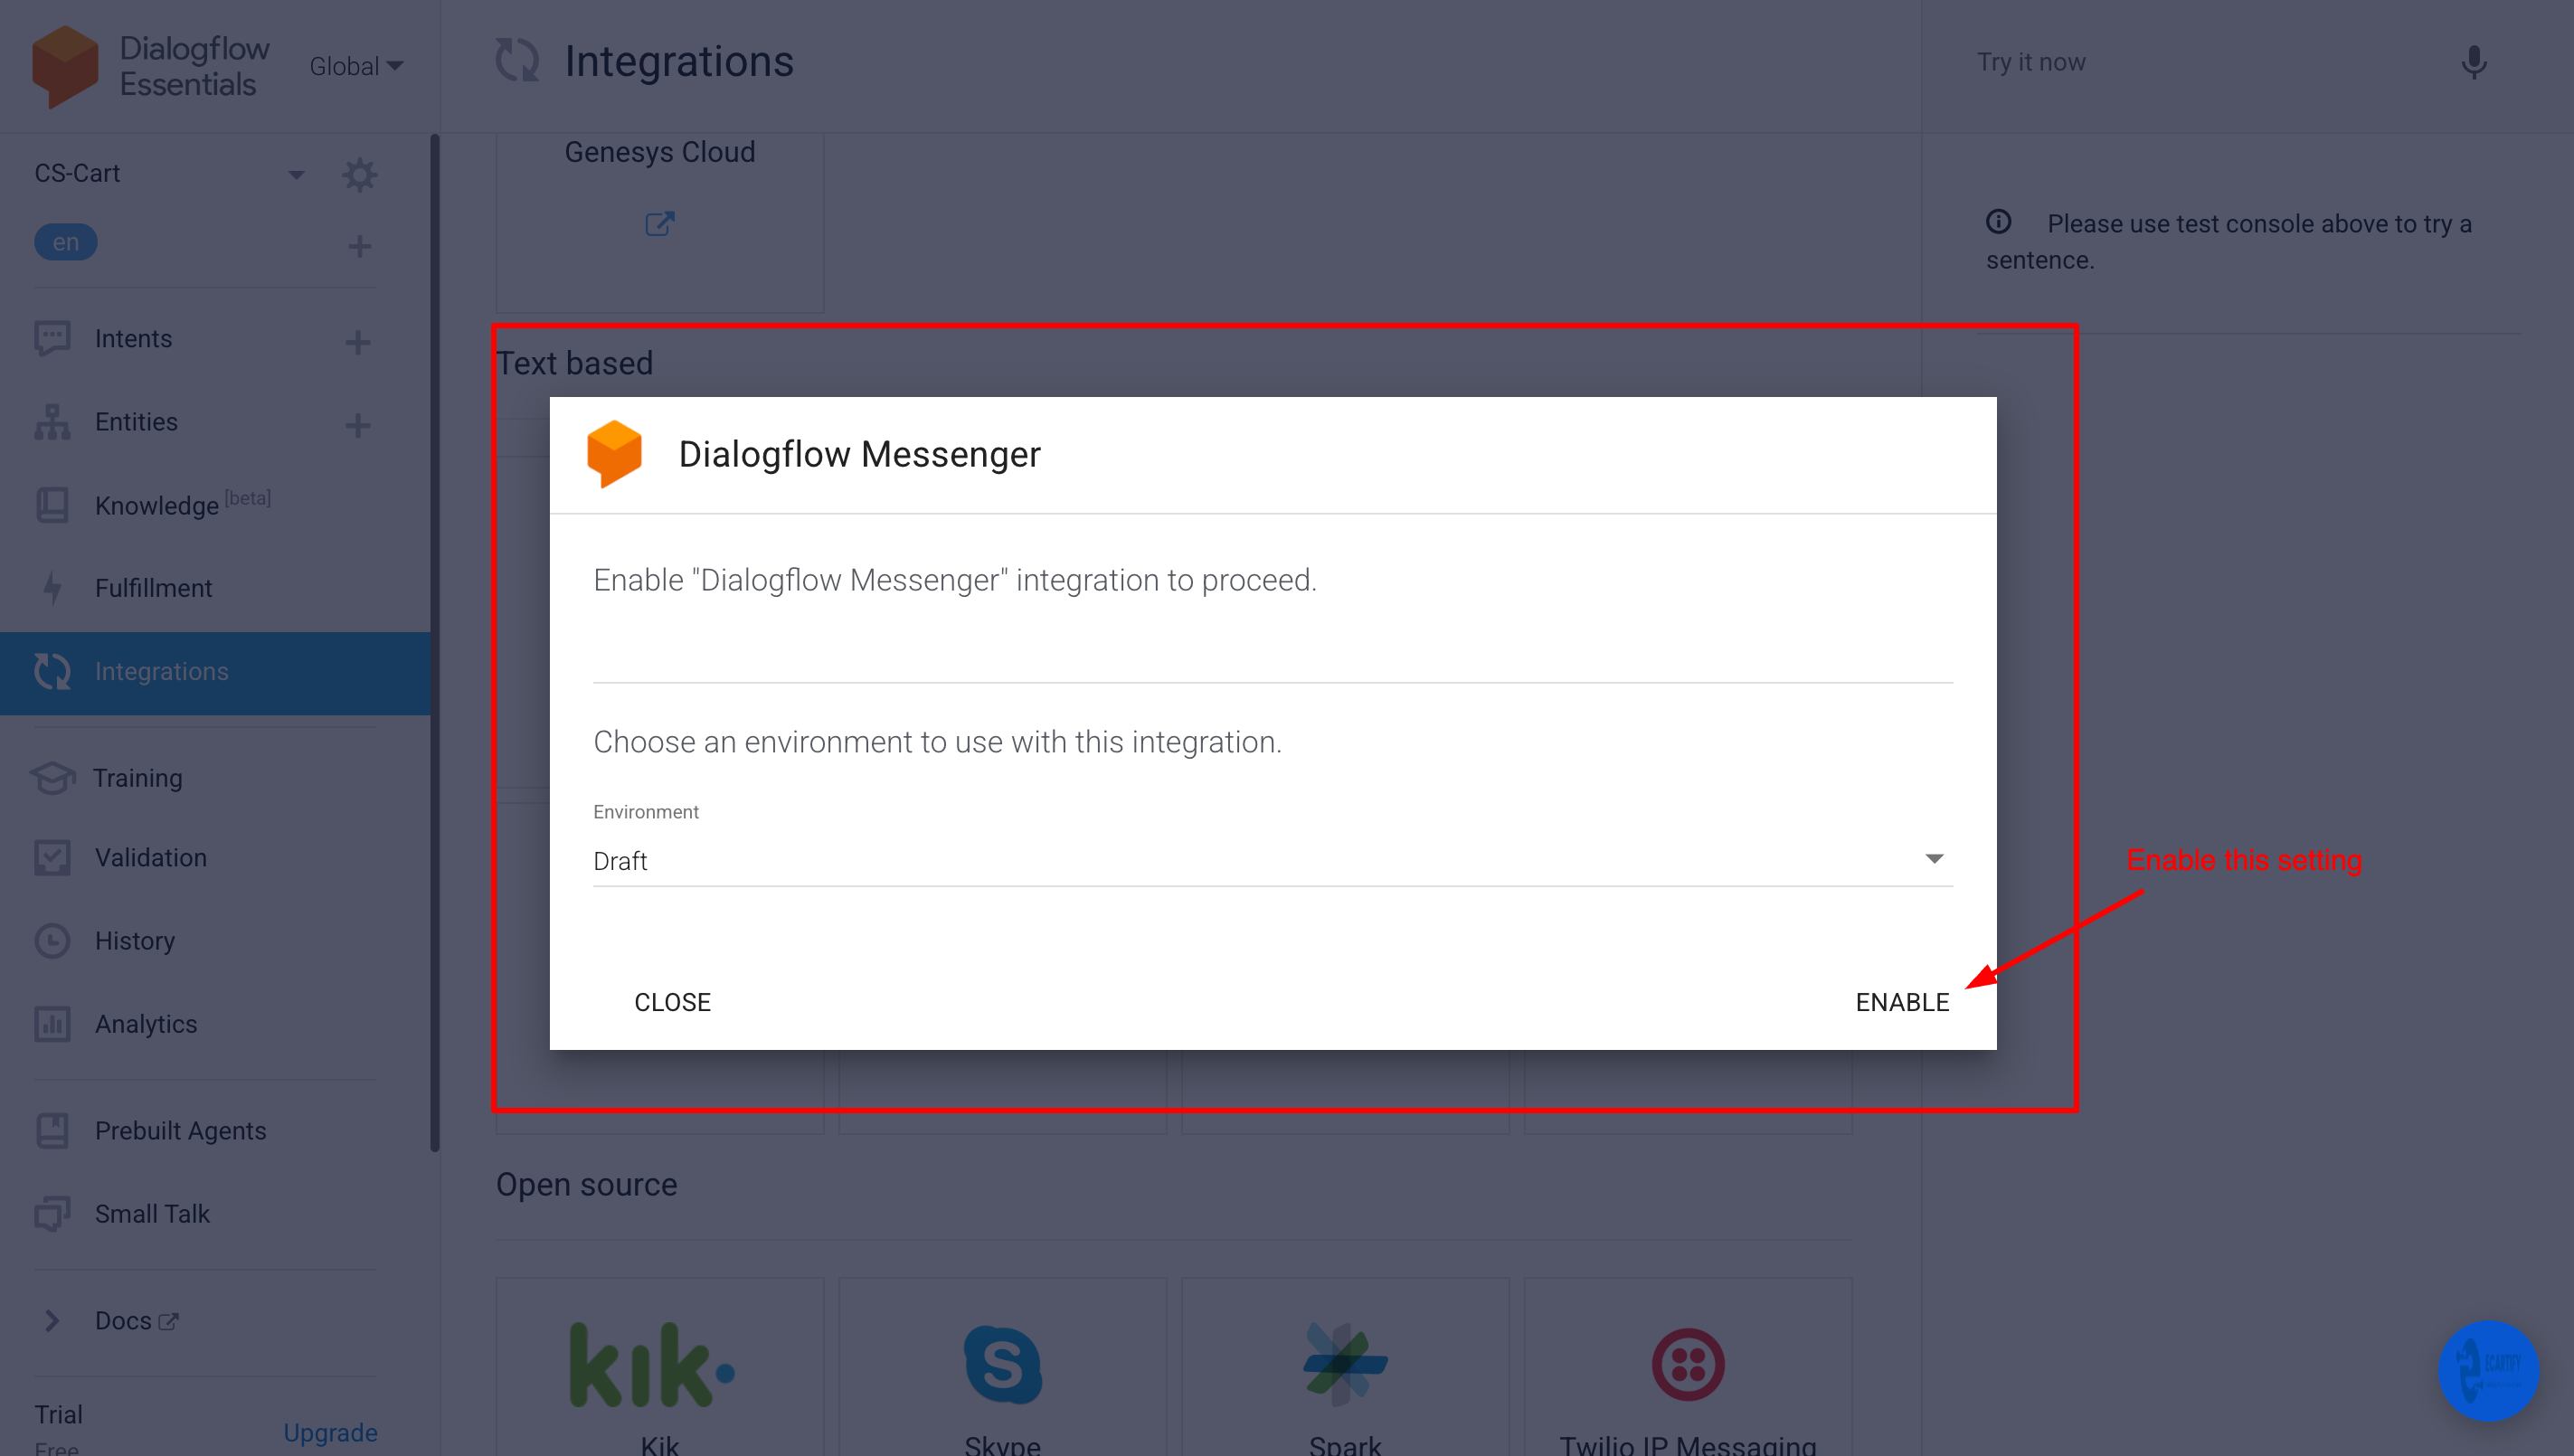
Enable it by clicking here
Copy agent id
iii) Agent zip file generation
Go to CS-Cart Admin: Log in to your CS-Cart administration panel. Navigate to Add-ons: Click on the "Add-ons" menu at the top and select "Manage add-ons". Open Add-on Settings: Locate your AI/Chatbot add-on from the list and click on its "Settings" tab.
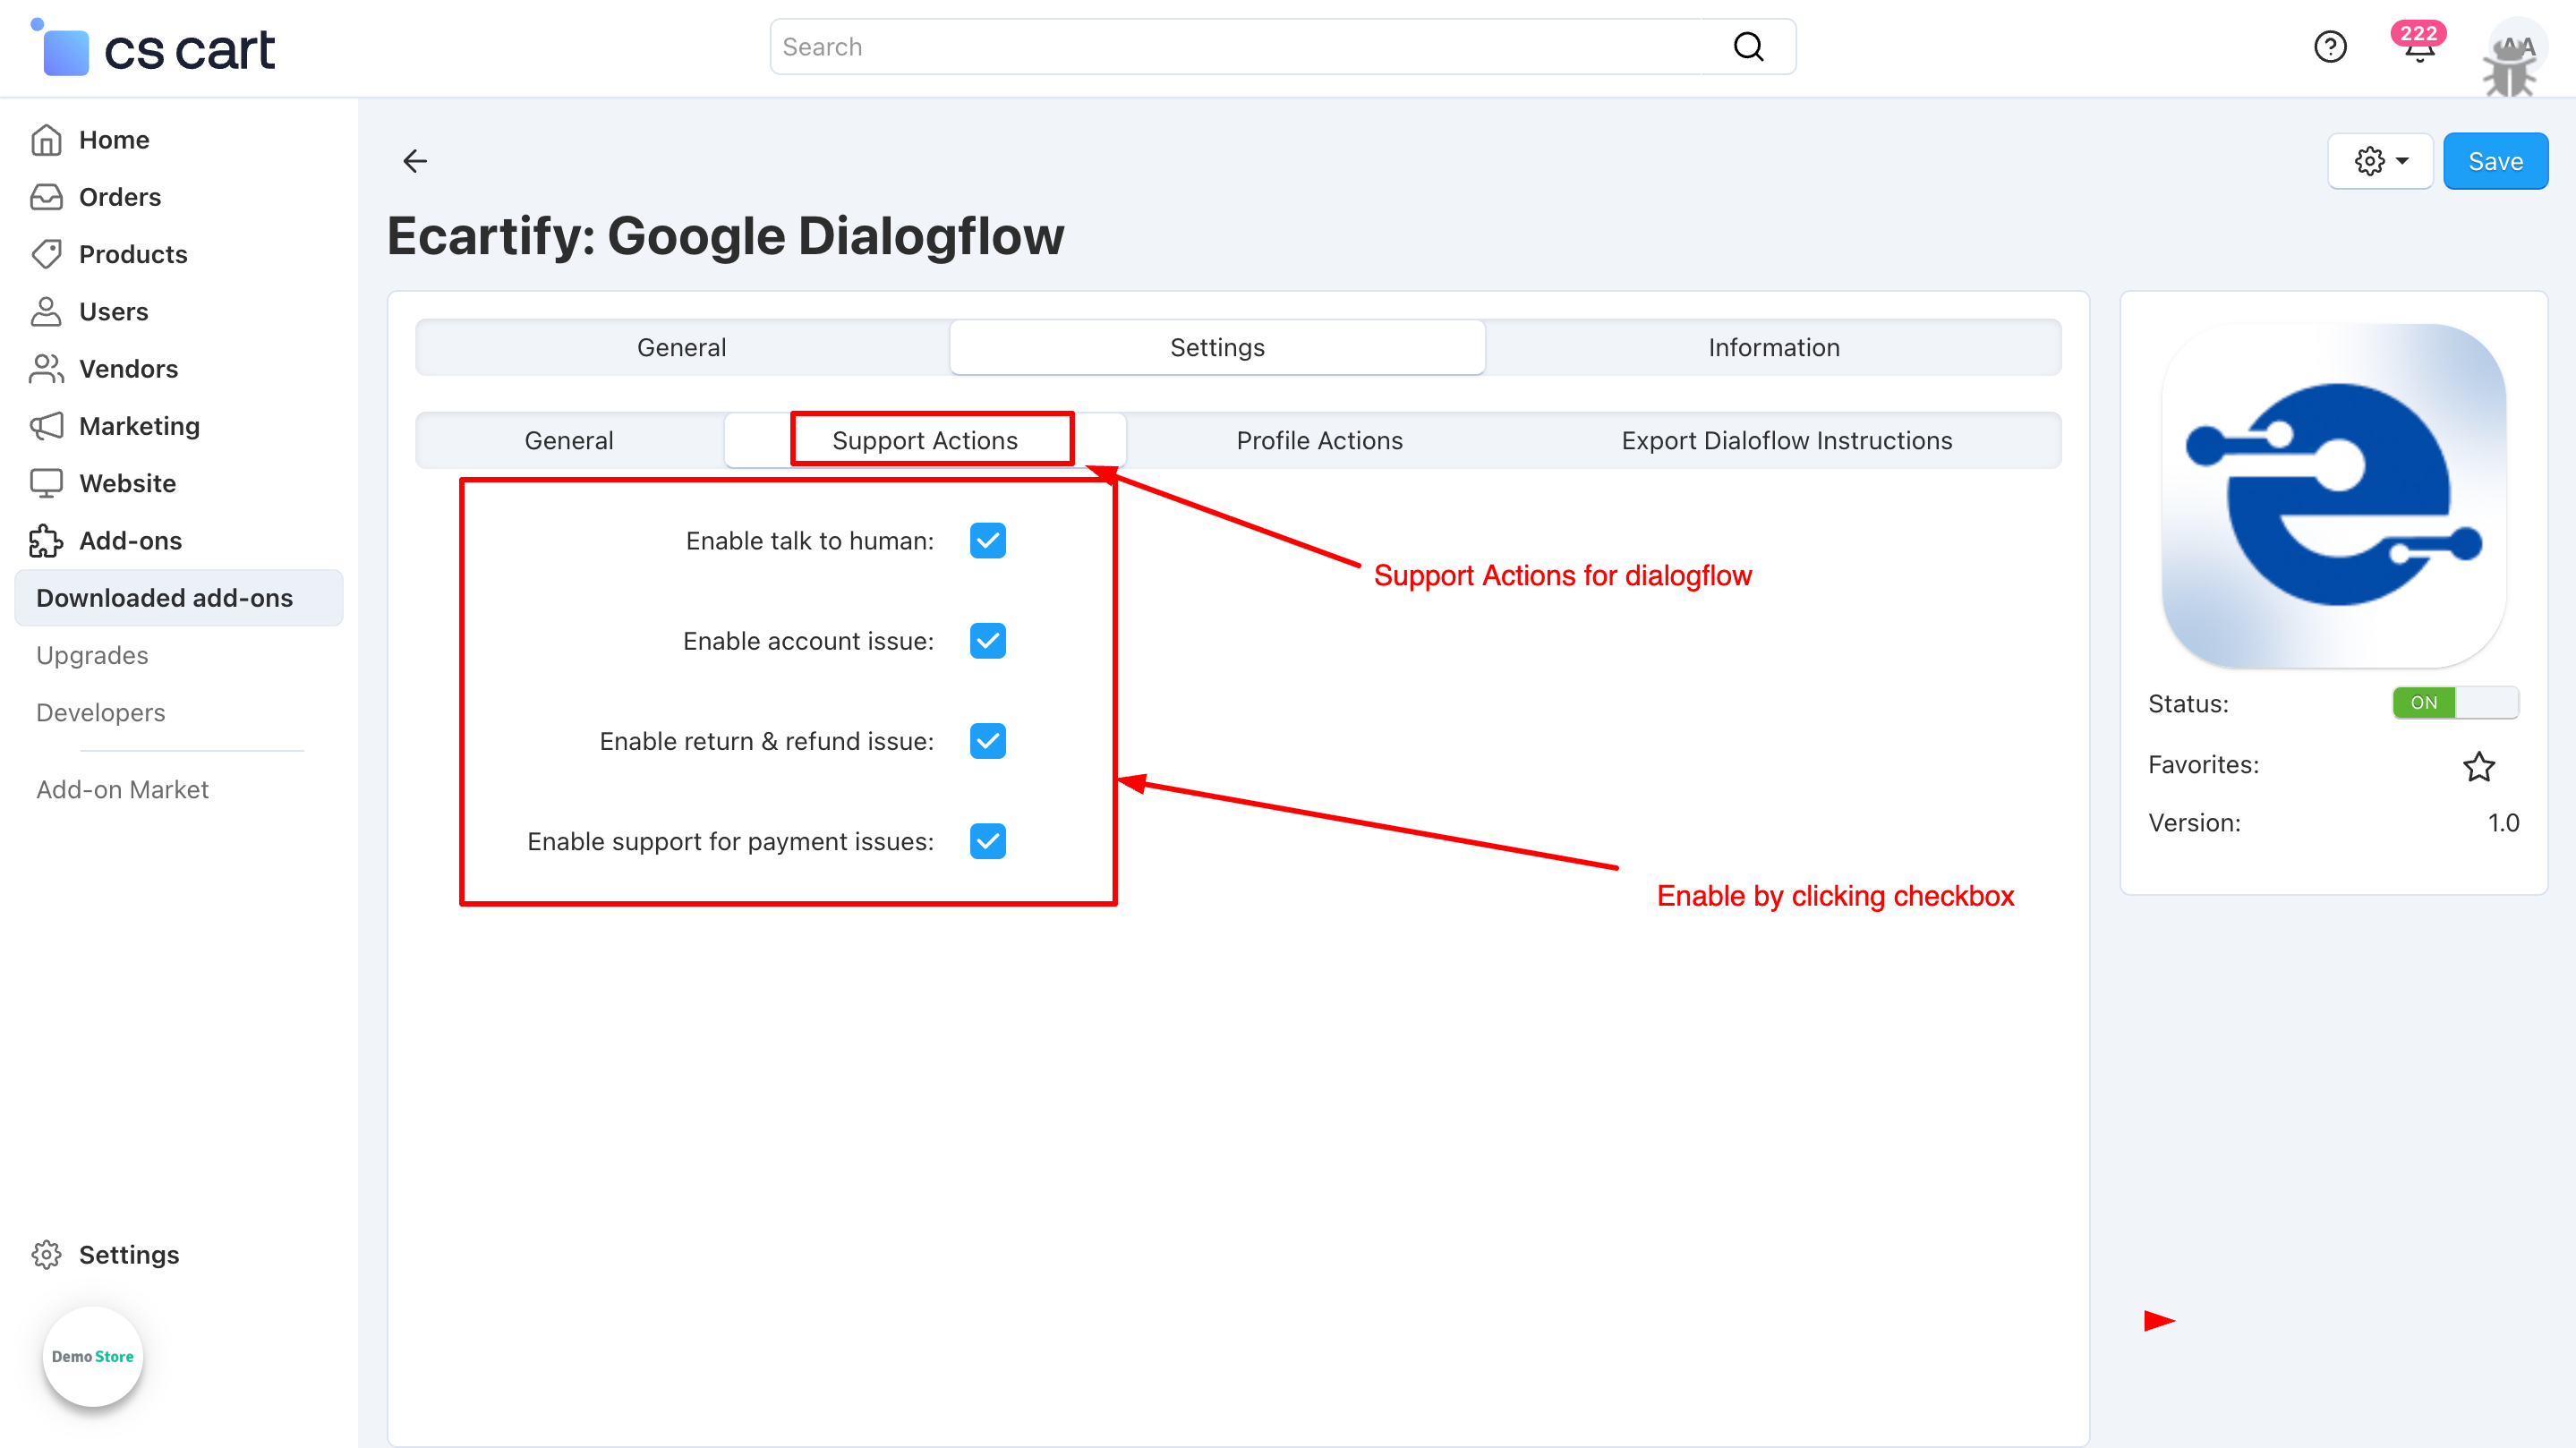
iv) Support Related Settings:
To provide a better customer experience, enable the following specific support triggers for your AI agent:
Enable Talk to Human: Toggle this on to allow the AI to hand over the conversation to a live agent when the query becomes too complex or the customer requests a person.
Enable Account Issue: Turn this on to let the AI assist users with login problems, password resets, or profile management.
Enable Return & Refund Issue: Activate this to automate the process for customers asking about return policies, status of returns, or refund timelines.
Enable Support for Payment Issues: Enable this to provide instant help for failed transactions, billing inquiries, or payment method questions.
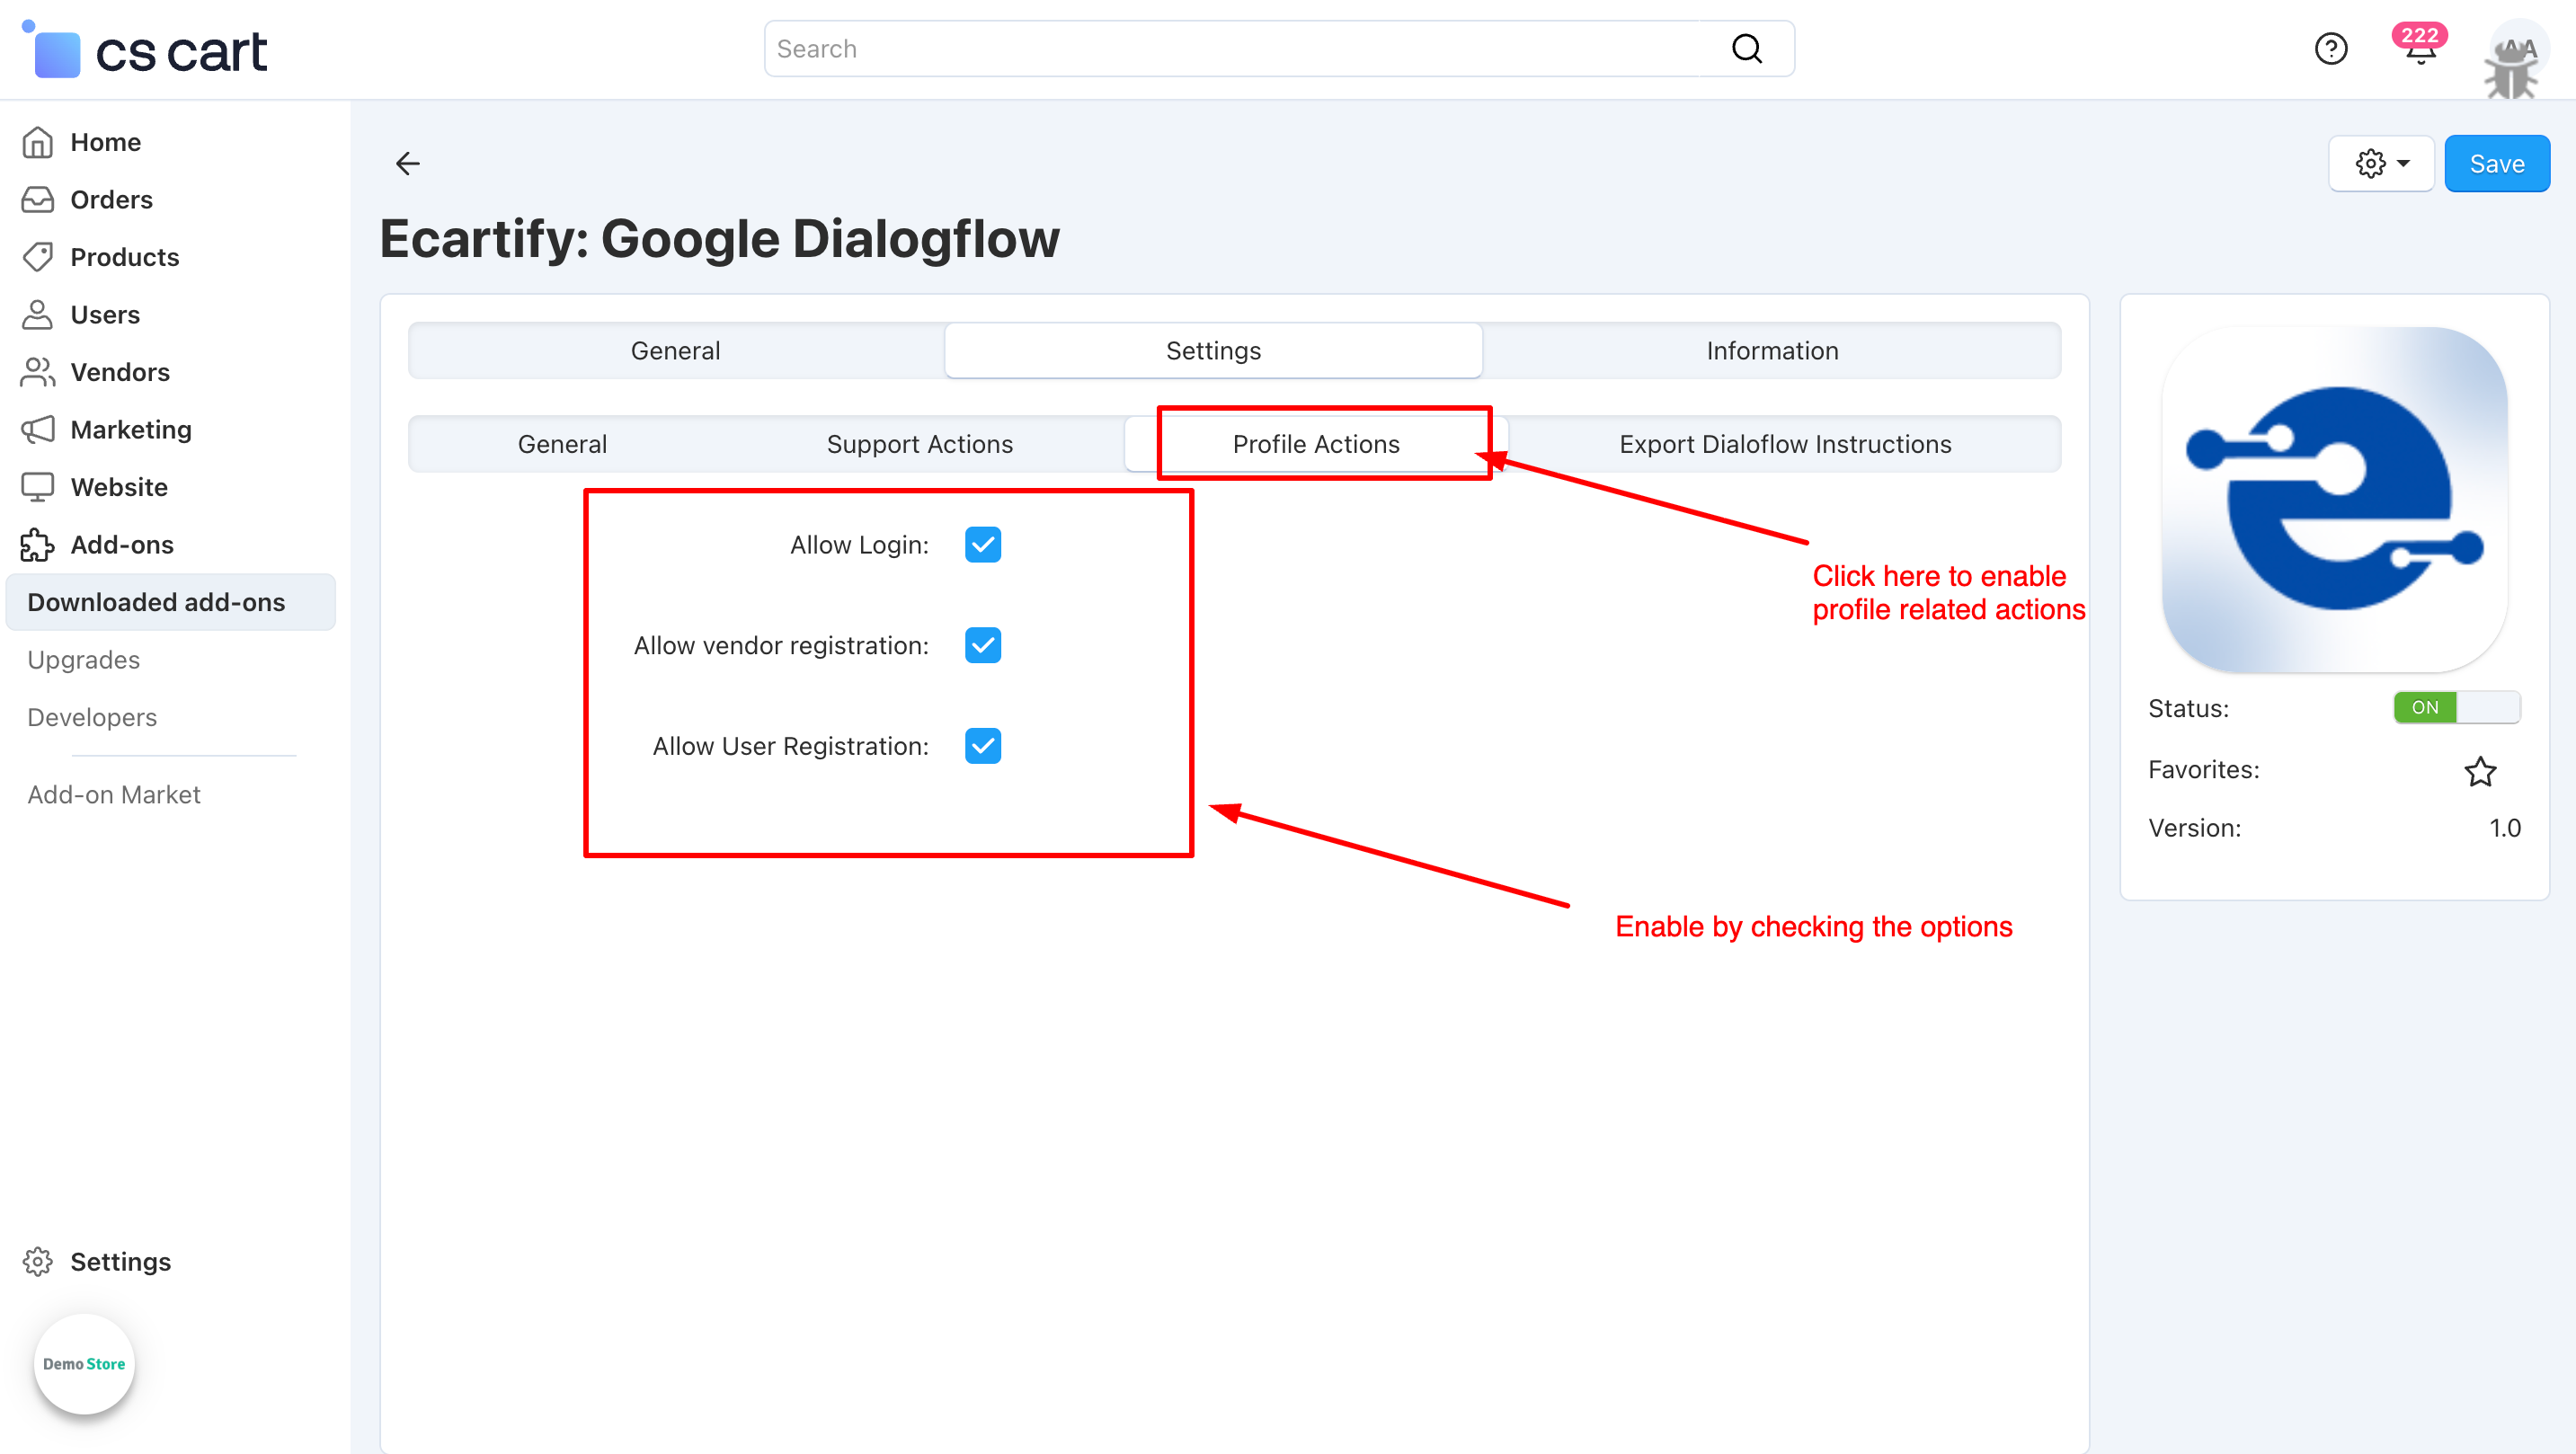
v) Profile Actions:
Configure how the AI agent interacts with user accounts and registrations:
Allow Login: Enable this to allow the AI to guide existing users through the login process or provide direct links to the sign-in page.
Allow Vendor Registration: Toggle this on if you want the AI to assist potential partners in signing up as sellers or vendors on your platform.
Allow User Registration: Activate this to enable the AI to help new customers create an account, making the onboarding process faster and more interactive.
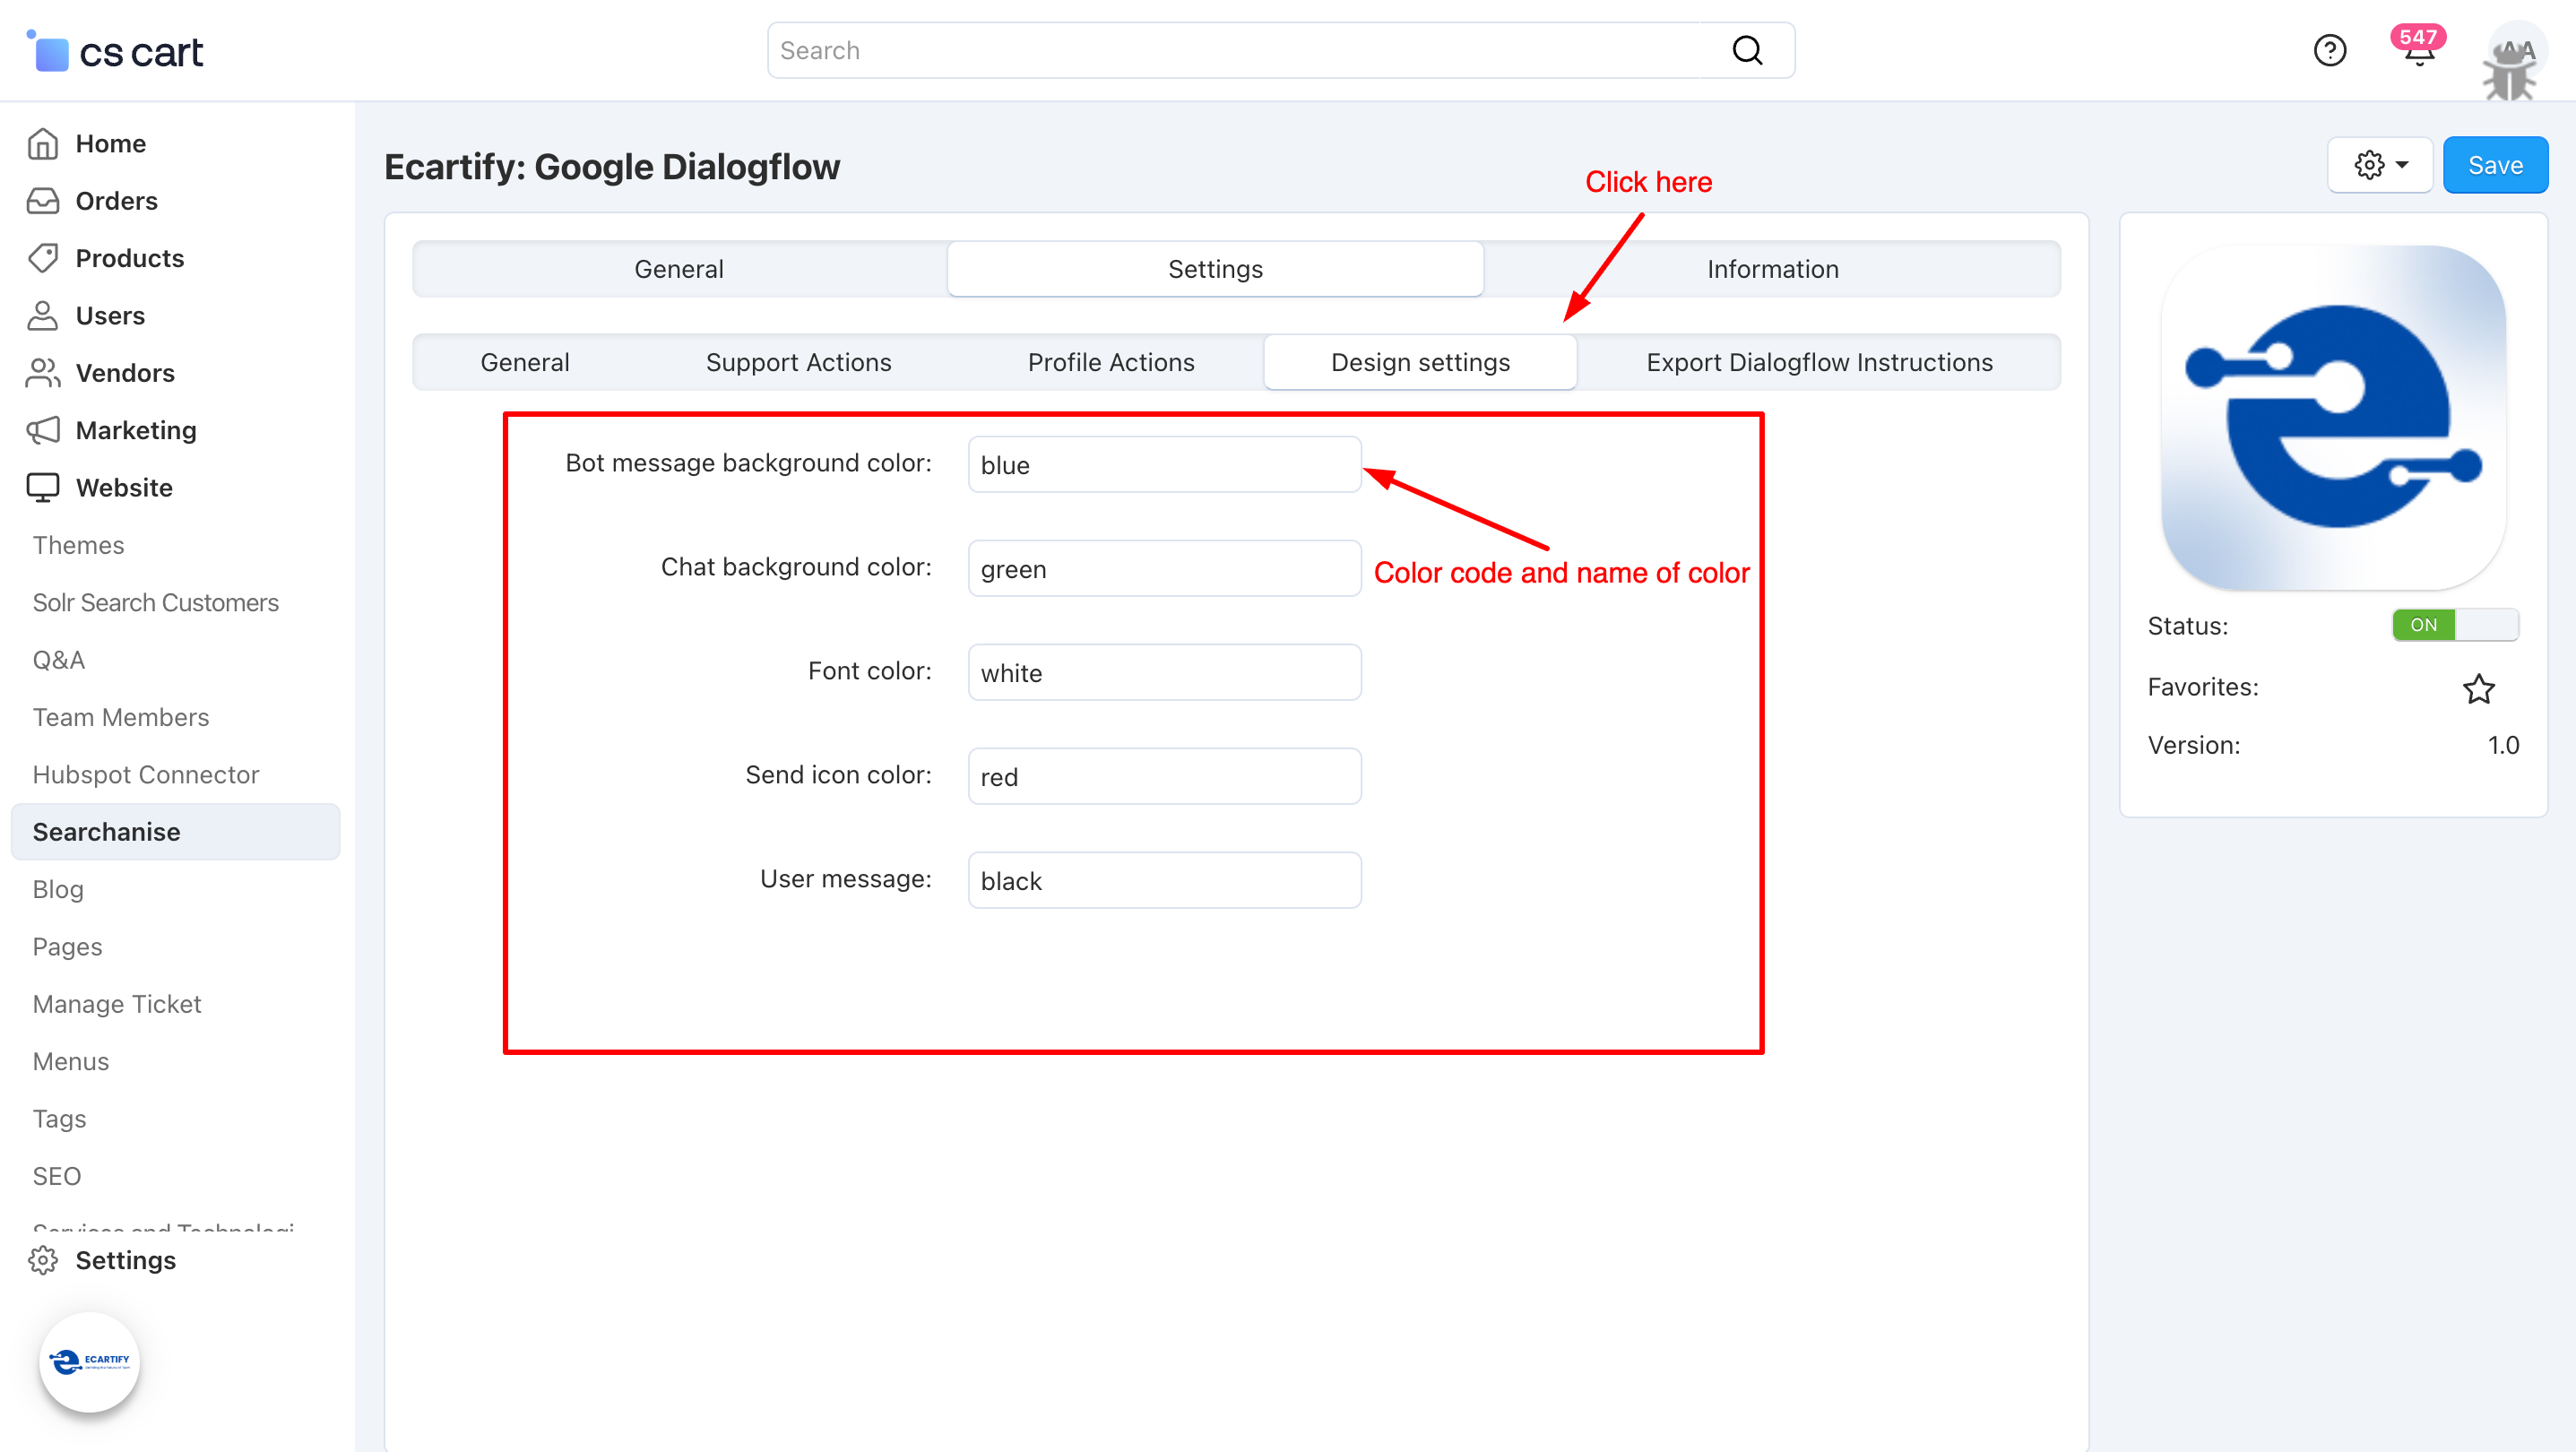
v) Design Settings:
You can customize the design of you chatbot from these settings.
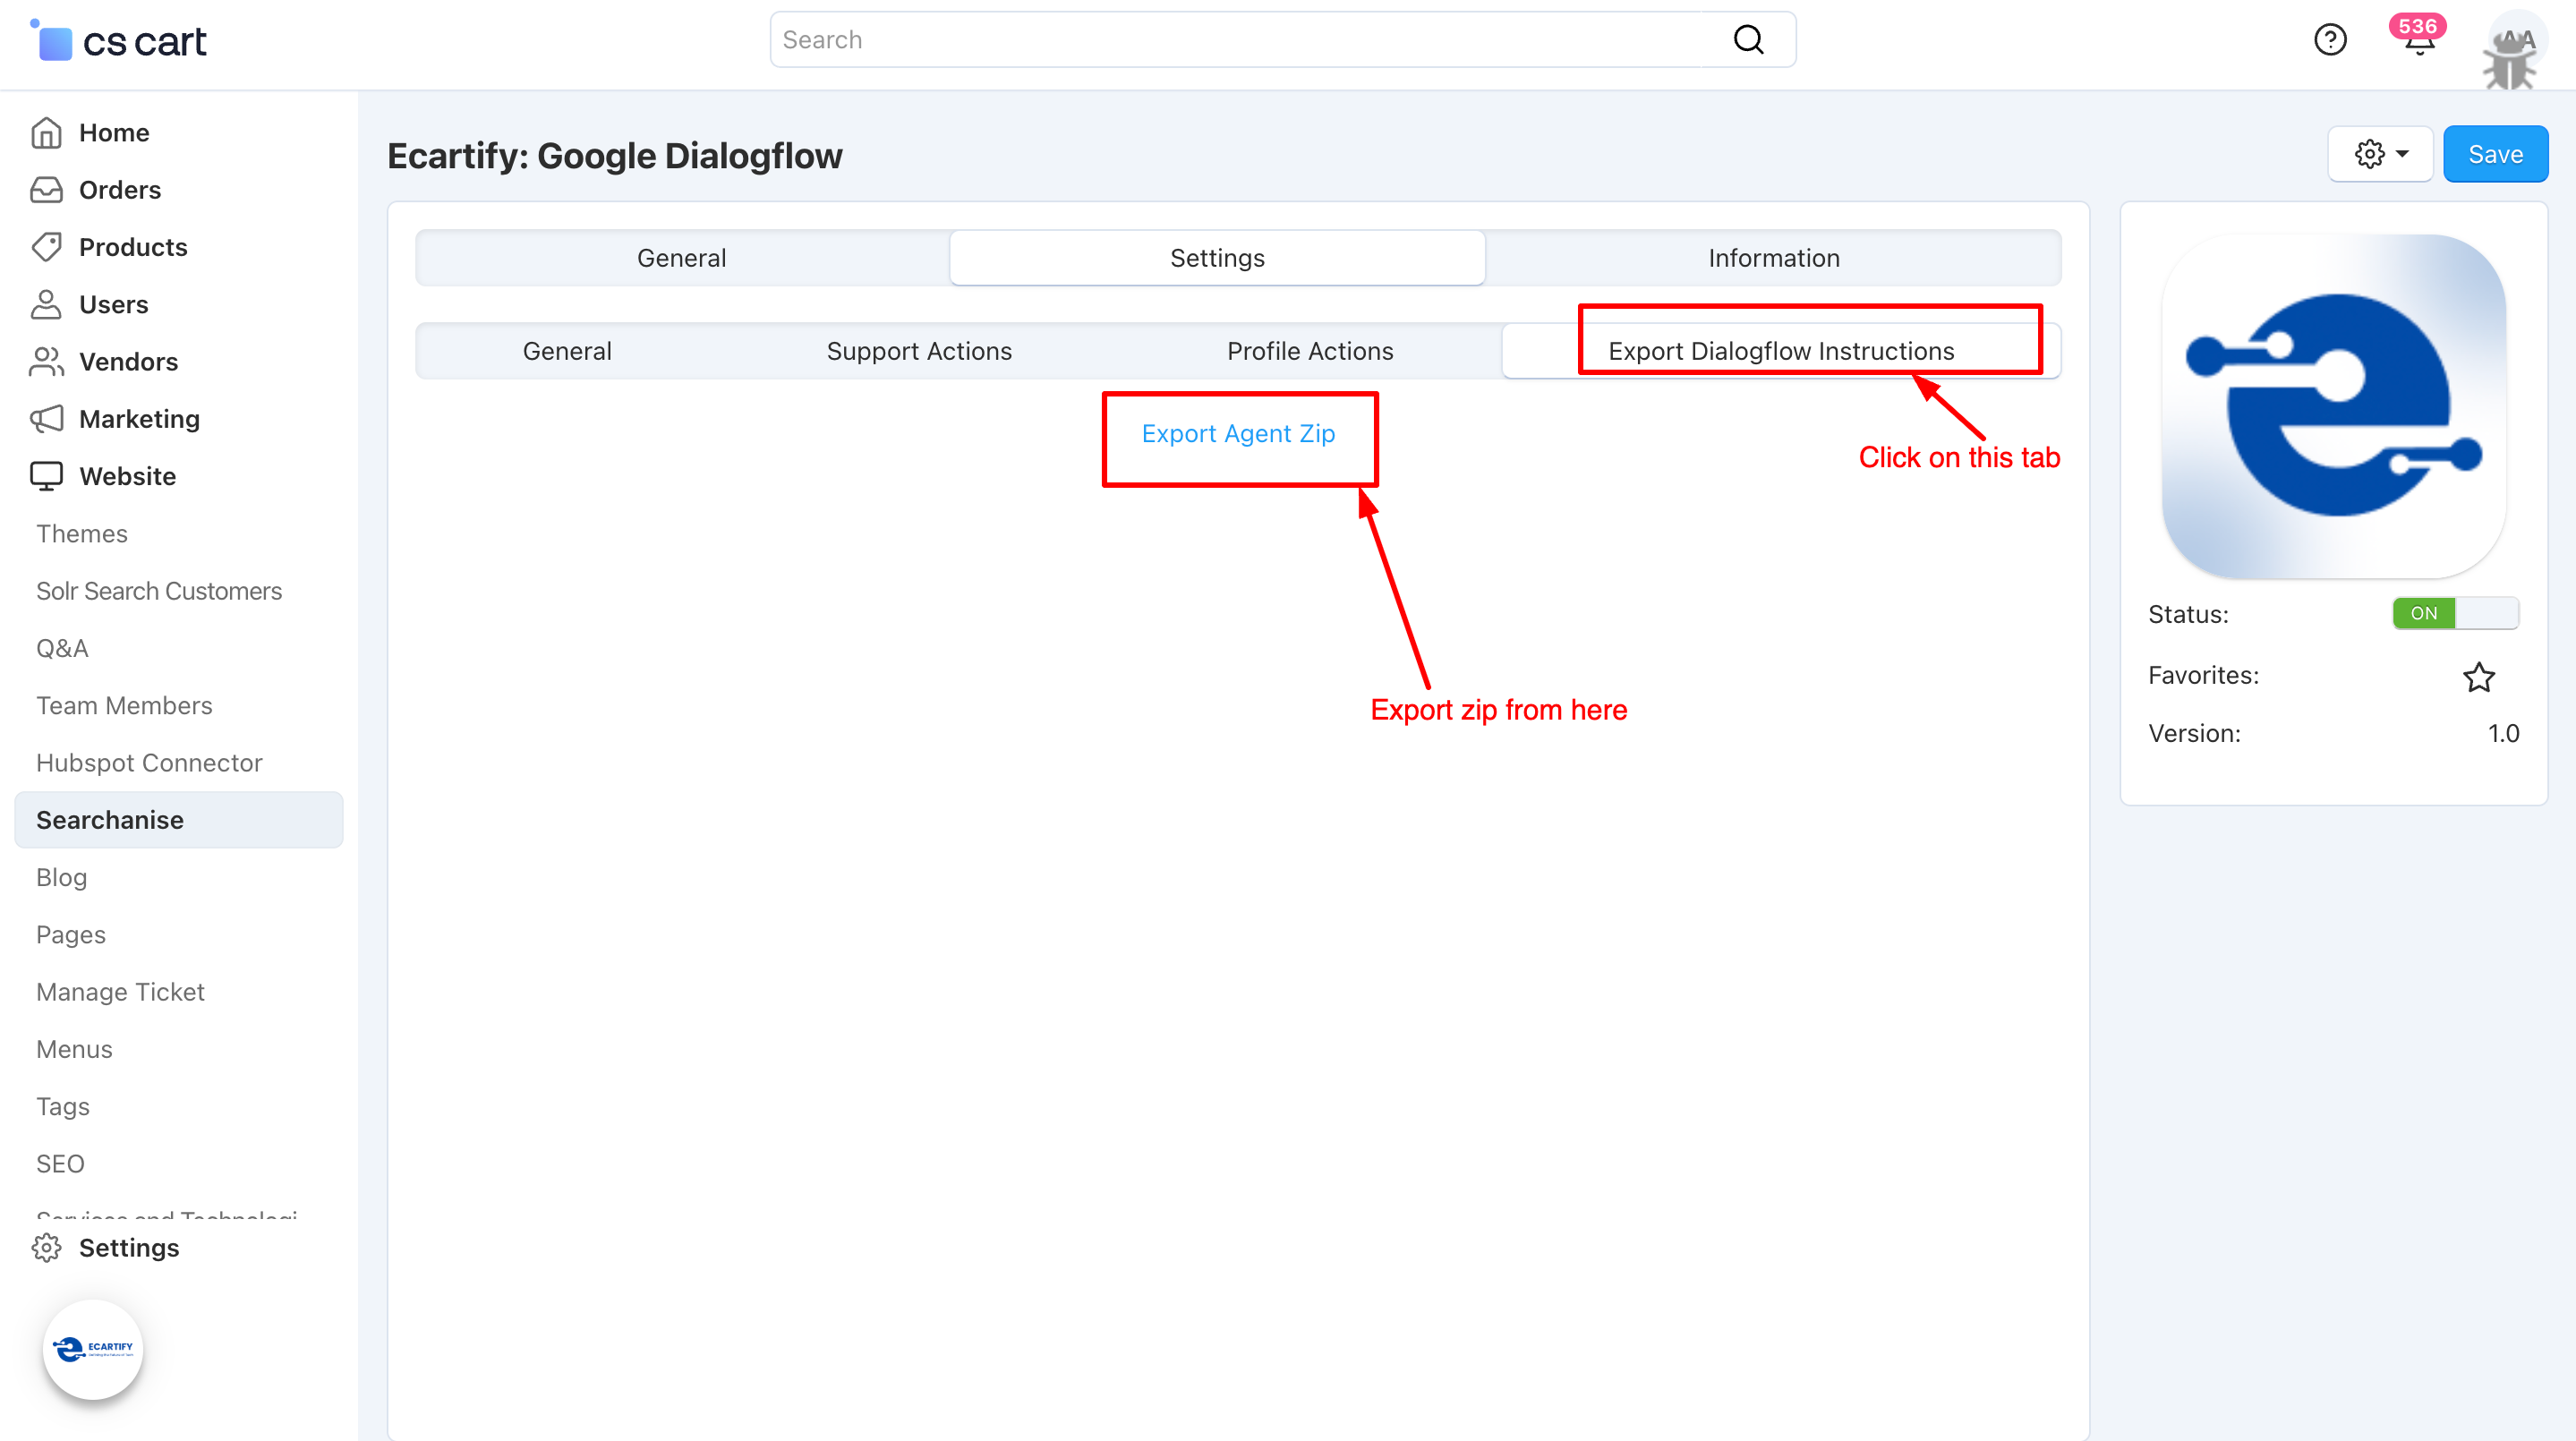
Step 3: Exporting Your Configuration
Now that you have configured all your settings, you need to generate the bundle for your add-on:
i) Export the Zip File: Use the settings you just saved to generate a custom configuration file.
ii) Click "Export Dialogflow Instructions": Find and click the "Export Dialogflow Instructions" button to prepare your package.
iii) Download the File: Once generated, download the zip file from this tab. You will need this file to complete the final integration between Dialogflow and your CS-Cart store.
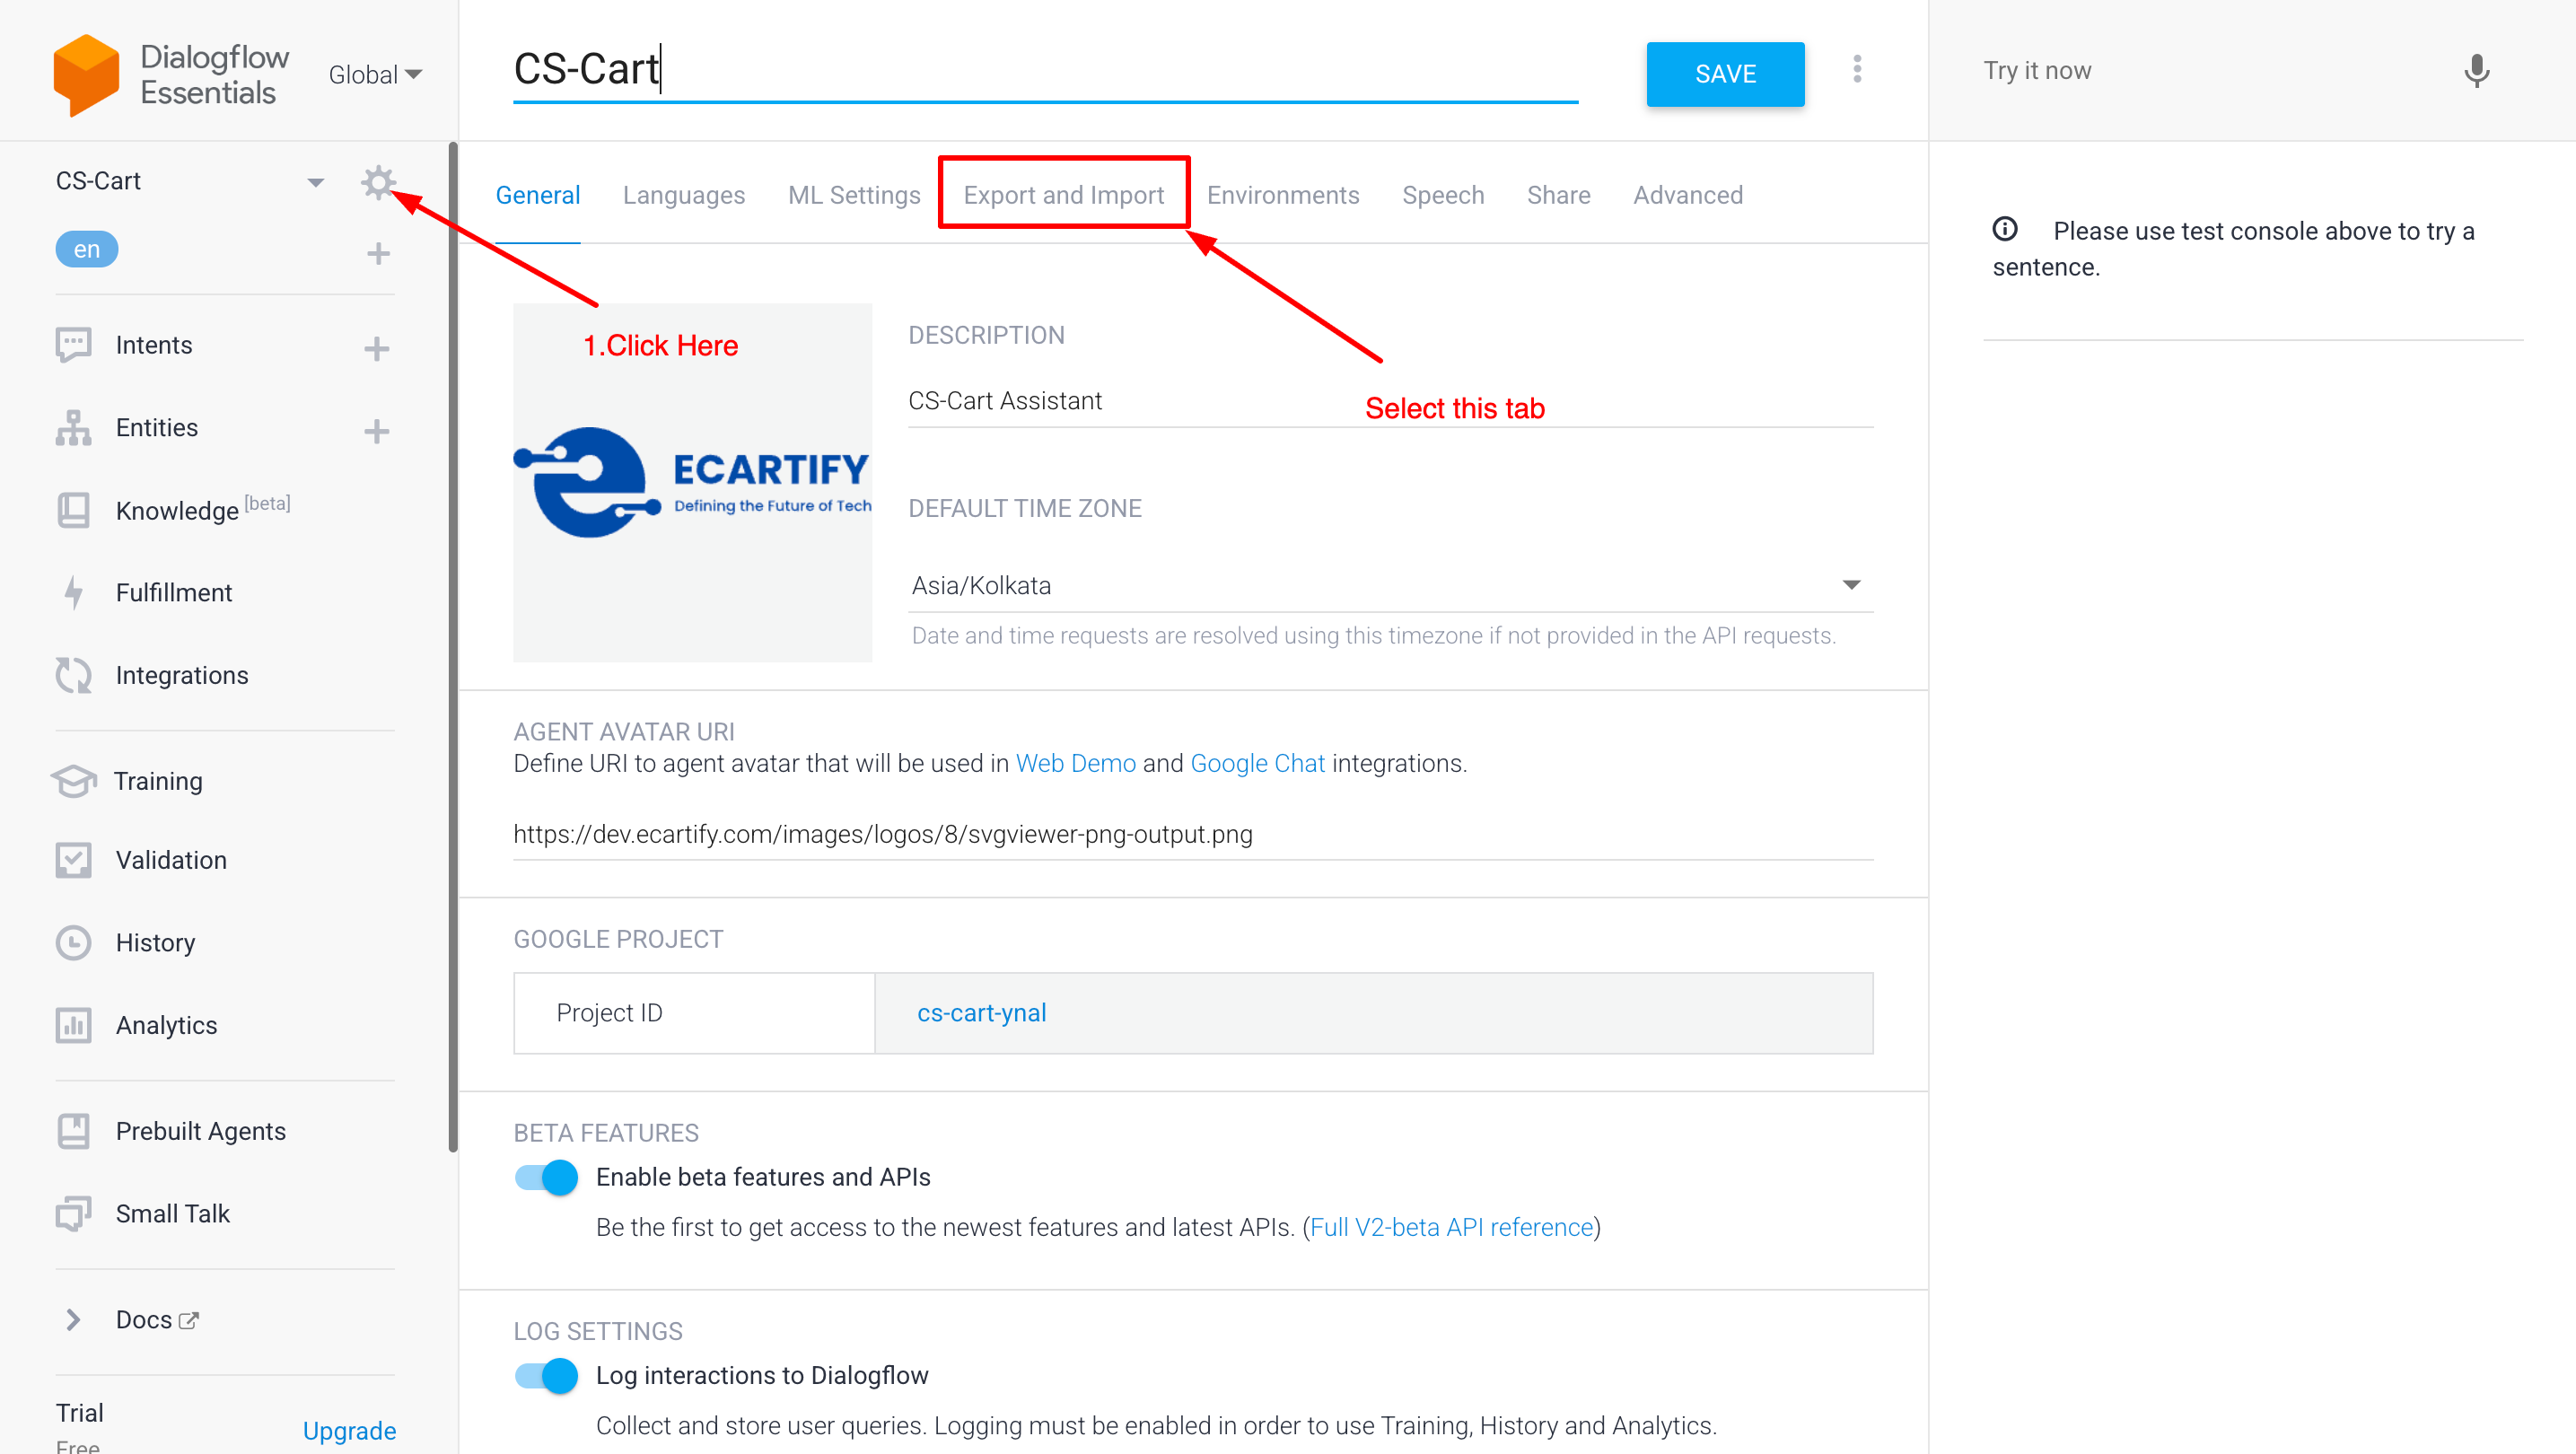
Step 4: How to Import the Agent File in Dialogflow
Once you have downloaded the zip file from your settings, follow these steps to upload it:
ii) Select Your Agent: Click on the Settings (gear icon ⚙️) next to your Agent's name in the left-hand menu. Go to "Export and Import": In the settings tabs at the top, click on the "Export and Import" tab.
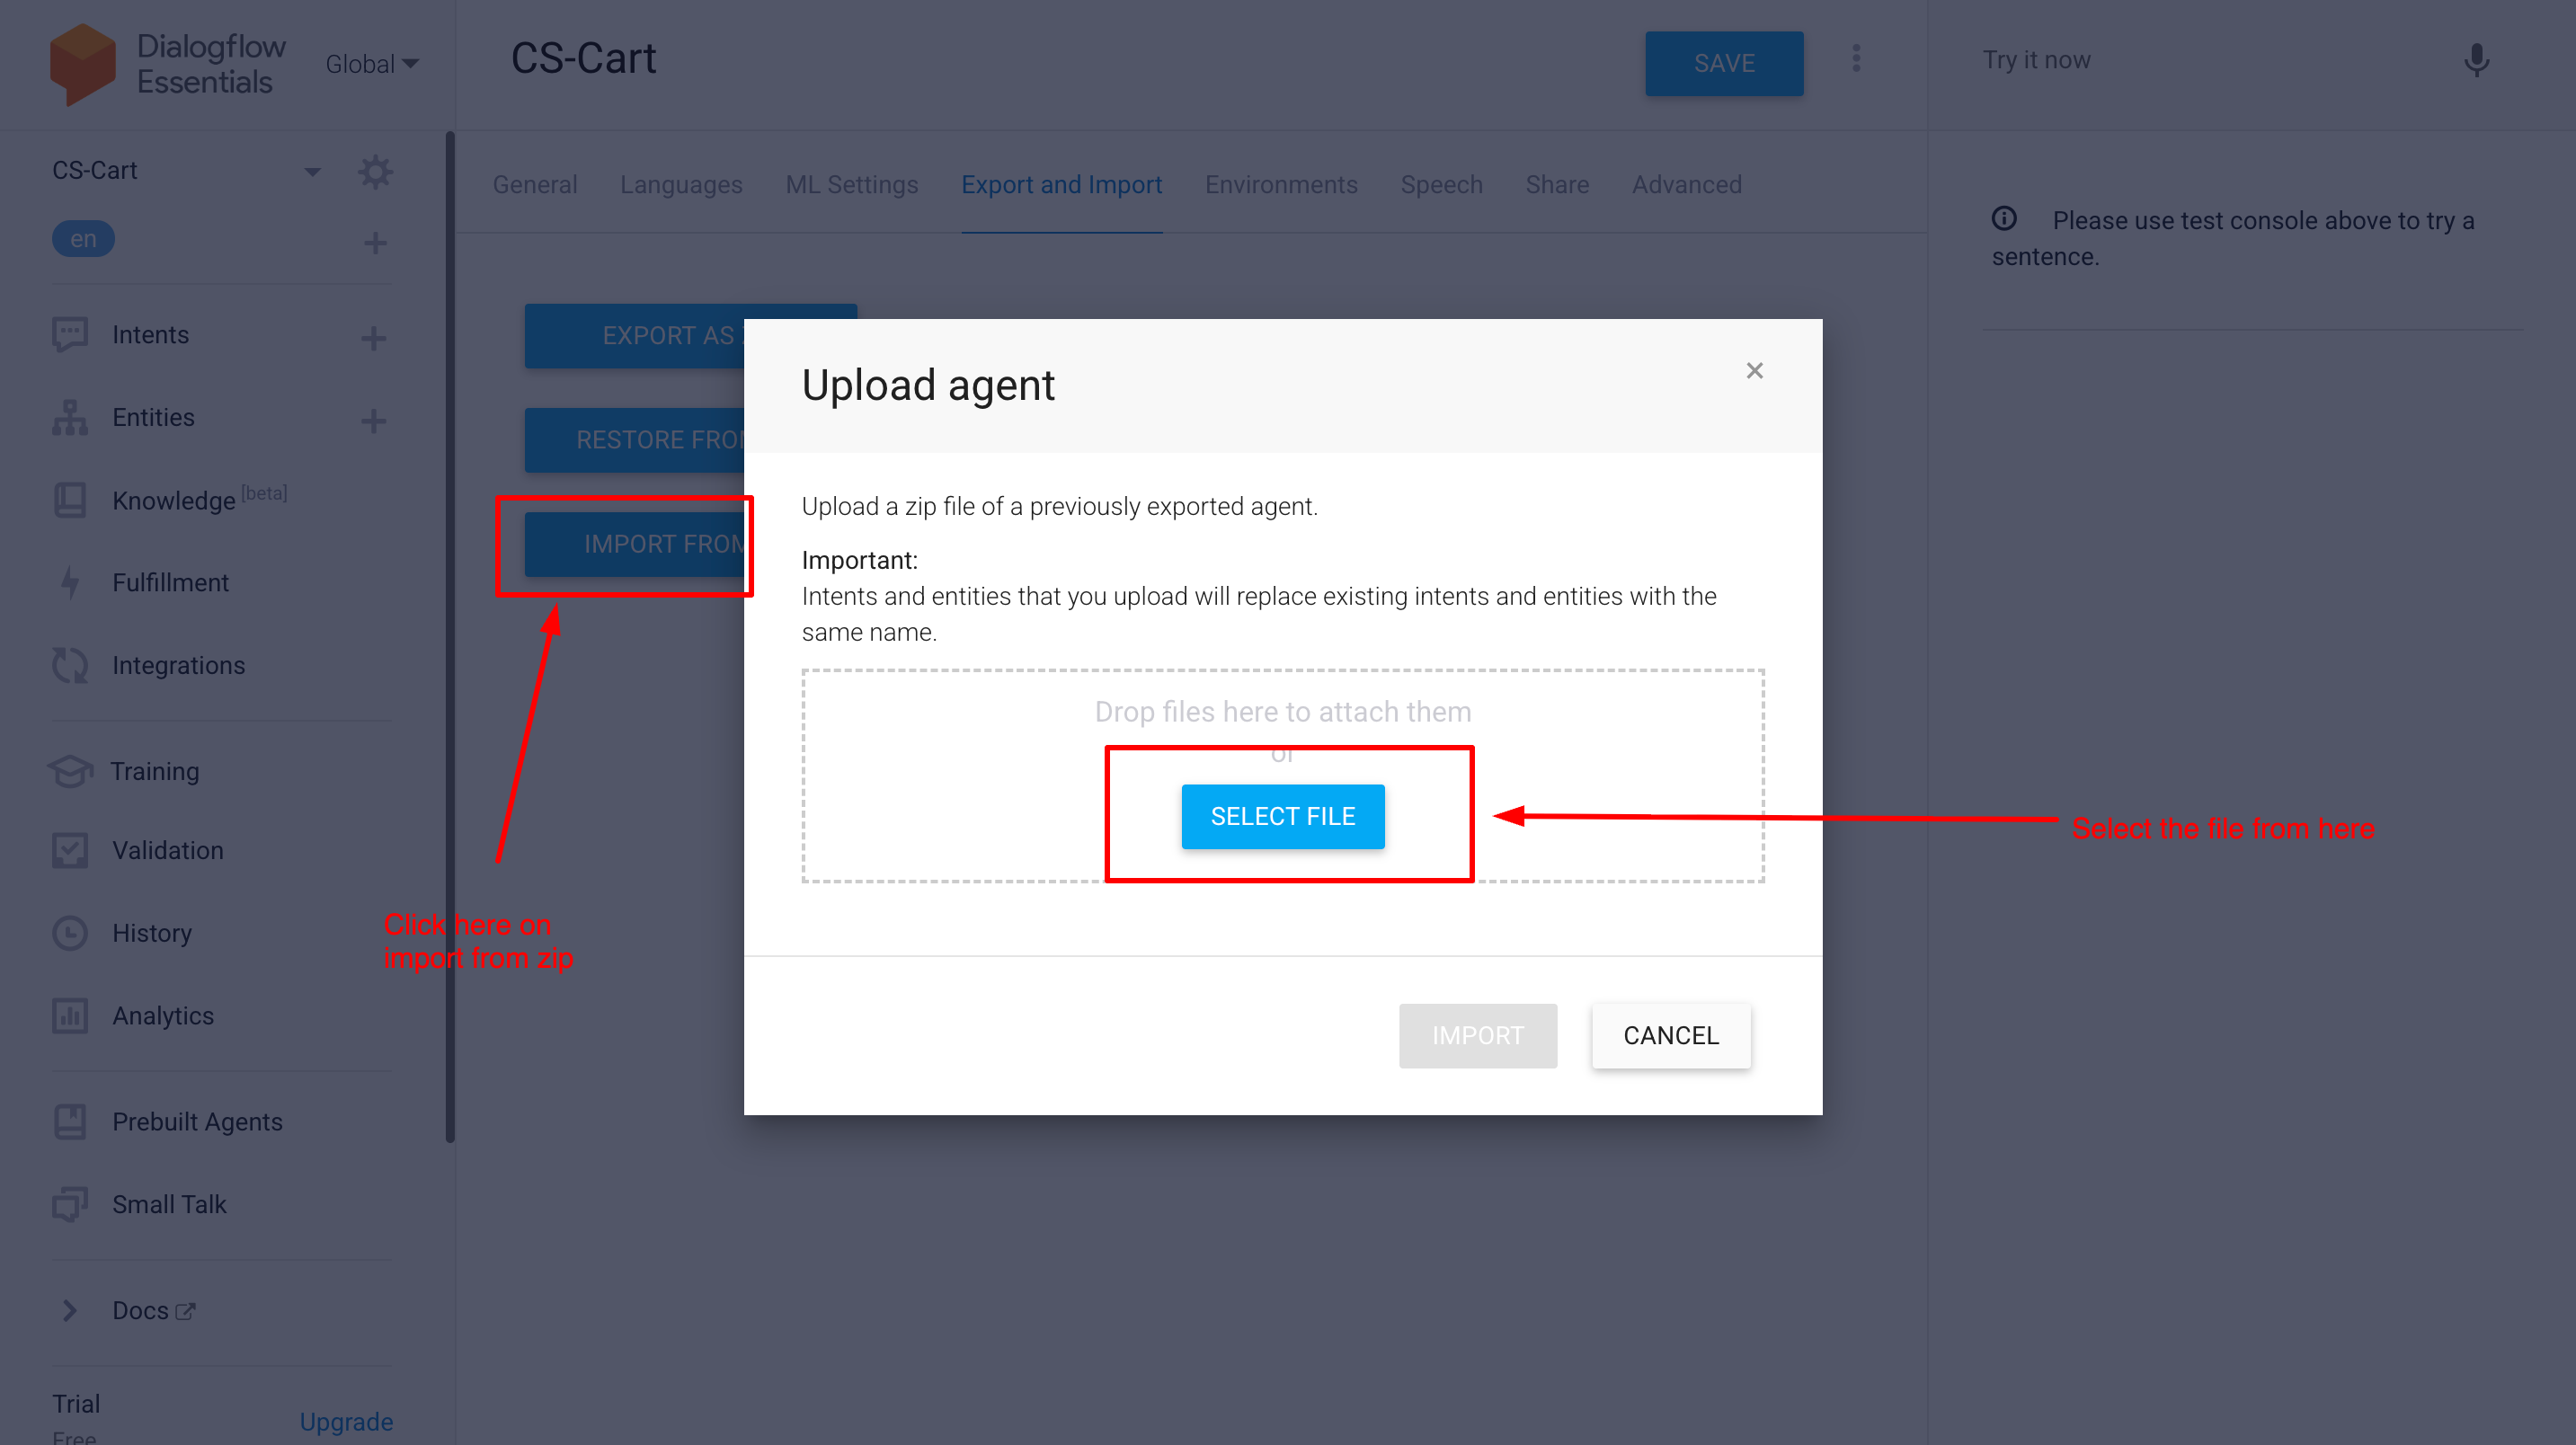
iii) Choose "Import From Zip": Click the "Import From Zip" button. Note: Use "Restore" instead of "Import" to ensure all intents and entities are fully updated with your new settings.
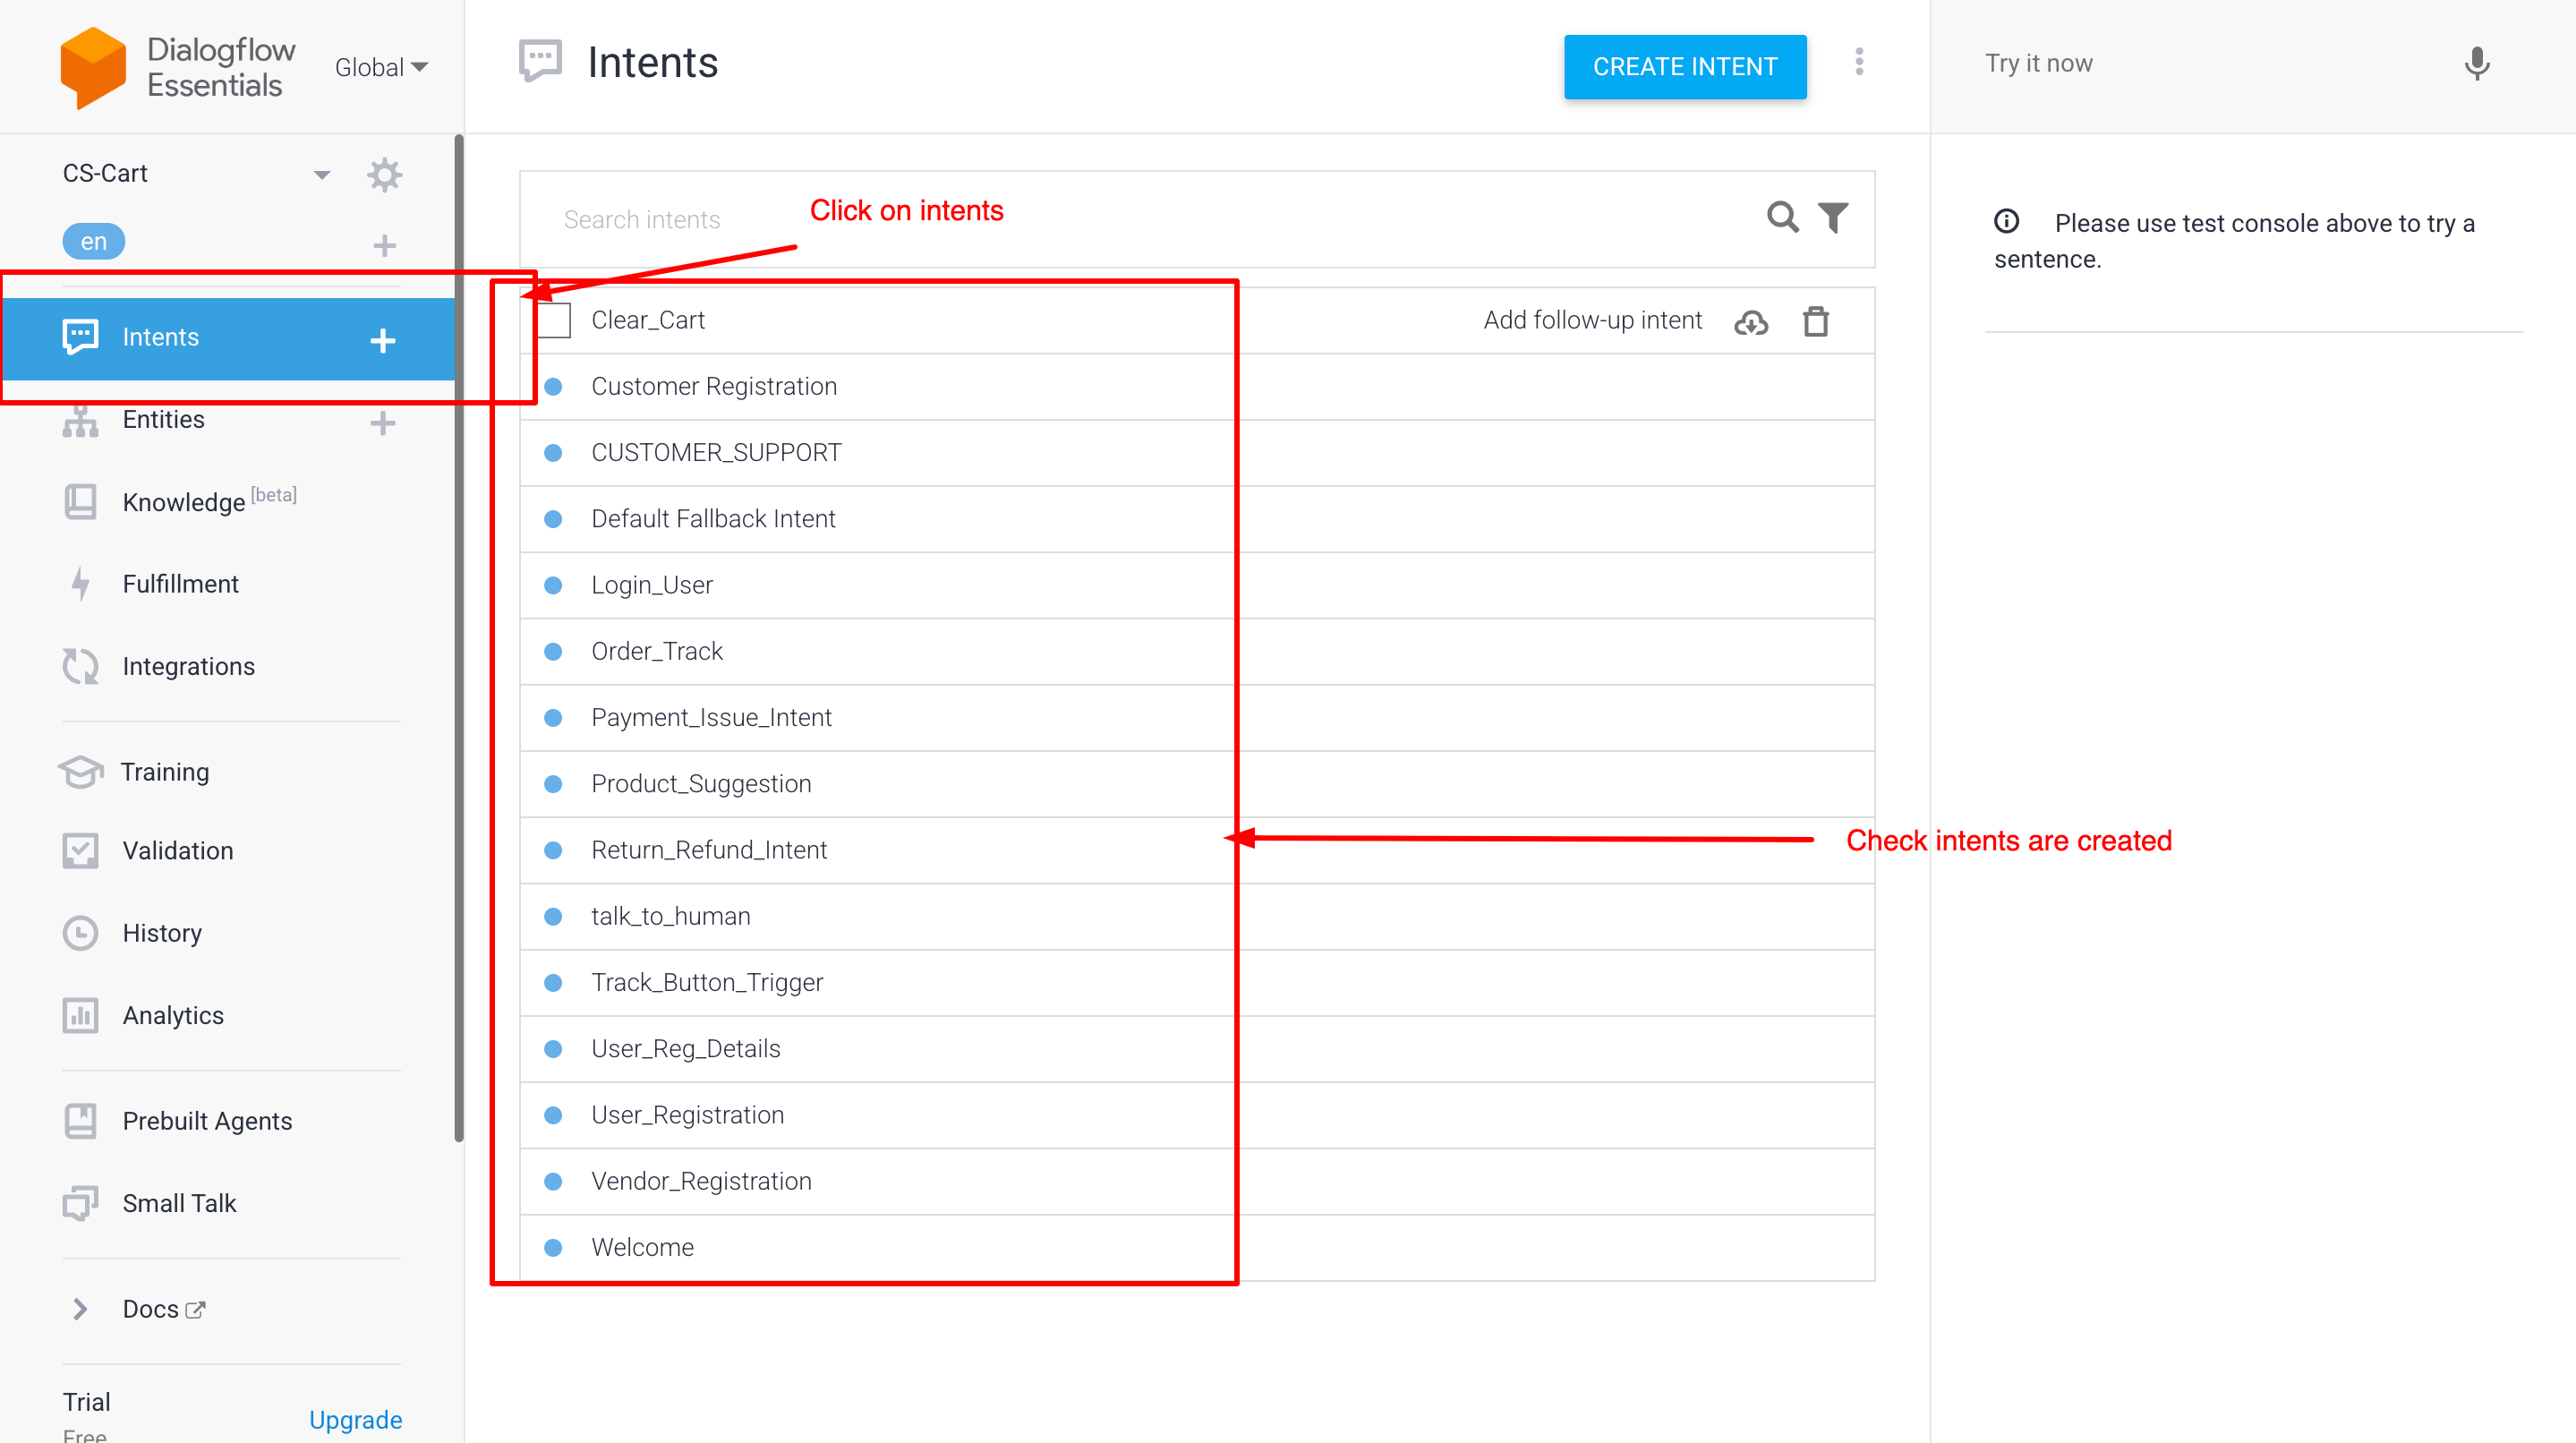
iii) Now verfiy intents are created or not
Step 4: Final Step: Test Your AI Agent
Congratulations! Your setup is now complete. Before going live, you should verify that everything is working as expected:
Verify CS-Cart Connection: Open your storefront and send a test message through the chat widget to ensure the AI is communicating with your CS-Cart store.
Now open storefront
Why Choose AI Conversational Assistant for Your CS-Cart Store?
AI conversational Assistant addon turns your CS-Cart store into a 24/7 automated powerhouse. By integrating Dialogflow, you get a smart assistant that doesn't just "chat"—it understands your customers, handles support, and automates store actions without you lifting a finger.
Deep Store Integration:
Unlike basic bots, this agent is built for CS-Cart. It can assist with User Registrations, Vendor Sign-ups, and Login issues directly through the chat interface.
Final Thoughts
AI Assistant transforms your store into an interactive shopping hub. By leveraging Google Dialogflow, this addon automates customer journeys—from User & Vendor registrations to real-time Order Tracking and personalized product discovery.
Go beyond basic chat with action-driven search: instantly show Bestsellers, Latest Products, or custom filters like "Products under $1000" directly in the chat. With a built-in Custom Knowledge Base, your bot learns your specific business rules to provide 24/7 expert support, reducing tickets and boosting conversions.
Empower B2B customers to request custom pricing, negotiate bulk orders, and receive personalized quotes directly through your CS-Cart store.
Request Quotation
Running a successful B2B e-commerce store requires flexibility in pricing, the ability to negotiate bulk orders, and personalized customer service. Wholesale buyers, corporate clients, and bulk purchasers need a way to request custom quotes for large quantities or special pricing arrangements.
But CS-Cart's default functionality doesn't provide a built-in quotation request system, leaving B2B store owners without an efficient way to handle custom pricing inquiries.
Introducing Ecartify: Request Quotation — a comprehensive quotation management system that enables customers to request custom quotes, allows admins to manage and approve requests with custom discounts, and automates the entire quote-to-order workflow.
What is Ecartify: Request Quotation?
Ecartify: Request Quotation is a powerful B2B sales tool that transforms your CS-Cart store into a professional quotation management platform:
Customers can request quotes directly from product pages or bulk request pages
Support for single and multiple product quotation requests
Automated email notifications for both customers and admins
Admin approval/disapproval workflow with custom discount application
Percentage or absolute discount options for flexible pricing
Direct checkout links for approved quotations
Complete quotation history tracking for customers and admins
This addon is built for B2B stores, wholesale businesses, and any e-commerce platform that needs flexible, personalized pricing capabilities.
How the Request Quotation System Works
1
Customer Requests Quotation
Customers can request quotes from product detail pages for specific quantities, or use the dedicated "Request Quotation" page in their account to select multiple products with desired quantities using the product picker.
2
Automatic Email Notifications
Both the customer and admin receive instant email notifications when a new quotation request is created, ensuring no request goes unnoticed.
3
Admin Reviews Request
Admins can view all quotation requests in the backend "Request List" page, where they can review product details, quantities, and customer information.
4
Apply Custom Discounts
Admins can apply custom discounts on a percentage or absolute value basis, tailoring pricing to each customer's specific needs and order volume.
5
Approve or Disapprove
Admins approve or disapprove the quotation request. Both actions trigger automatic email notifications to the customer with the decision and details.
6
Customer Completes Order
Approved quotations include a direct checkout link in the email, taking customers straight to the checkout page with their quoted products and applied discounts.
Key Features
Multiple Request Options for Customers
Customers have flexible ways to request quotations:
Product Page Requests: Request quotes directly from any product detail page with custom quantity
Bulk Request Page: Select multiple products using the product picker in account section
Custom Quantities: Specify different quantities for each product
Comprehensive Admin Management
Admins get powerful tools to manage quotations:
Centralized "Request List" page showing all quotations
Filter and sort by status, date, or customer
Apply custom discounts (percentage or fixed)
One-click approval or disapproval
Track quotation status from request to completion
Automated Email Communication
Intelligent notifications at every stage:
New Request: Admin and customer notified
Approval: Customer receives checkout link with discount details
Disapproval: Customer notified with explanation
Flexible Discount System
Percentage Discount
Apply 5%, 10%, 15% or any percentage off
Absolute Discount
Fixed dollar amount reduction
Per-Product Pricing
Customize pricing for individual items
Customer Request Tracking
Customers monitor requests through their account:
Dedicated "Request List" page in account
Check status (Pending, Approved, Disapproved, Completed)
See applied discounts on approved quotes
Access direct checkout links
Seamless Checkout Integration
Direct checkout links sent via email
Pre-filled cart with quoted products
Automatic discount application
Quotation marked complete after order
Step-by-Step Usage Guide
Step 1: Install and Configure the Addon
Setting up Page Ranker requires a few configuration steps to connect your external services:
Download and install the addon from CS-Cart marketplace or Ecartify website
Navigate to Add-ons → Page Ranker → Settings
Enter your Google Search Console Client ID
Enter your Google Search Console Client Secret
Configure Gemini AI Credentials for AI-powered suggestions
Optionally add OpenAI Credentials for alternative AI suggestions
Note: You'll need to create a Google Cloud project and obtain OAuth credentials. The addon includes detailed documentation for this process.
Step 1: Customer Requests Quote from Product Page
Navigate to any product detail page
Enter the desired quantity
Click "Request Quotation" button
Add optional notes
Submit the request
Receive instant confirmation email
Step 2: Bulk Quotation Request from Account
Sign in and navigate to Account
Click "Request Quotation"
Use product picker to select multiple products
Enter quantity for each product
Add notes about requirements
Submit multi-product request
Step 3: Admin Reviews and Manages
Access Request List:
View all quotation requests organized by status
Review Details:
Check customer info, products, and quantities
Apply Discounts:
Choose percentage or absolute discount type
Approve/Disapprove:
Make final decision on the request
Step 4: Customer Completes Order
Customer clicks checkout link in email
Cart pre-filled with quoted products
Discount automatically applied
Customer completes the order
Quotation marked as "Completed"
Ecartify: Request Quotation transforms your CS-Cart store into a professional B2B sales platform with intelligent quotation management, automated workflows, and flexible pricing capabilities.
If you want to attract wholesale buyers, streamline bulk order negotiations, and provide personalized pricing experiences, this addon is essential for growing your B2B sales.
Ready to Boost Your B2B Sales?
Stop losing wholesale customers to complicated ordering processes. Upgrade to Ecartify: Request Quotation and provide the professional quotation experience B2B buyers expect.
Transform Your CS-Cart SEO with AI-Powered Analytics and Optimization
Page Ranker
Running a successful e-commerce store requires more than just great products. You need to be visible on search engines, track your performance metrics, and continuously optimize your content for better rankings.
But CS-Cart's default capabilities don't provide integrated Google Search Console data, AI-powered SEO suggestions, or comprehensive page-level optimization tools.
Introducing Ecartify: Page Ranker — an advanced SEO analytics and optimization extension that brings Google Search Console insights, AI-powered content suggestions, and comprehensive SEO analysis directly into your CS-Cart admin panel.
What is Ecartify: Page Ranker?
Ecartify: Page Ranker is a comprehensive SEO management tool that enhances your CS-Cart store with powerful features designed to improve your search engine visibility and optimize your content:
Direct Google Search Console integration for real-time performance data
AI-powered SEO suggestions using Gemini and OpenAI
Comprehensive SEO analysis for products, categories, and pages
Visual dashboards showing impressions, clicks, and performance metrics
Intelligent meta title, description, and URL optimization
Multi-dimensional data analysis by pages, queries, countries, and devices
This addon is built for store owners who want to leverage data-driven insights and cutting-edge AI to dominate search engine rankings.
Key Features of Ecartify: Page Ranker
Google Search Console Integration:
Connect your CS-Cart store directly to Google Search Console for comprehensive search performance insights:
One-click authorization with Google Search Console
Secure OAuth integration using Client ID and Secret
Real-time synchronization of search performance data
Track impressions, clicks, CTR, and average positions
No manual data exports or third-party tools needed
All your search console data is accessible directly within CS-Cart's familiar admin interface.
Comprehensive Analytics Dashboard:
View your store's search performance through multiple analytical lenses with beautiful visual representations:
Pages Analysis
Track performance of individual URLs and landing pages
Query Analysis
Discover which search terms drive traffic to your store
Country Analysis
Understand geographic distribution of your search traffic
Device Analysis
Compare desktop, mobile, and tablet search performance
Each analysis type features both interactive graphs and detailed data tables for comprehensive insights.
AI-Powered SEO Optimization:
Leverage cutting-edge AI technology to improve your content with intelligent suggestions:
Integration with Google Gemini AI for advanced content analysis
OpenAI integration for alternative optimization approaches
AI-generated meta title suggestions optimized for click-through rates
Intelligent meta description recommendations
SEO-friendly URL slug suggestions
Comparative analysis showing improvements over existing content
Example AI Optimizations:
Current: "Blue Shoes" → AI Suggests: "Premium Blue Running Shoes for Men - Comfortable & Durable"
Current: "shoes" → AI Suggests: "premium-blue-running-shoes-men"
AI analyzes keyword density, length optimization, and engagement potential
Page-Level SEO Analysis:
Get detailed SEO health reports for every product, category, and page in your store:
Dedicated "Page Ranker" tab in product, category, and page editors
Real-time SEO score and improvement points
Meta title analysis with length and keyword optimization
Meta description quality assessment
URL structure evaluation and recommendations
Actionable improvement suggestions for each element
No more guessing what needs improvement—get specific, actionable recommendations for every page.
Visual Data Representation:
Transform raw Google Search Console data into meaningful insights with professional visualizations:
Interactive line charts showing trends over time
Bar graphs for comparative analysis
Color-coded performance indicators
Sortable data tables with filtering options
Export capabilities for external reporting
Mobile-responsive dashboard design
Intelligent Suggestion System:
One-click optimization that compares AI suggestions against your current content:
Current vs. Suggested
Side-by-side comparison of existing and AI-optimized content
Improvement Metrics
Quantified predictions for potential ranking improvements
One-Click Apply
Instantly update your content with AI suggestions
The "Suggest to Improve" button revolutionizes content optimization by bringing enterprise-level SEO intelligence to CS-Cart.
Step-by-Step Setup Guide
Step 1: Install and Configure the Addon
Setting up Page Ranker requires a few configuration steps to connect your external services:
Download and install the addon from CS-Cart marketplace or Ecartify website
Navigate to Add-ons → Page Ranker → Settings
Enter your Google Search Console Client ID
Enter your Google Search Console Client Secret
Configure Gemini AI Credentials for AI-powered suggestions
Optionally add OpenAI Credentials for alternative AI suggestions
Note: You'll need to create a Google Cloud project and obtain OAuth credentials. The addon includes detailed documentation for this process.
Step 2: Connect to Google Search Console
Authorize your CS-Cart store to access Google Search Console data:
Click the "Connect to Search Console" button in addon settings
Sign in with your Google account that has Search Console access
Grant the necessary permissions for data access
Verify the connection status shows "Connected"
Once connected, data synchronization begins automatically and updates regularly.
Step 3: Explore the Analytics Dashboard
Access comprehensive search performance data through the Page Ranker dashboard:
Pages Tab:
View impressions and clicks for individual pages. Identify top-performing URLs and pages needing optimization.
Queries Tab:
Discover which search terms bring traffic. Find opportunities for content expansion and keyword targeting.
Countries Tab:
Analyze geographic performance. Understand where your search traffic originates and optimize accordingly.
Devices Tab:
Compare desktop vs. mobile vs. tablet performance. Optimize for device-specific user experiences.
Each tab includes both visual graphs and sortable data tables for comprehensive analysis.
Step 4: Use Page-Level SEO Analysis
Optimize individual products, categories, and pages with integrated SEO analysis:
Navigate to any product, category, or page edit screen
Click on the new "Page Ranker" tab
Review the SEO Analysis Report showing current optimization status
Check improvement points for meta title, description, and URL
Review title and description analysis with specific recommendations
Step 5: Get AI-Powered Optimization Suggestions
Use artificial intelligence to improve your SEO content with one click:
In the Page Ranker tab, click "Suggest to Improve"
The AI analyzes your current meta title, description, and URL slug
Review AI-generated suggestions with improvement explanations
Compare suggested content against your existing content
Apply suggestions with one click or manually refine them
Save changes and monitor performance improvements
Pro Tip: Test AI suggestions on lower-performing pages first to measure impact before rolling out across your entire store.
Perfect for Every E-Commerce Store
Whether you're a small boutique or large marketplace, Page Ranker helps you:
Improve Search Rankings:
Data-driven optimization based on actual Google Search Console metrics.
Save Time:
AI-powered suggestions eliminate hours of manual SEO research and writing.
Increase Click-Through Rates:
Optimized meta titles and descriptions attract more clicks from search results.
Monitor Performance:
Track the impact of your SEO efforts with comprehensive analytics.
Make Informed Decisions:
Use real data from Google to prioritize optimization efforts.
Stay Competitive:
Leverage enterprise-level SEO tools typically only available to large corporations.
The addon ensures every page in your store can be optimized using the same professional-grade tools used by Fortune 500 companies.
Ecartify: Page Ranker is the ultimate SEO solution for CS-Cart stores that want to dominate search engine results with data-driven insights and AI-powered optimization.
It transforms CS-Cart into a comprehensive SEO command center—combining Google Search Console integration, artificial intelligence, and actionable analytics in one seamless package.
If you want to increase organic traffic, improve search rankings, and leverage cutting-edge AI for content optimization, this addon will completely revolutionize how you approach SEO in CS-Cart.
Ready to Dominate Search Rankings?
Stop guessing and start optimizing with real data and AI intelligence. Upgrade to Ecartify: Page Ranker and transform your CS-Cart store into an SEO powerhouse that attracts more organic traffic and drives sustainable growth.
Turn every customer interaction into a revenue opportunity with proven upselling strategies that increase order value and customer satisfaction.
Ecartify: Customer Upsell – Boost Sales with Gamified Engagement
Transform your checkout experience with interactive spin wheels and quiz games! The Customer Upsell addon engages customers at the perfect moment, increases average order value, and recovers abandoned carts through gamified discounts and smart product recommendations. Perfect for e-commerce stores looking to boost conversions!
Key Features of Customer Upsell
Interactive Spin Wheel: Engage customers with exciting spin-to-win games offering instant discounts.
Quiz Games: Create fun quizzes that reward customers with discounts and promotions.
Product Upsells: Display related products with special discounts during checkout.
Fun & Memorable: Gamification creates positive shopping memories
Reward Feeling: Customers feel they've earned their discount
Brand Differentiation: Stand out from competitors with interactive features
Transform Your Checkout Into a Revenue Machine
Your Customer Upsell addon is ready to revolutionize how customers interact with your store. Say goodbye to boring checkouts and abandoned carts. With gamified engagement and smart upselling, you can:
Pro Tip: Start with a 60% win rate (more green segments) and 10% win discount to maximize engagement. After analyzing data, adjust segment ratios and discount amounts to optimize profitability. The abandoned cart notifications work best with a 2% discount code for the first reminder and 5% for the 7-day follow-up!
Ready to gamify your checkout? Install Customer Upsell today and watch your conversion rates and revenue soar!
AI Creator helps you generate high-quality product content for your CS-Cart store using AI. Create product descriptions, titles, and SEO text in seconds, with optional multilingual and translation support.
AI Creator – The Product Content Generator & Translation Engine for CS-Cart
AI Creator supercharges your CS-Cart store with powerful AI content generation. Create professional, SEO-friendly, and multilingual product content in seconds using Google Gemini or OpenAI (ChatGPT).
Go beyond content with built-in chat and review translation, including a free translation option to reduce costs. One addon. Two AI engines. Complete automation for modern CS-Cart stores.
Key Features of AI Creator
Dual AI Engine: Gemini + ChatGPT:
Use Google Gemini for creative content or OpenAI (ChatGPT) for SEO-focused writing.
Choose what fits your needs and budget
Full Multilingual Support: Generate content in any language your store supports: English, Hindi, Arabic, French, German, Spanish — or any custom language used in CS-Cart.
Works on All CS-Cart Setups:
CS-Cart, Multi-Vendor, Ultimate, Any theme, Any hosting, Any custom modifications
NEW: AI Chat & Review Translation System: A powerful built-in translation feature designed for global stores.(included free api for translation)
Easy Installation: No technical expertise required—get started in just a few minutes.
Step-by-Step Setup Guide
Step 1: Install the Addon
Installing the AI Creator Addon is simple:
Login to your CS-Cart admin panel.
Go To Add-ons → Manage add-ons→ Click on ⚙️ gear icon→ Manual installation
Upload the provided ZIP file of the addon.
Once uploaded, the addon will appear under CS-Cart - Add-ons.
Now click on the AI Creator add-on and add the required settings.
This process takes only a few minutes and requires no coding knowledge.
Step 2: Configure the Settings
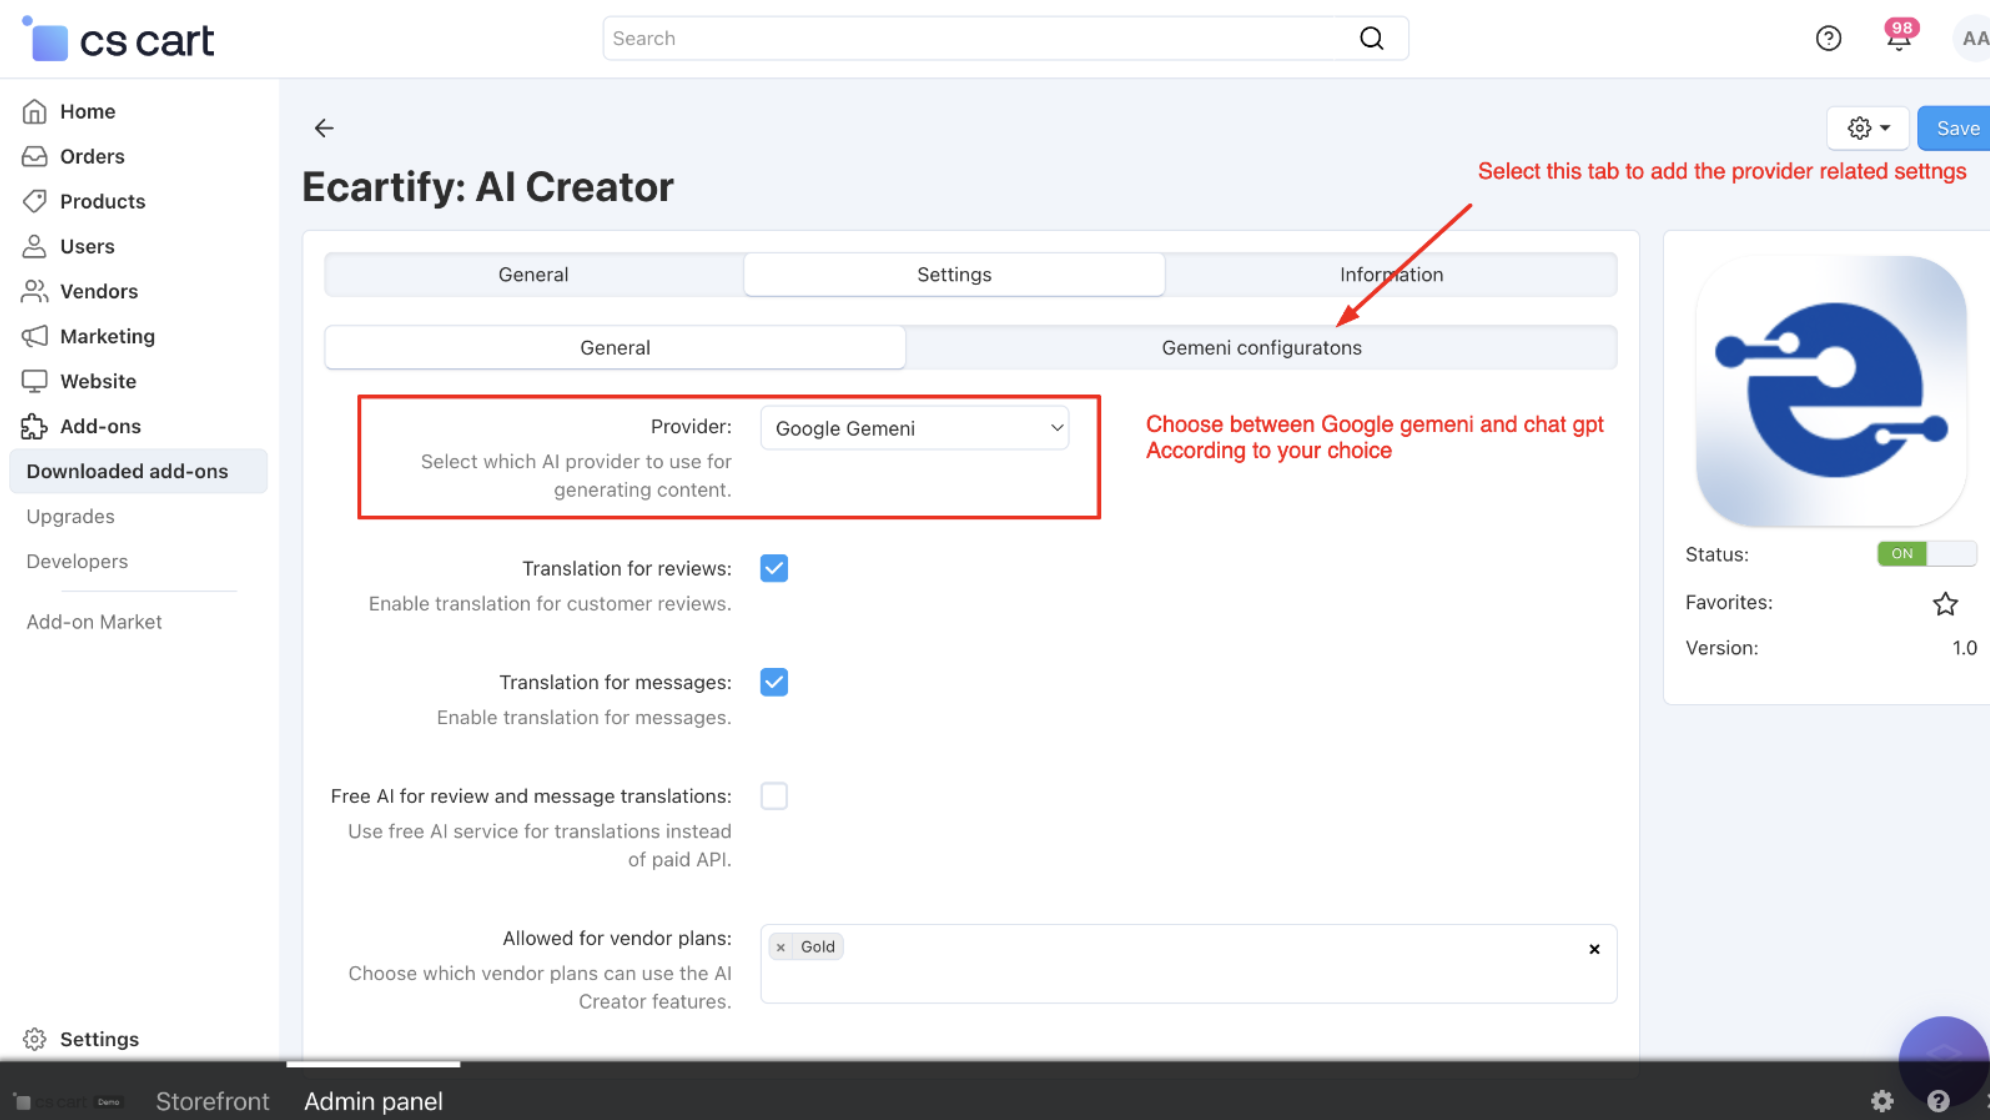
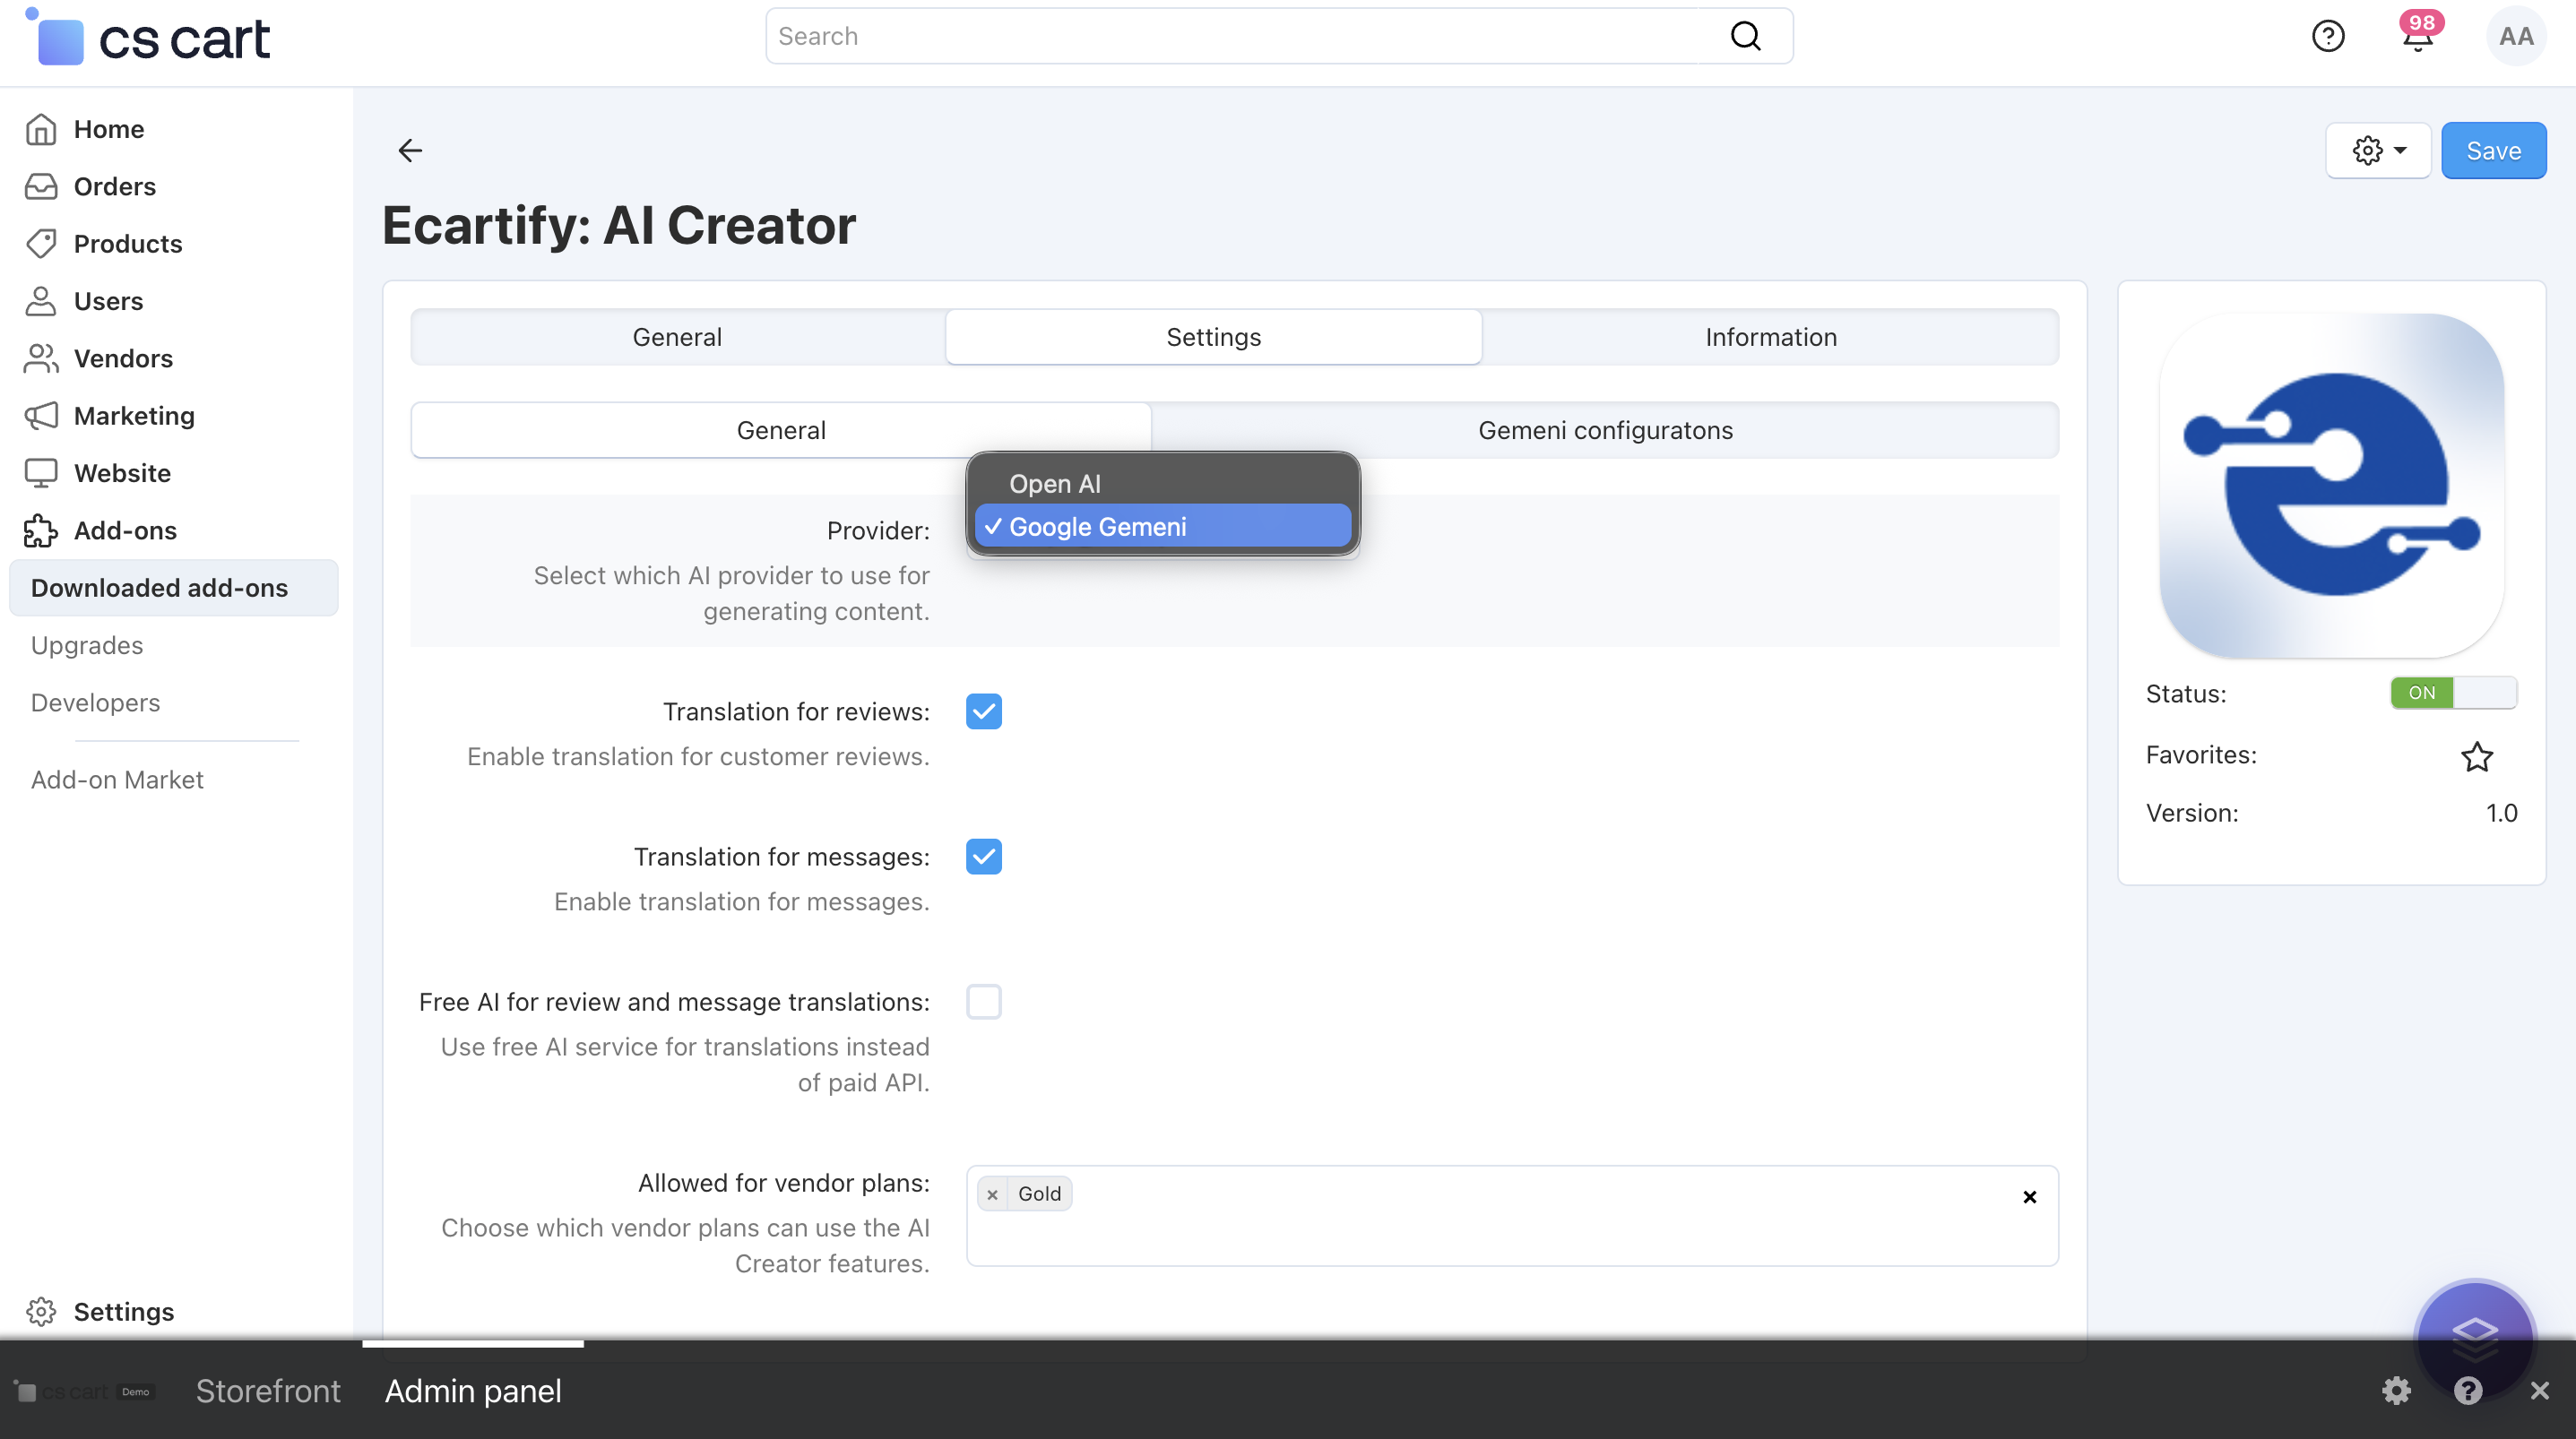
After installing the add-on, navigate to the Add-ons → Manage add-ons section and open the AI Creator add-on settings page. Here, you can configure the general options that control how the AI Creator works across your store, including content generation, translations, and vendor access:
i) Switch between two AI engines:
Use Google Gemini for creative, detailed, and natural-sounding content, or OpenAI (ChatGPT) for structured, precise, and SEO-optimized writing.
You can change the AI anytime based on your content goals, accuracy needs, or budget — giving you full control and flexibility.
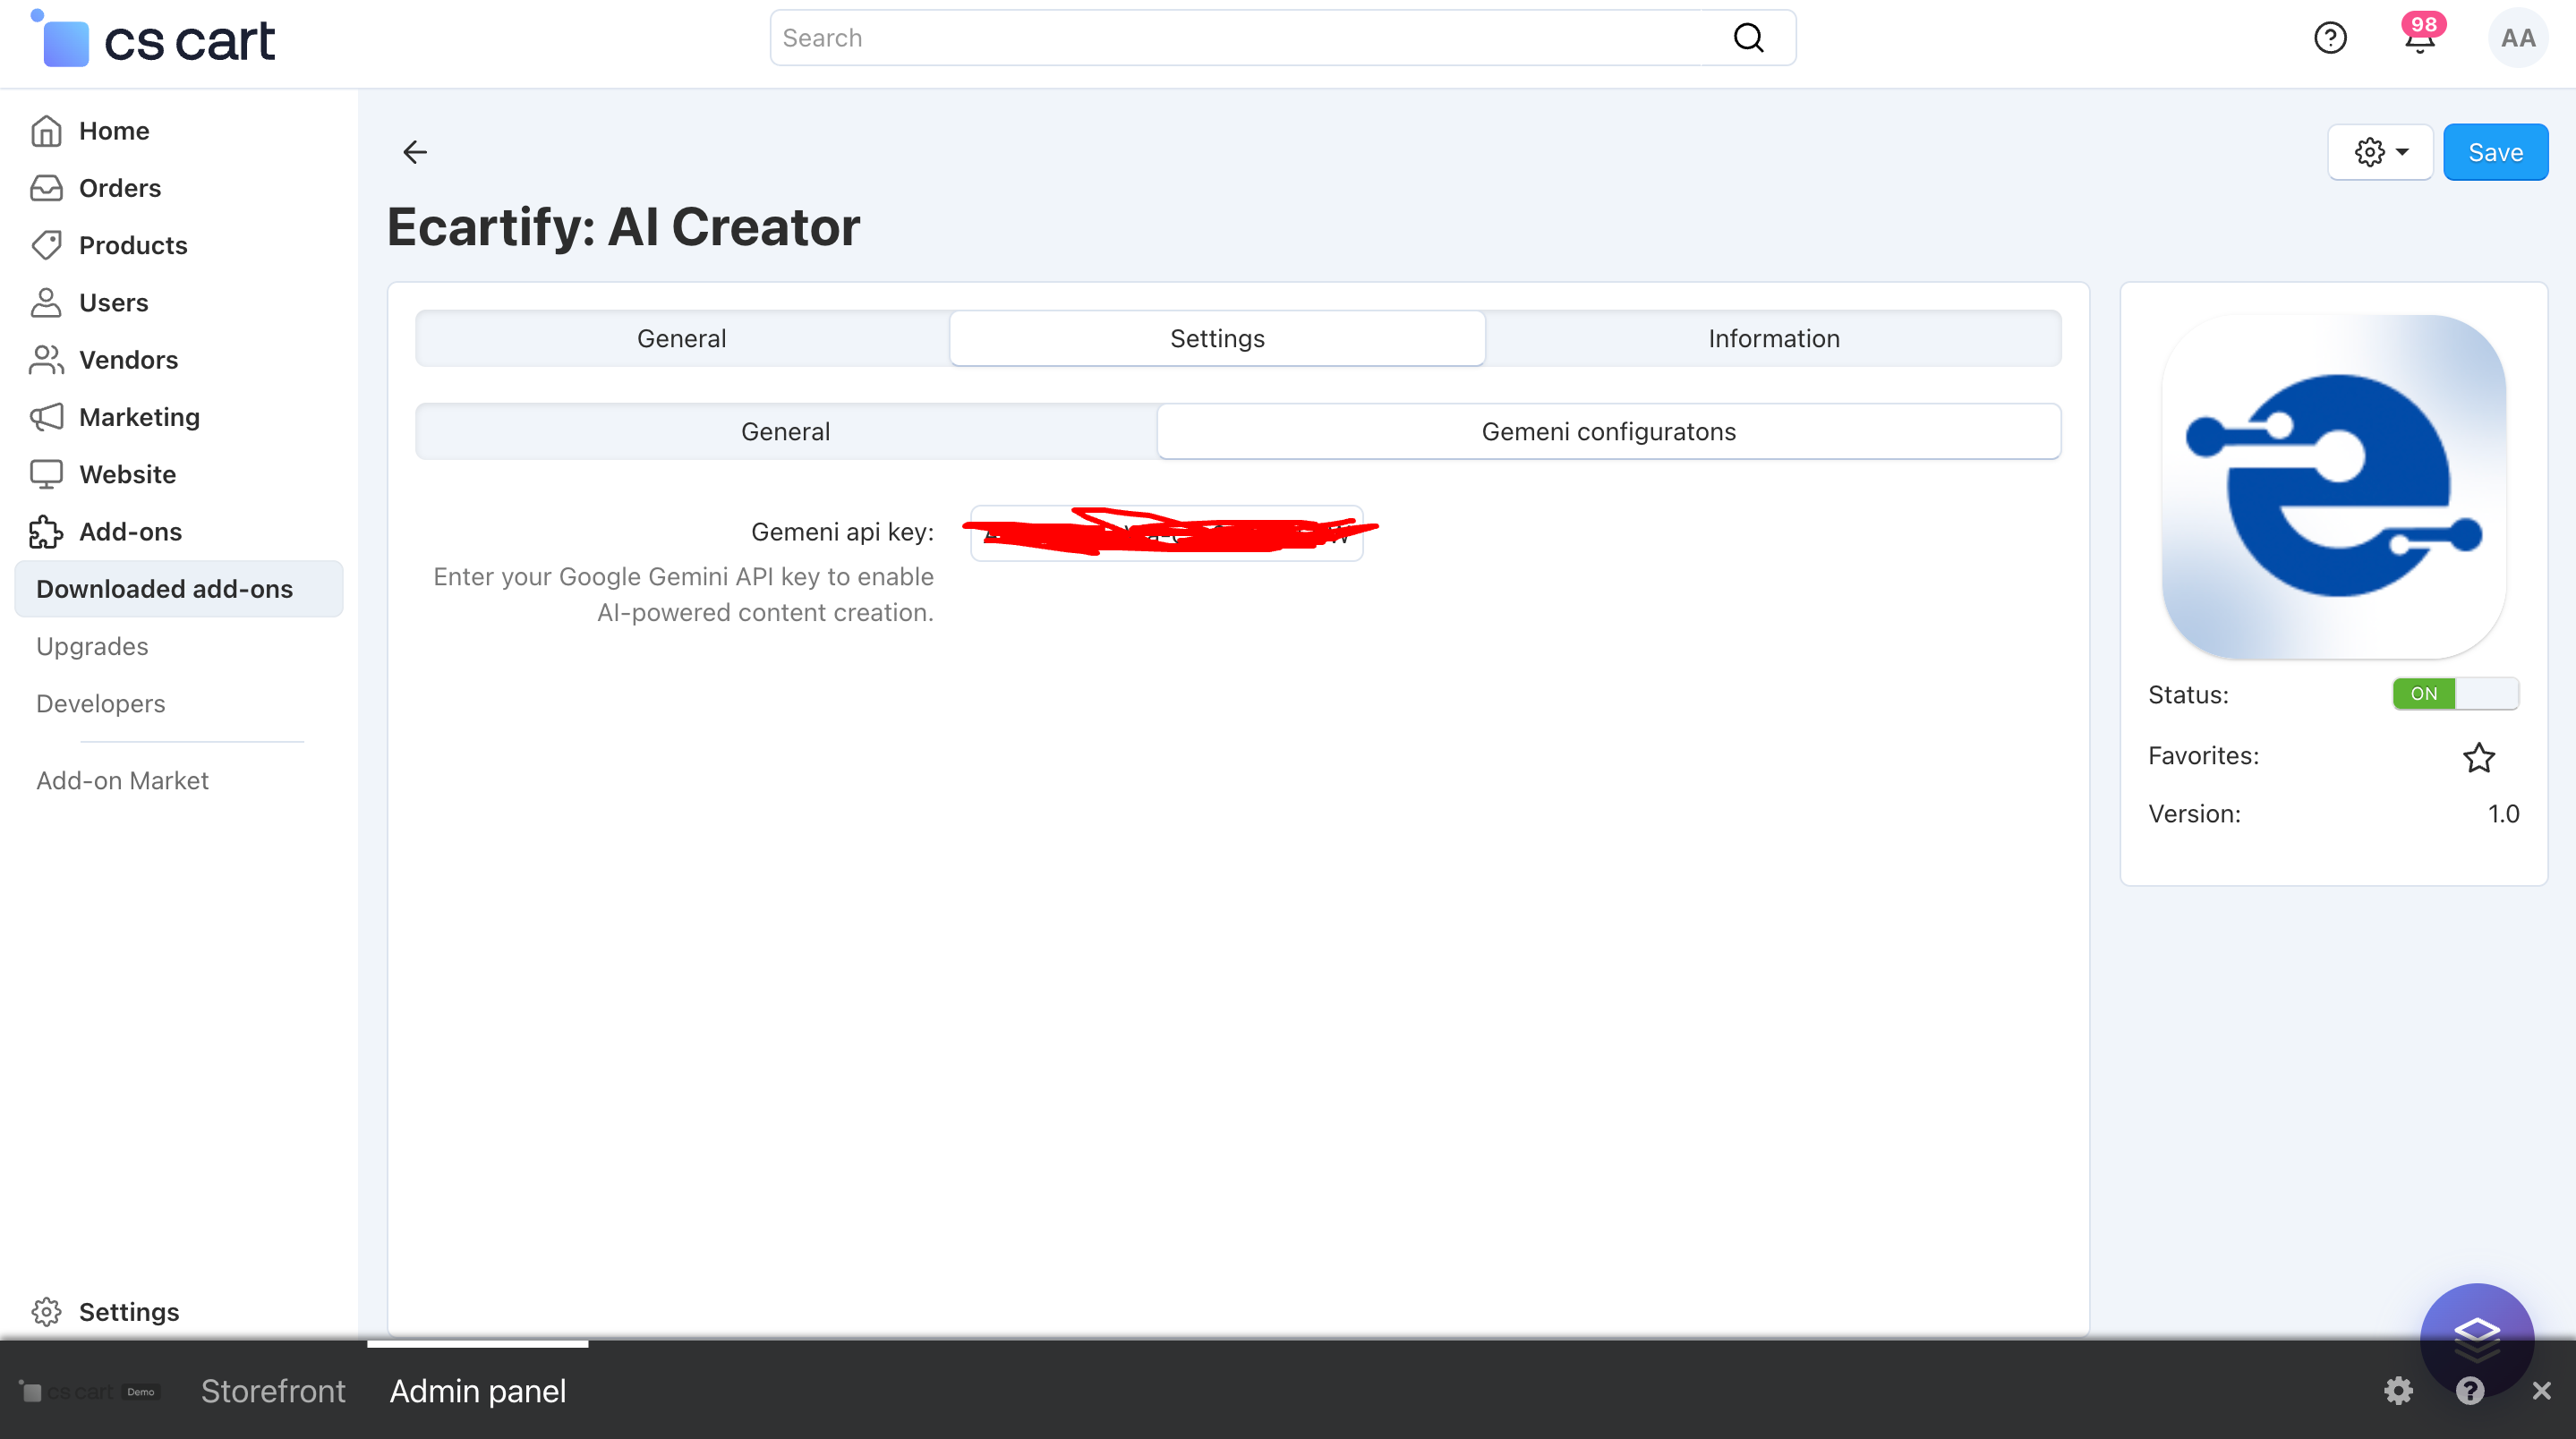
Select the preferred AI provider to generate content and translations. This provider will be used for all AI-powered features enabled in the add-on. Choose the provider that best fits your content style, performance needs, or cost preferences.
Make sure the required API key is added in the corresponding tab before saving the settings.
Without a valid API key, AI-powered features will not work.
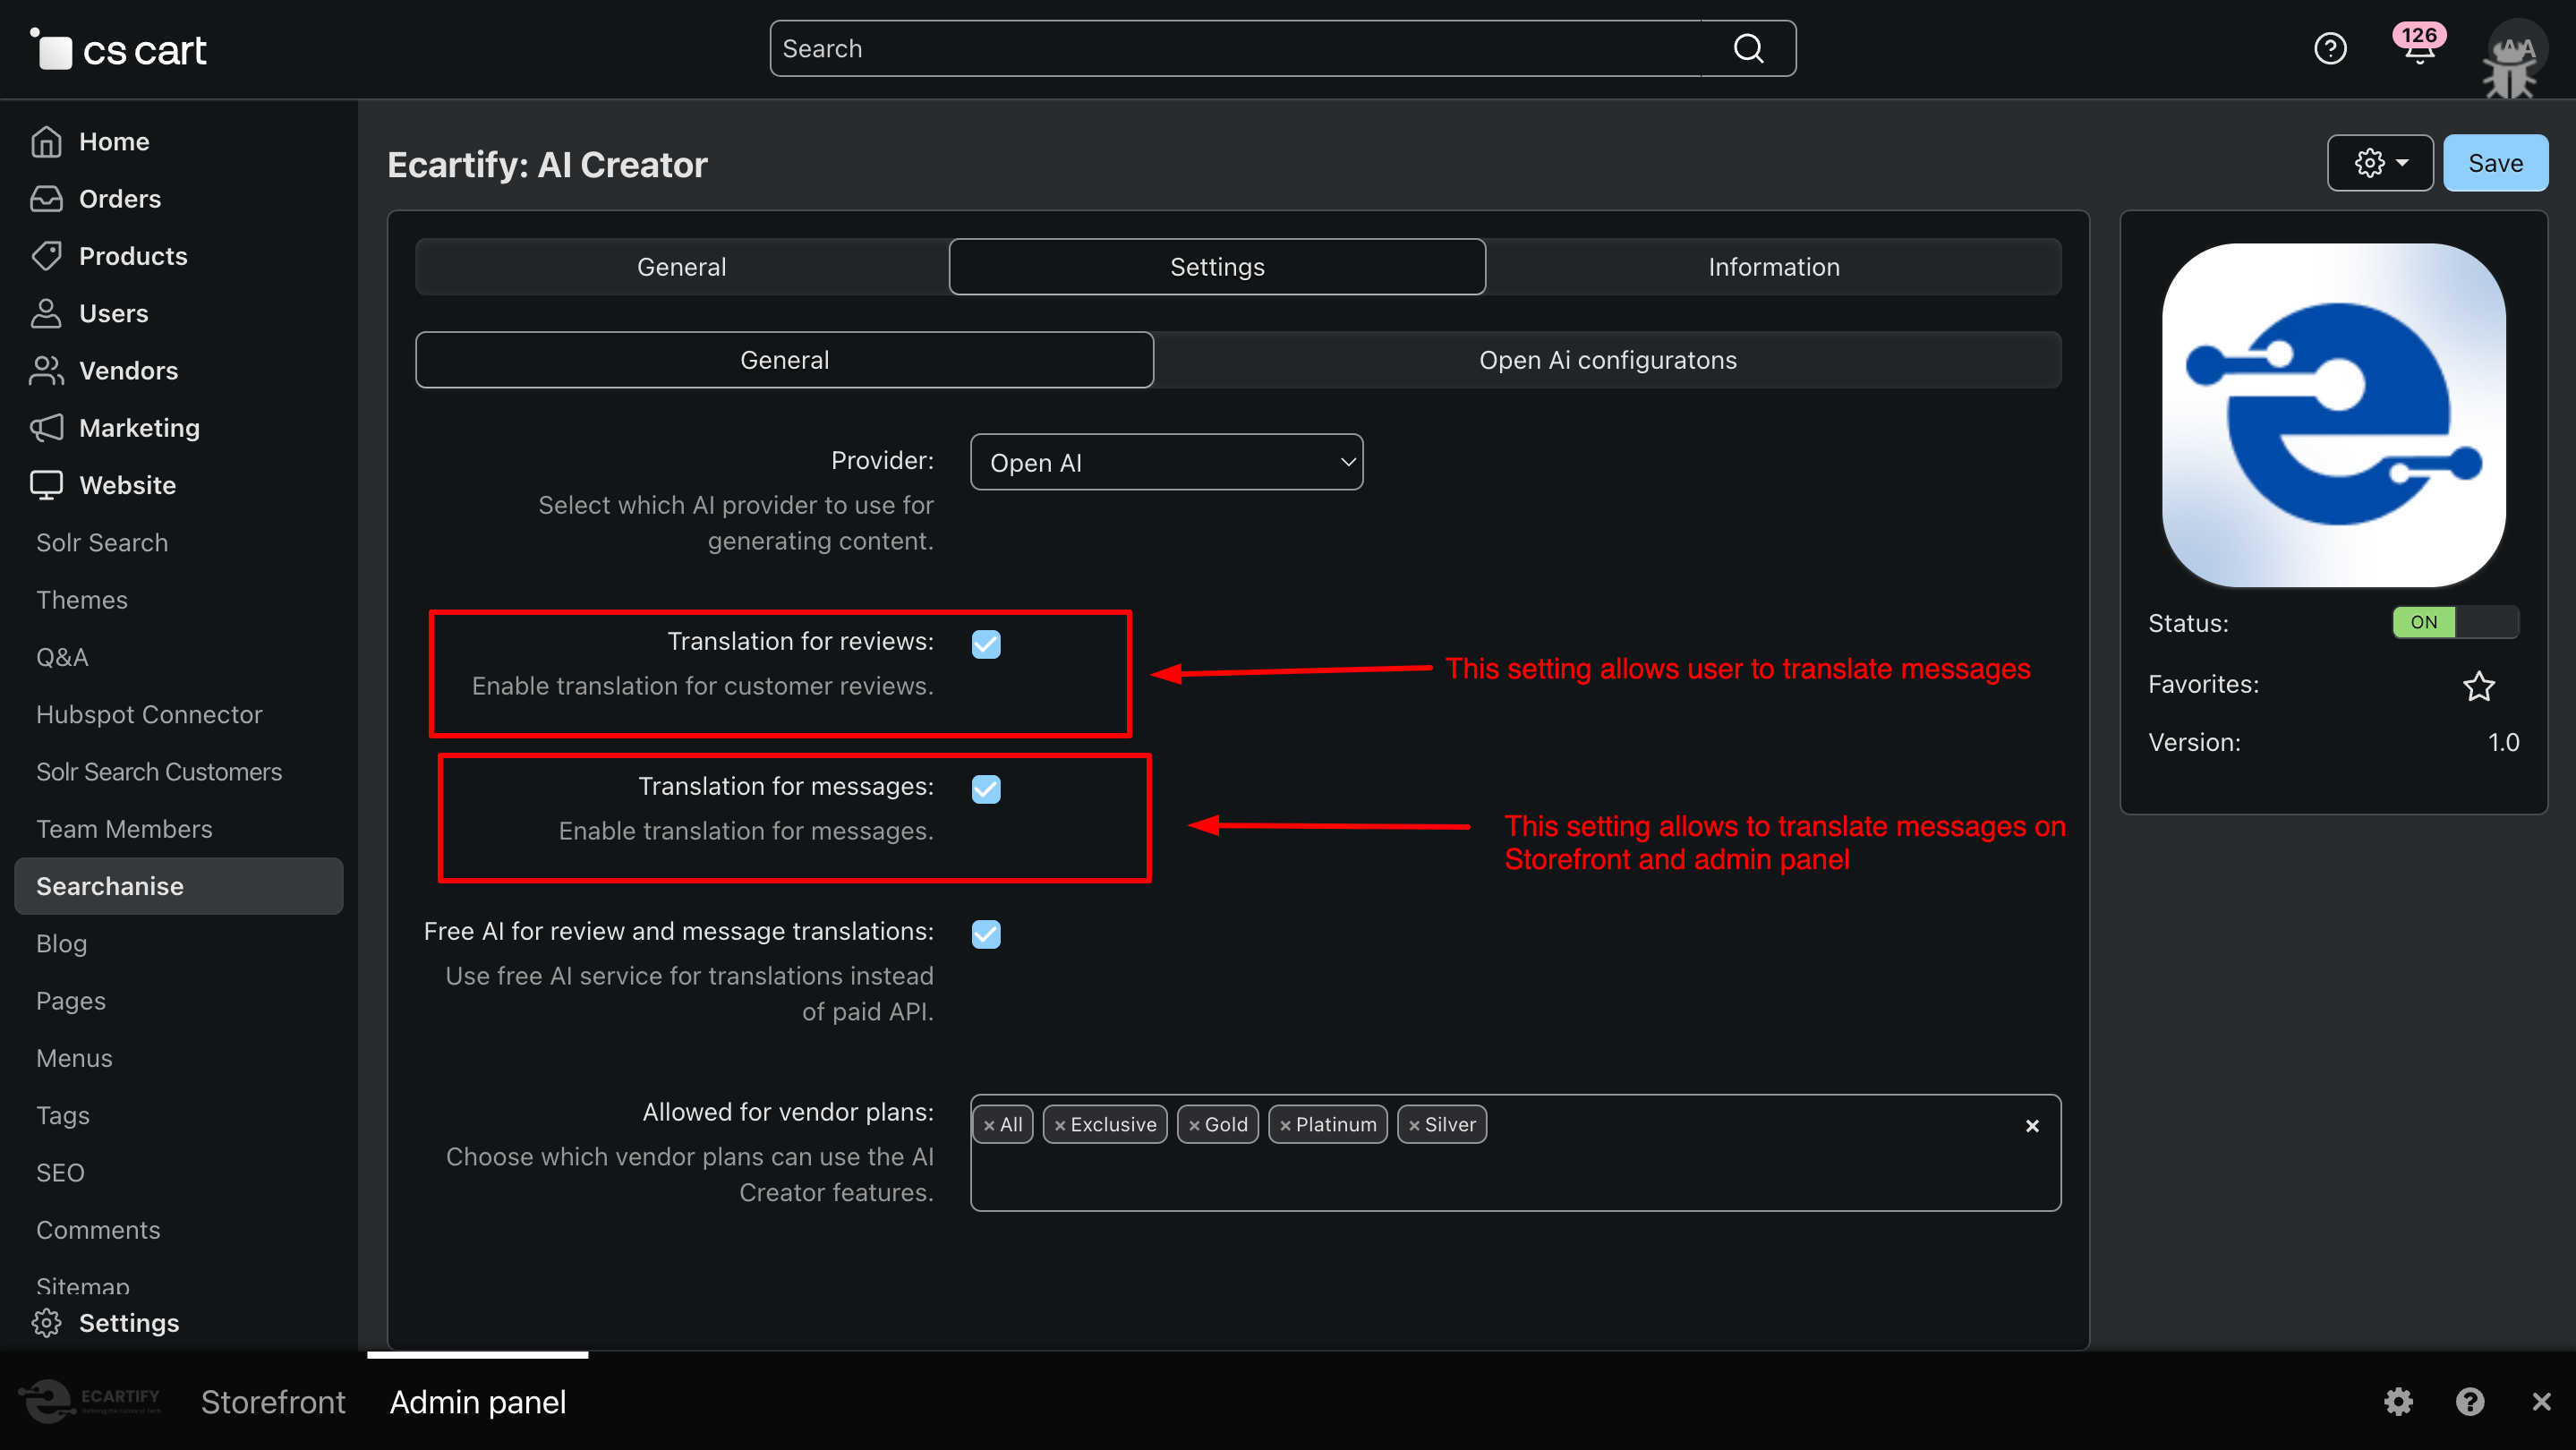
Use the provided options to enable or disable translation for customer reviews and customer/vendor messages as needed. You can easily turn these features on or off from the settings panel — refer to the screenshot for a step-by-step view on how to enable them.
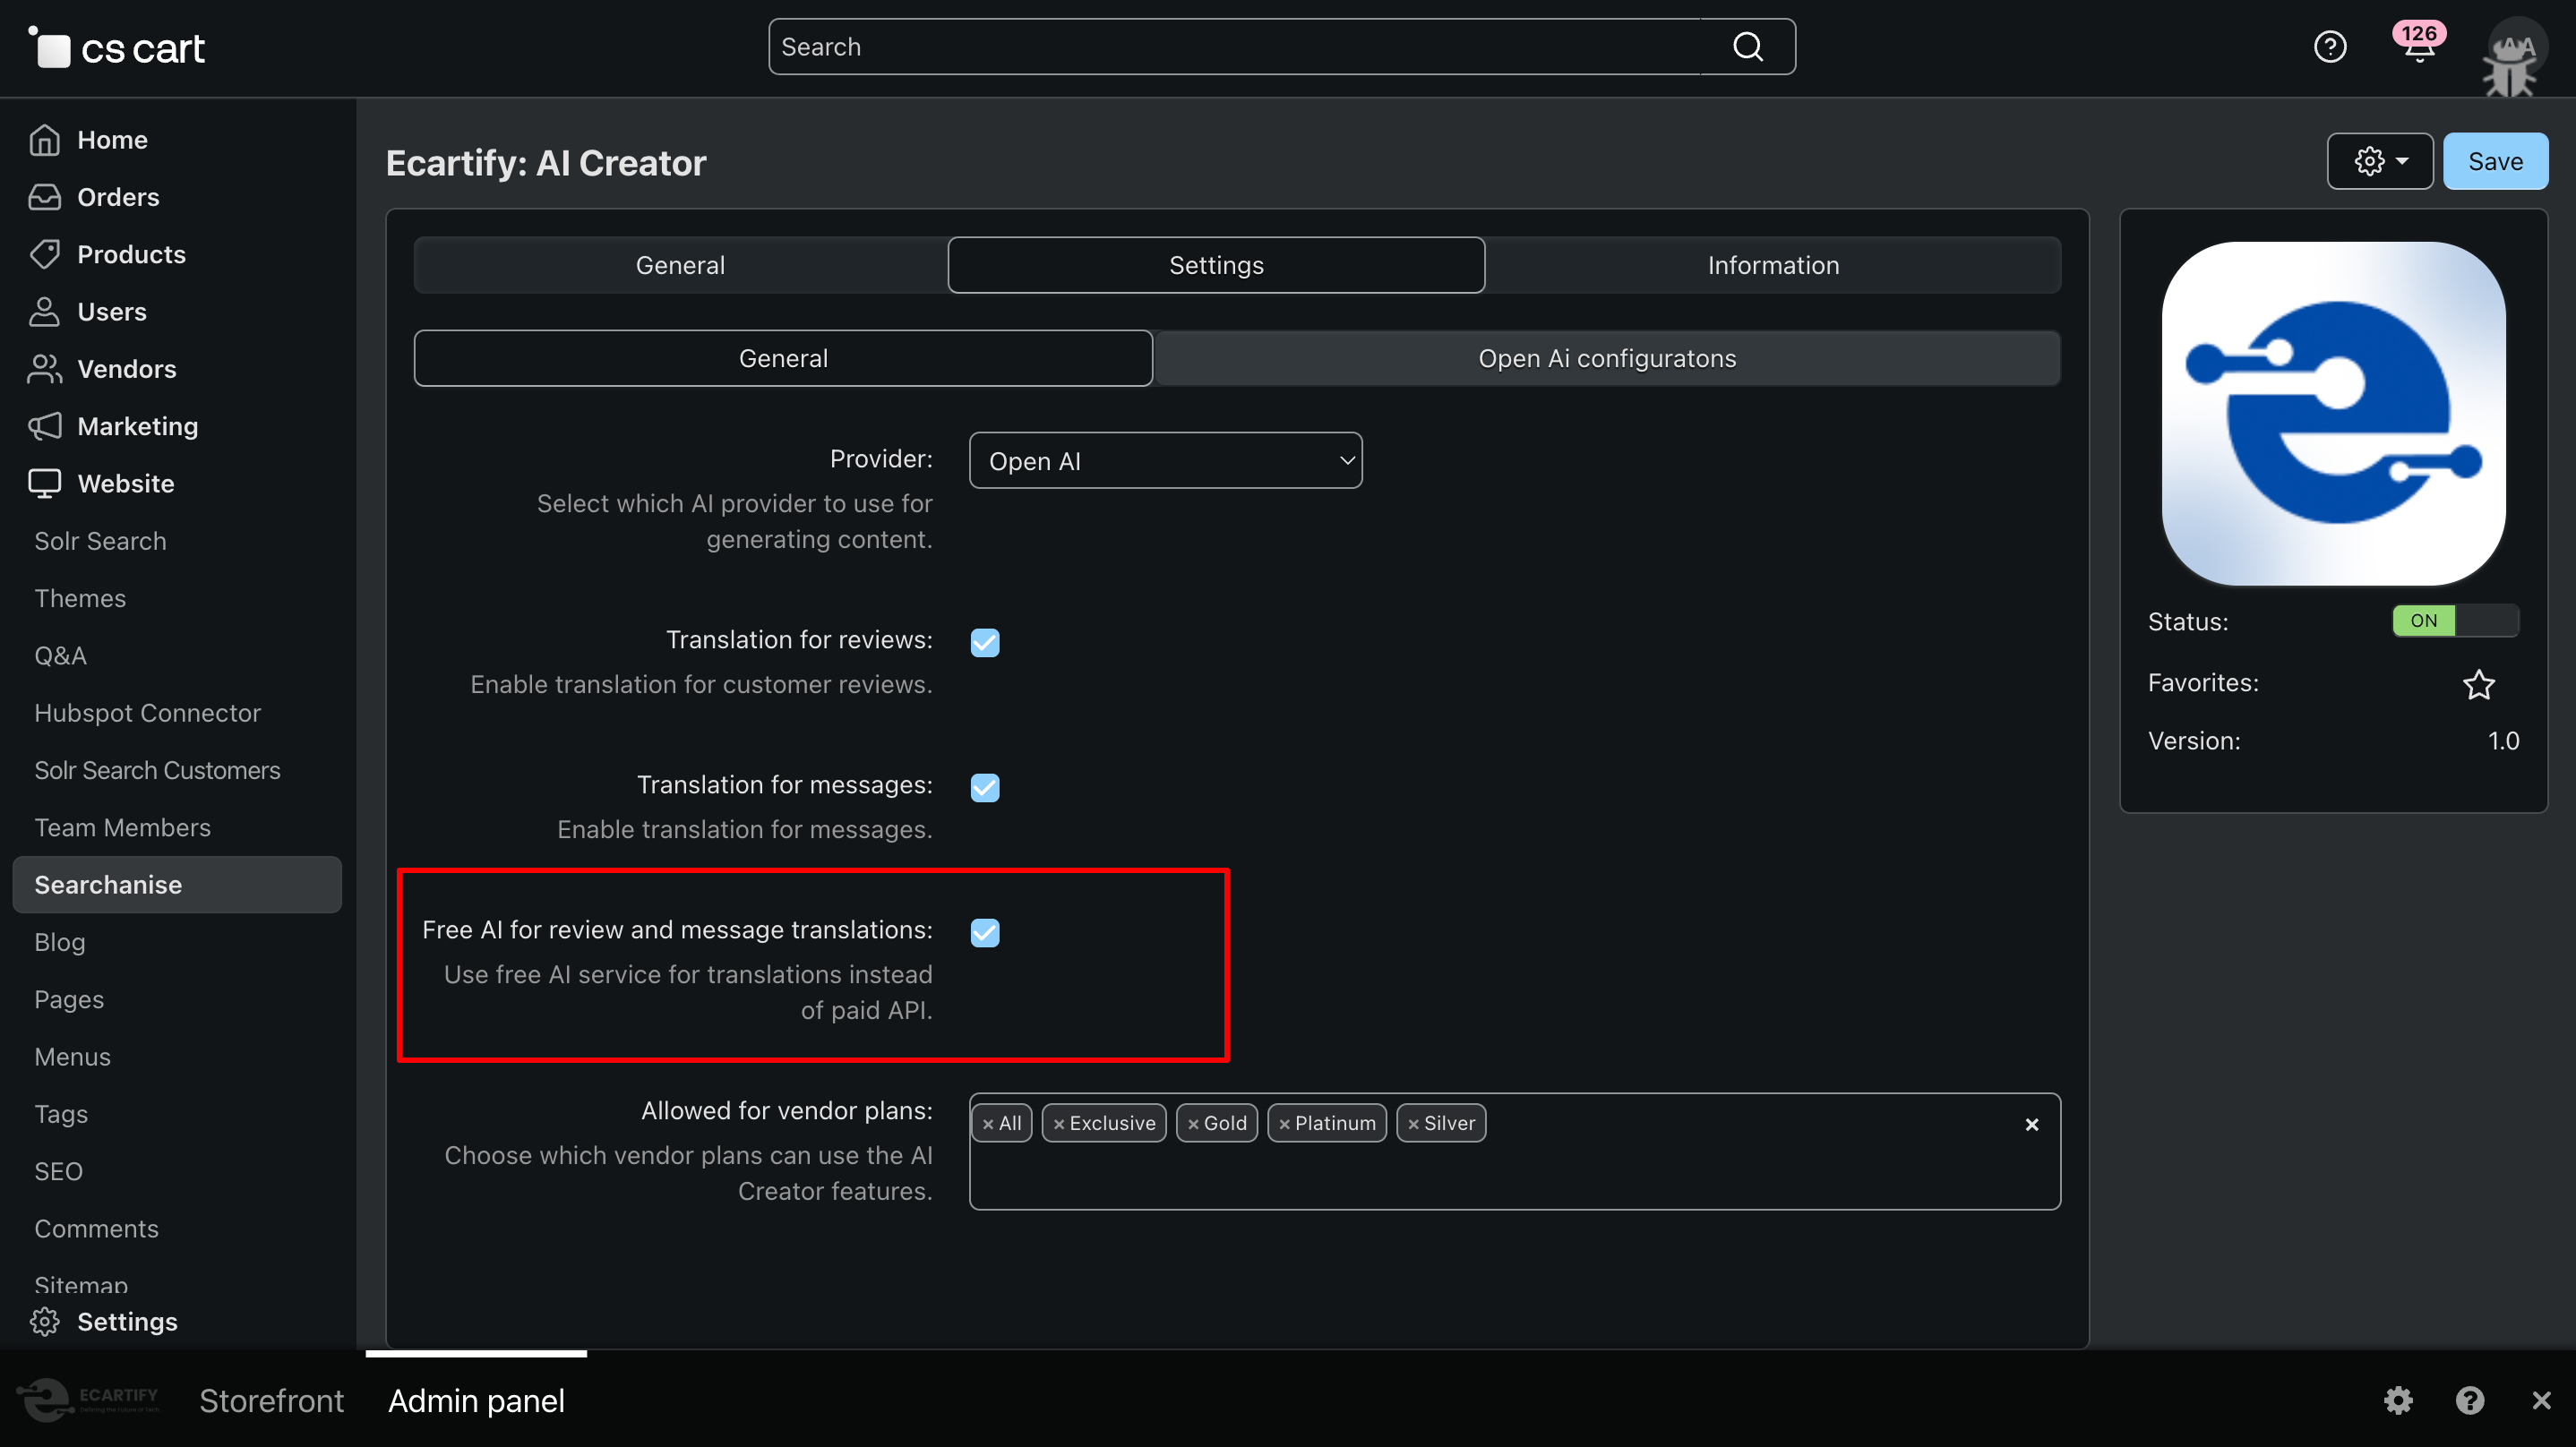
iii) Free AI for review and message translations:
Enable this option to use the built-in free translation service for translating customer reviews and messages instead of paid AI APIs. This helps reduce or completely avoid API costs while still allowing smooth multilingual communication. You can switch to Gemini or OpenAI (ChatGPT) anytime if higher accuracy is needed.
iv) Allowed for vendor plans:
Use this option to select which vendor plans are allowed to access and use the AI Creator features. This gives you full control over AI usage by vendors and helps manage permissions based on different subscription or pricing plans.
All settings are now configured — AI Creator is ready to generate and translatecontent for your store.
Step 3: Unlock the Power of AI Creator
You can run the addon in two ways:
Generate AI-powered product content that is professional, SEO-friendly, and multilingual using Google Gemini or OpenAI (ChatGPT).
Translate customer reviews and messages instantly using AI or the free translation engine to save time and costs.
Step 4: How to generate product content
Generating content with AI Creator is quick and easy. Follow these steps:
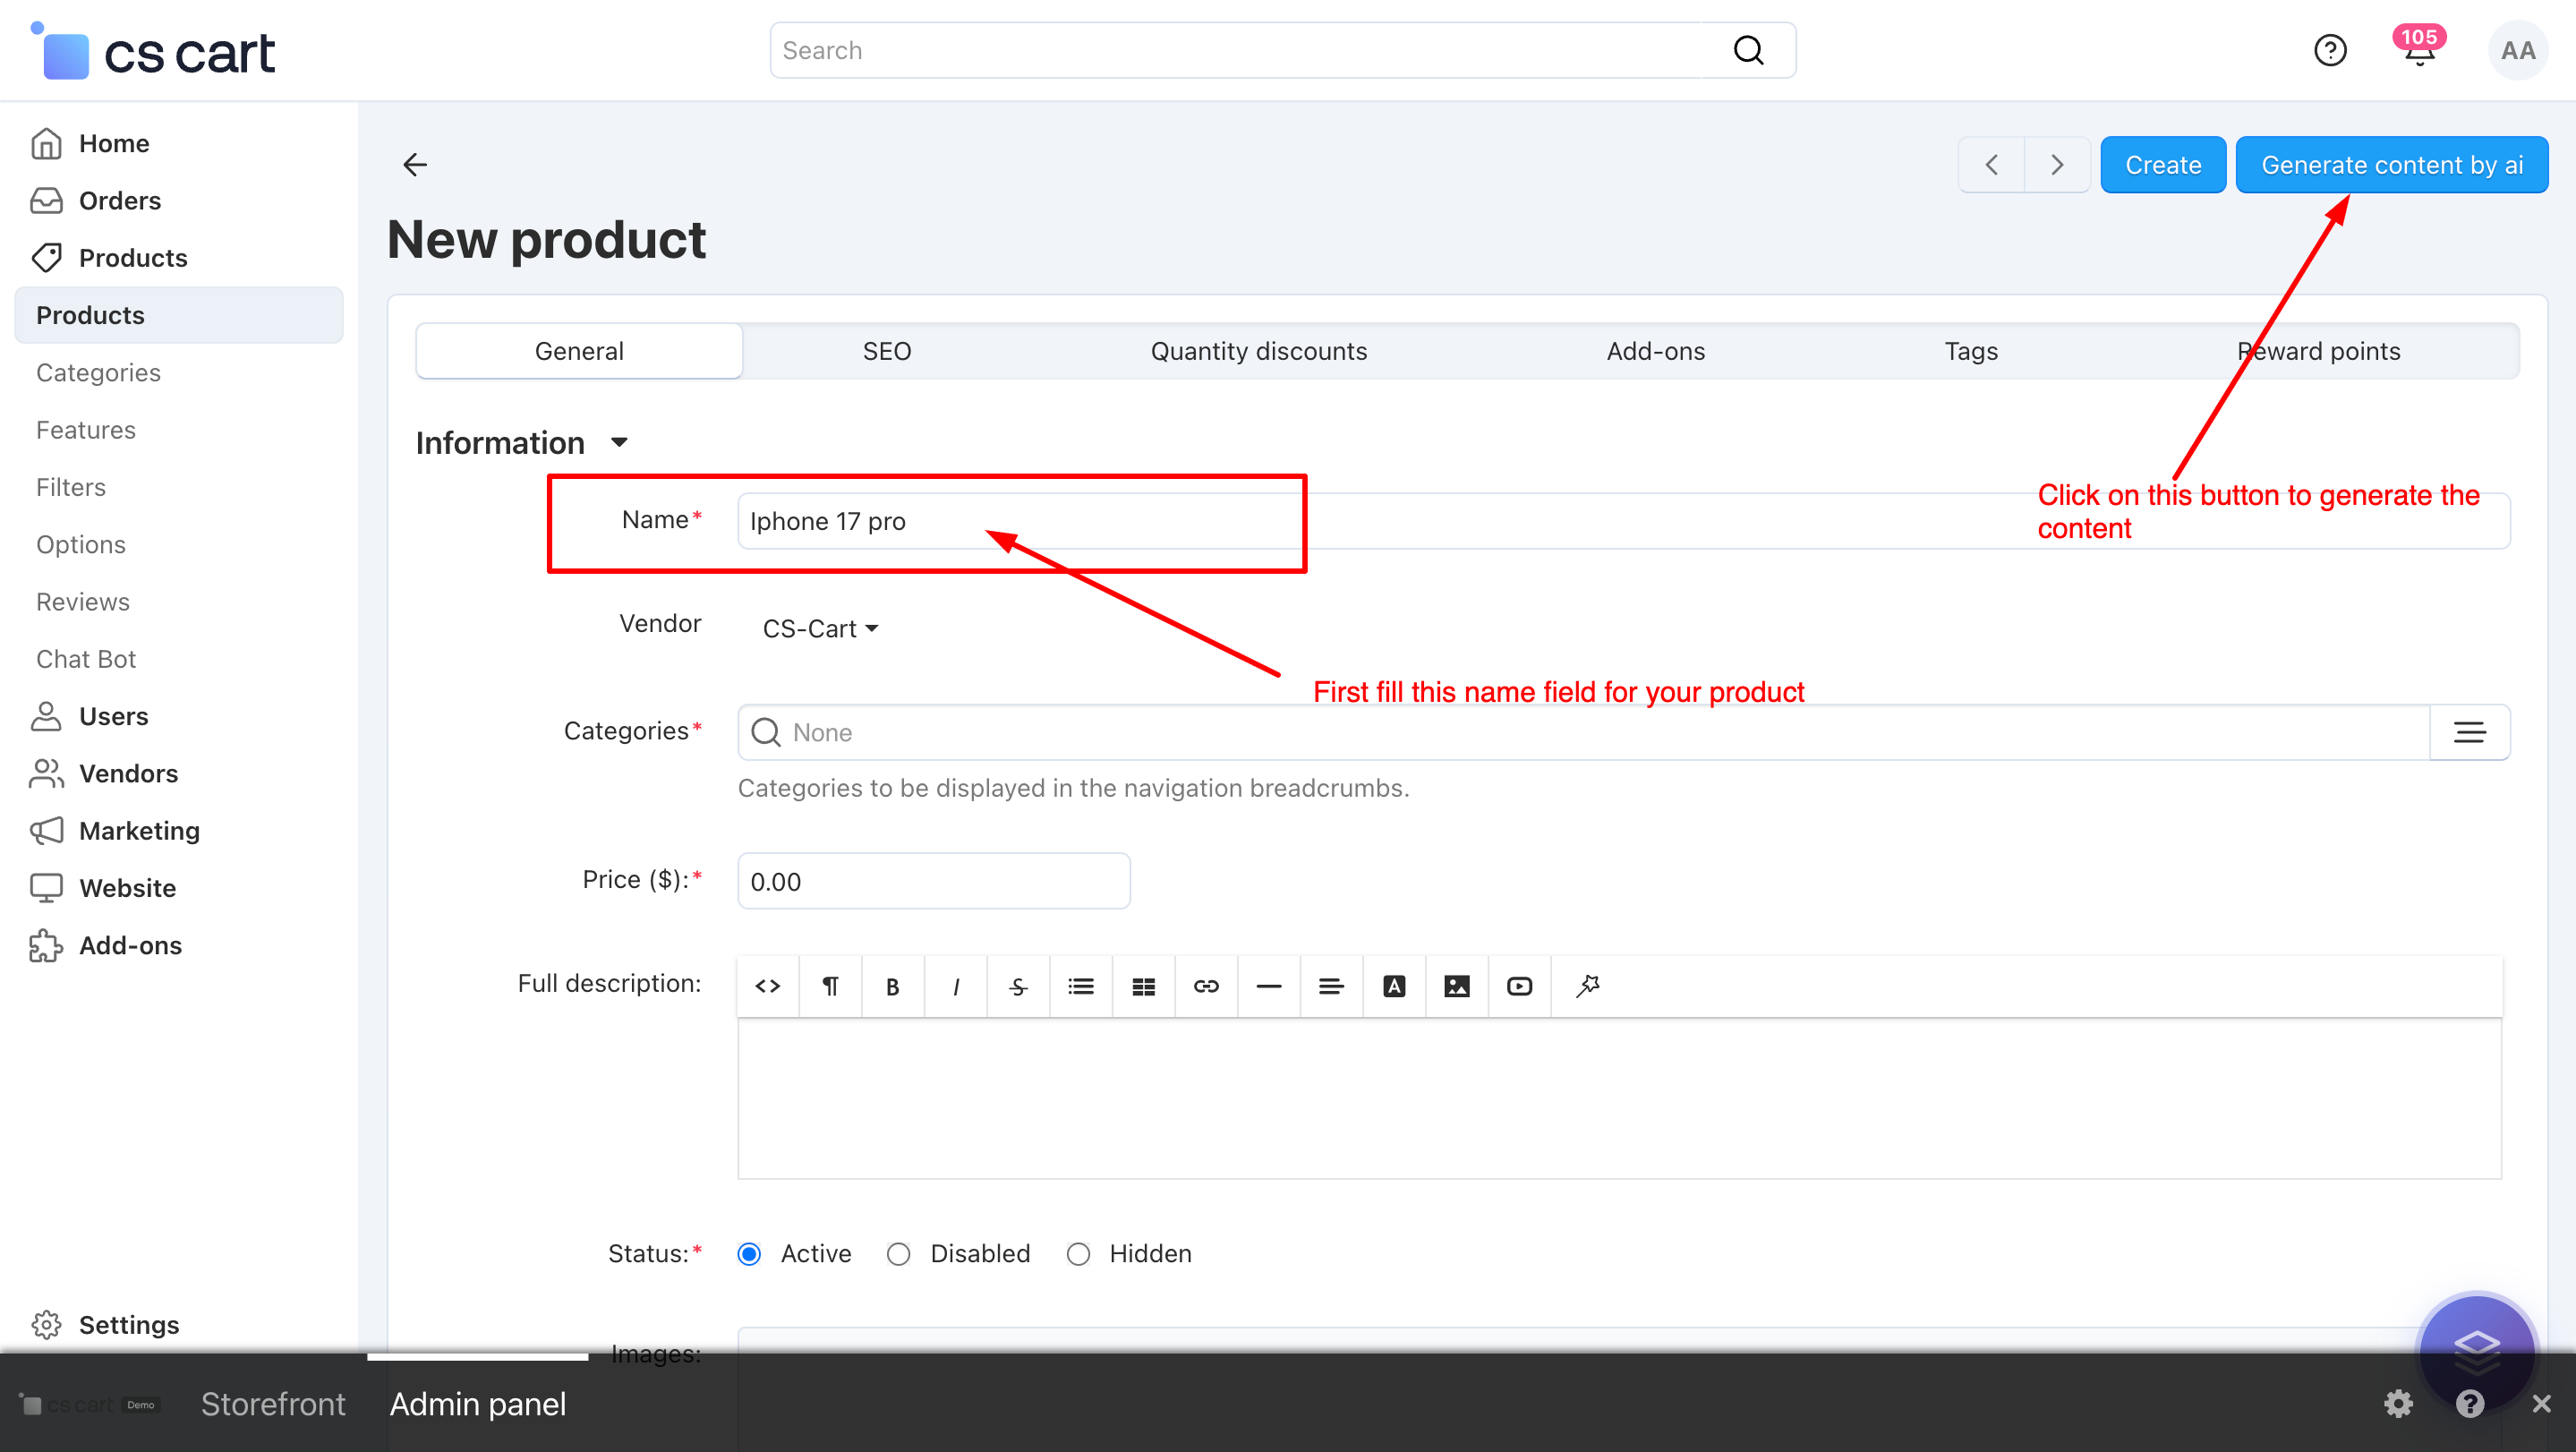
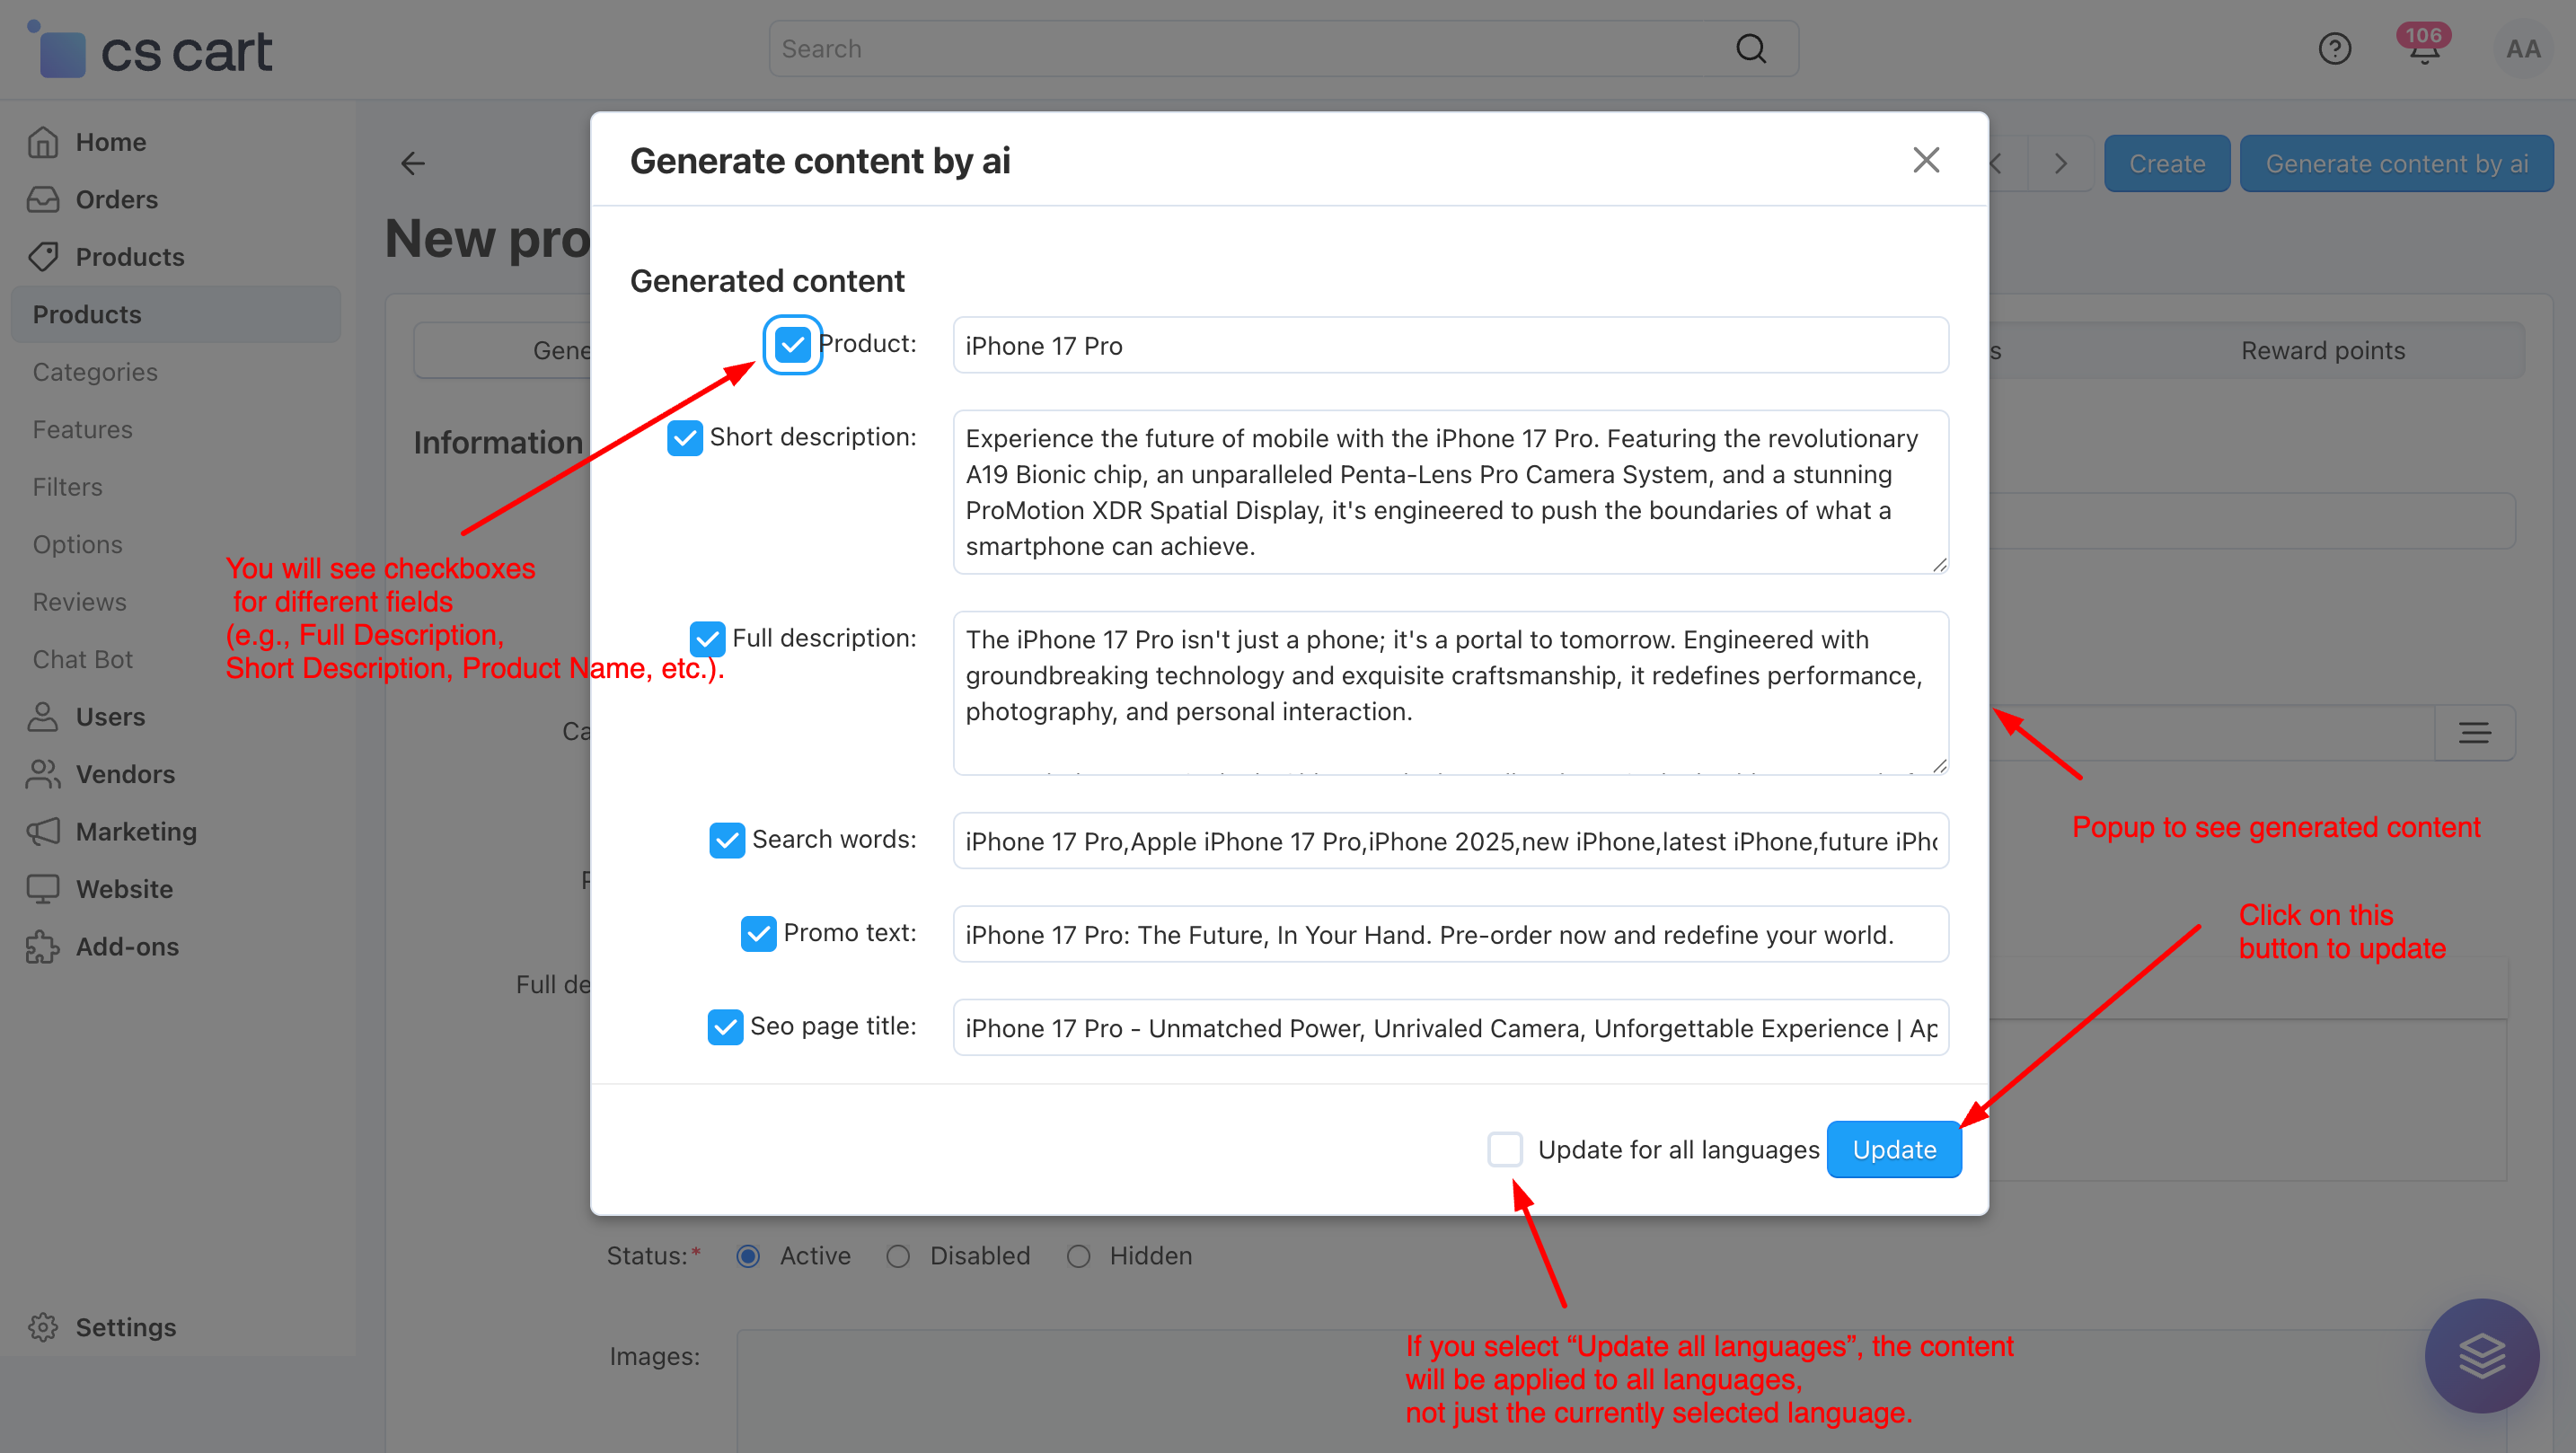
i) Open any product page (new or existing) in your CS-Cart admin panel and fill in the product title. (Note: For updating an existing proudct,click on ⚙️gear button first)
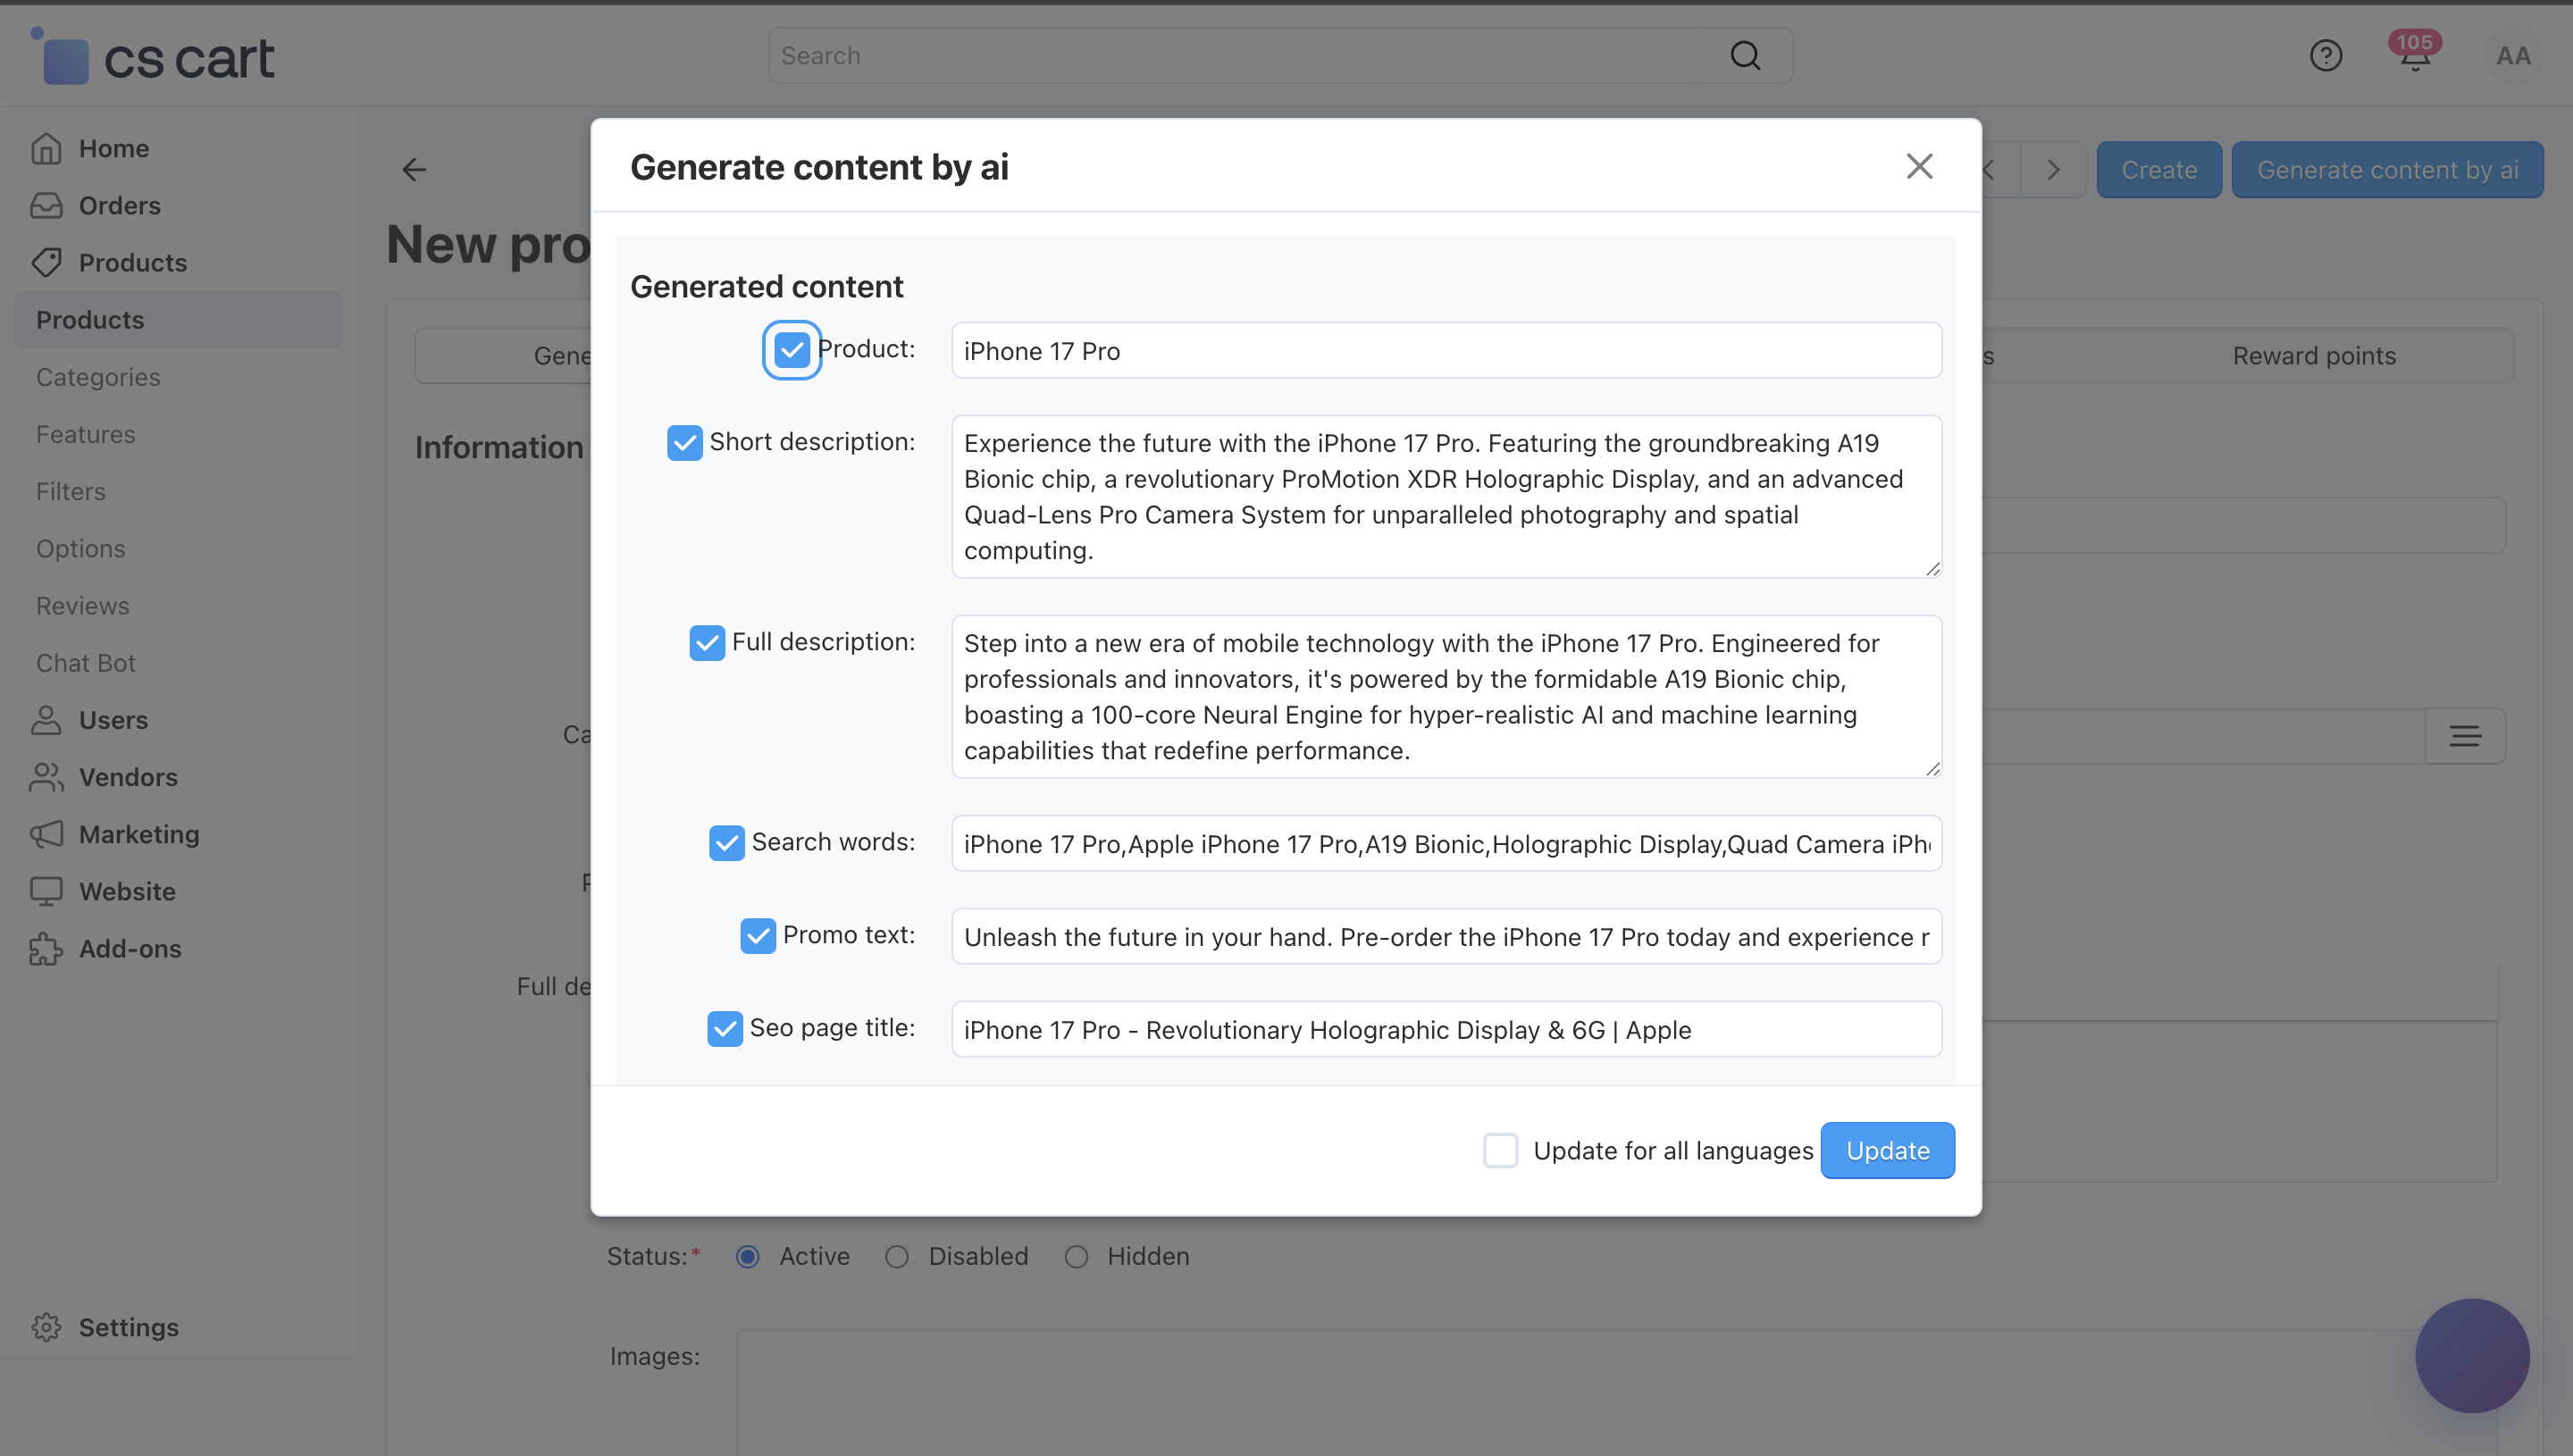
ii) Review the content in the popup. You will see checkboxes for different fields (e.g., Full Description, Short Description, Product Name, etc.).
Only the fields you check will be updated when you click Save.
If you select “Update all languages”, the content will be applied to all languages, not just the currently selected language.
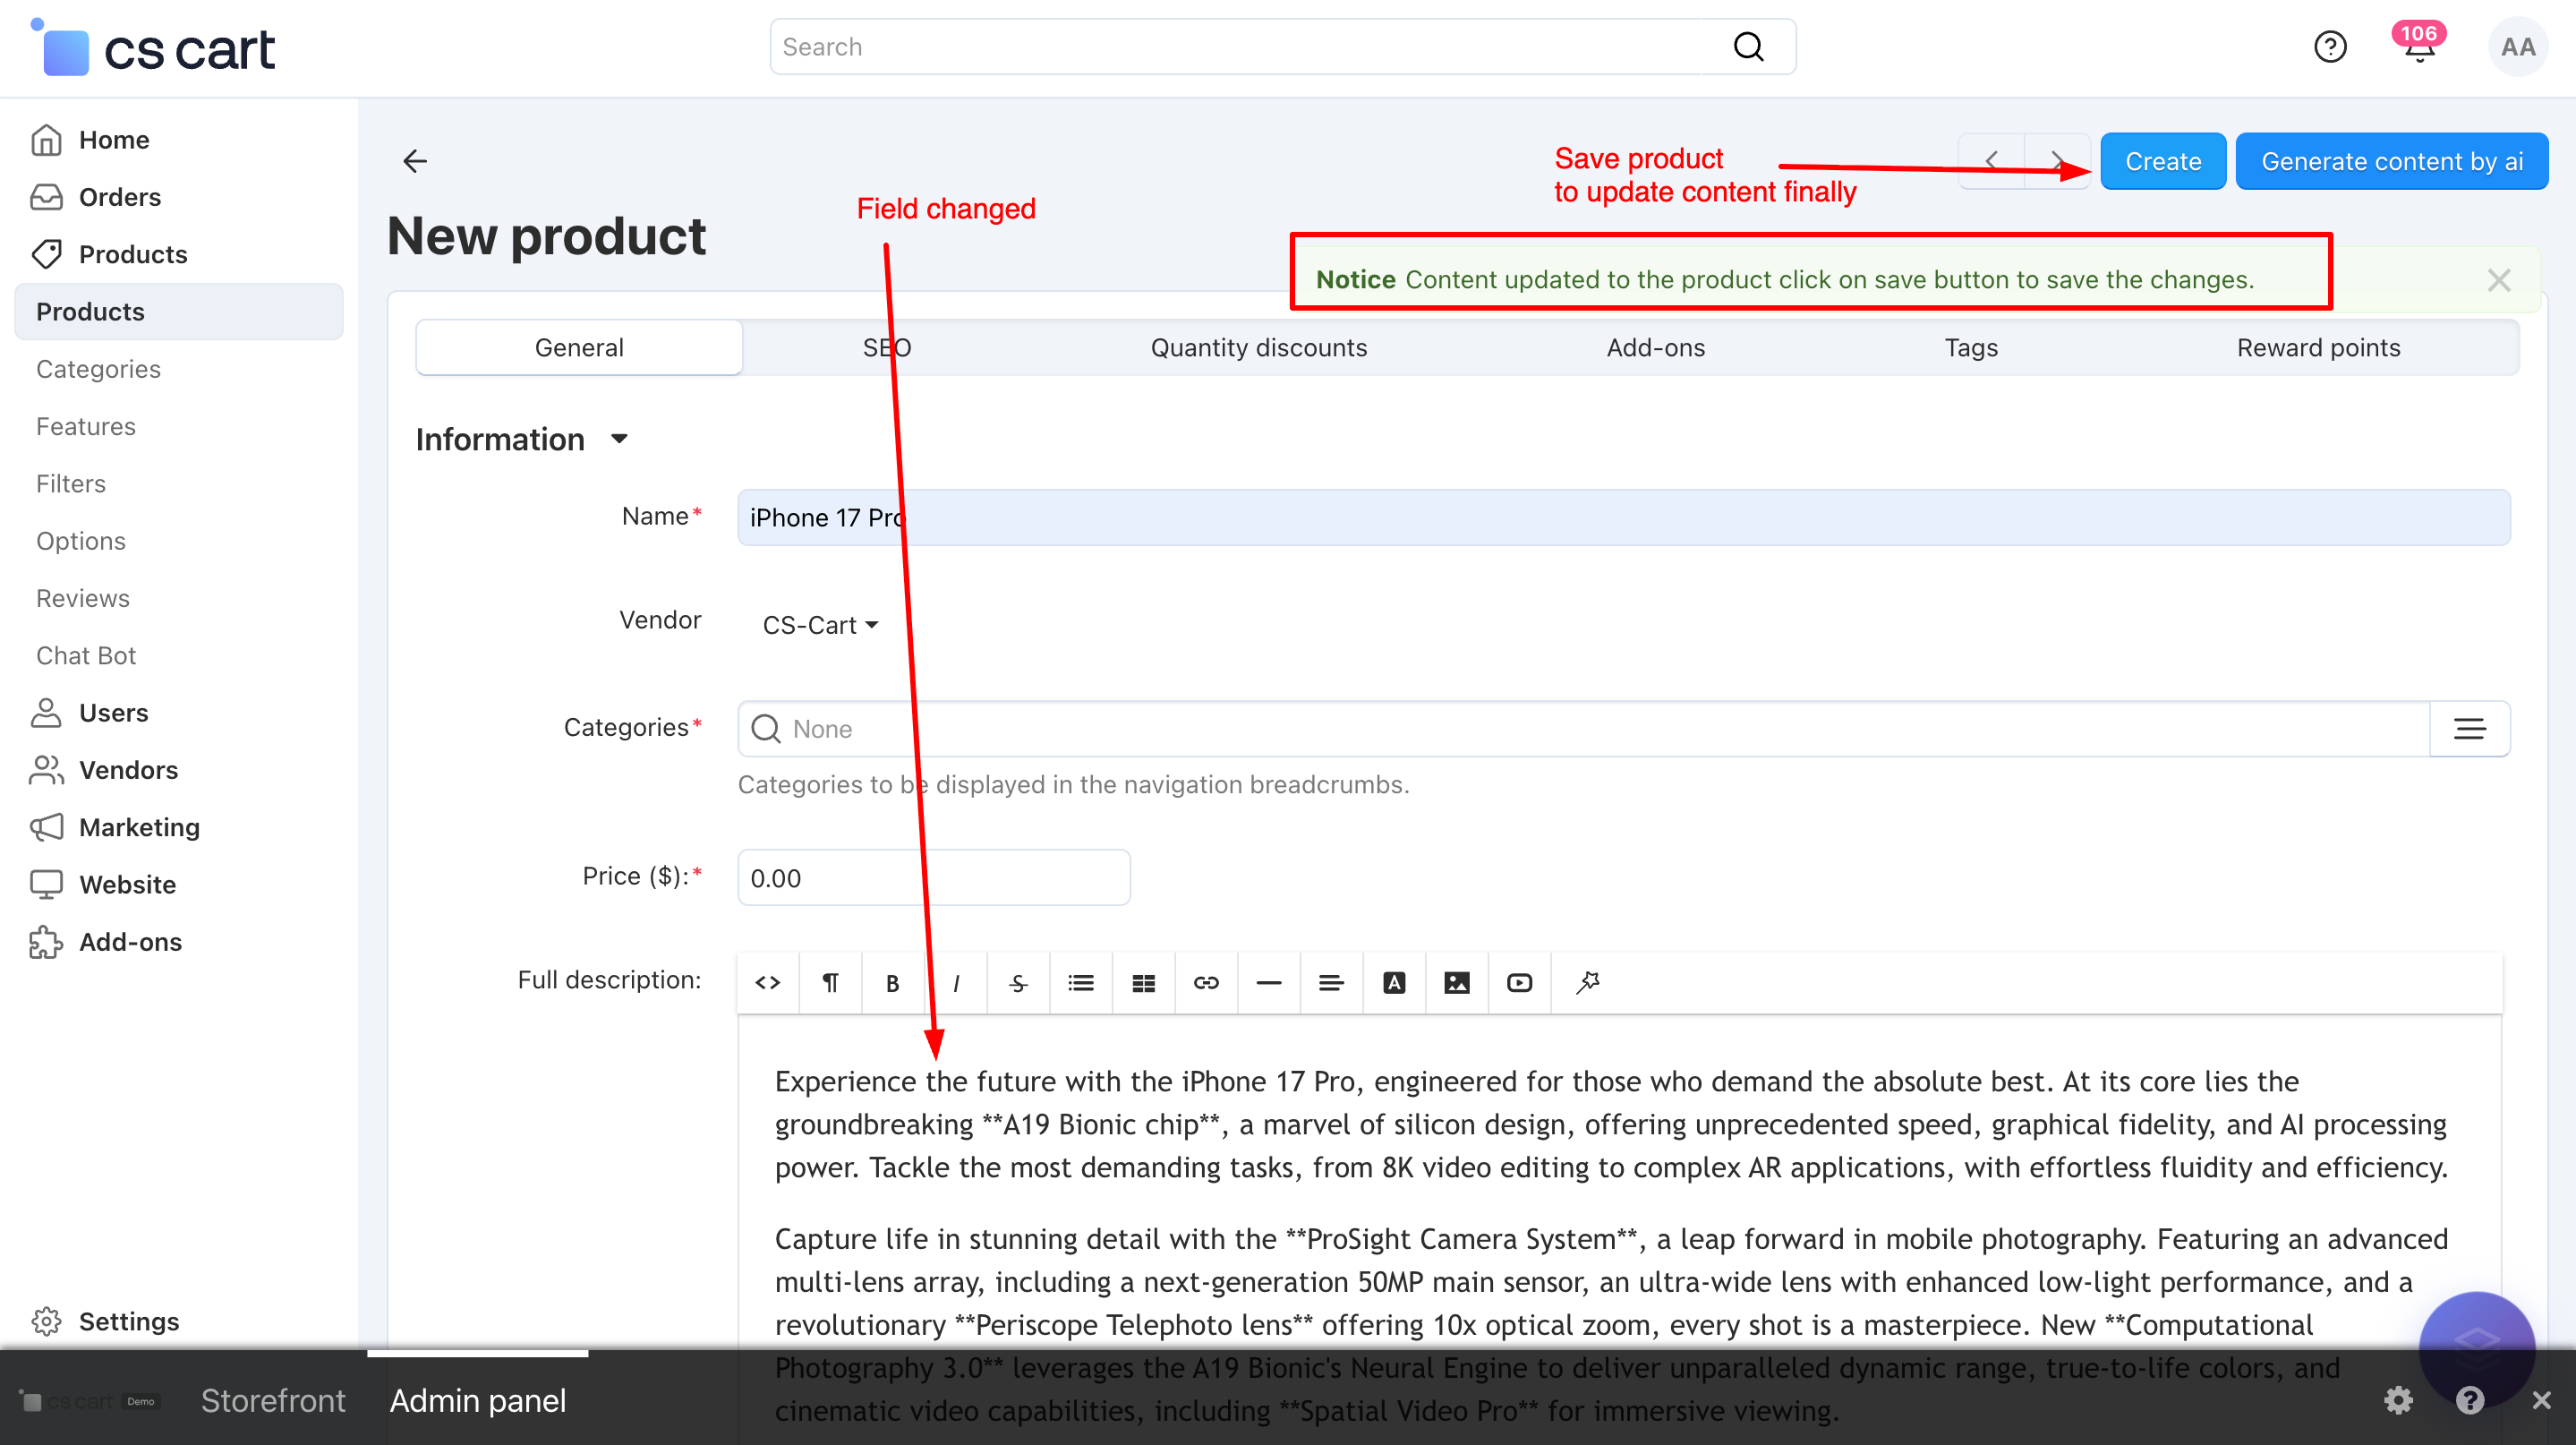
iii) After clicking Apply, the selected content is automatically added to the respective input fields on the product page. Review the content carefully in the input fields. Click Save on the product page to finally save the changes.
.
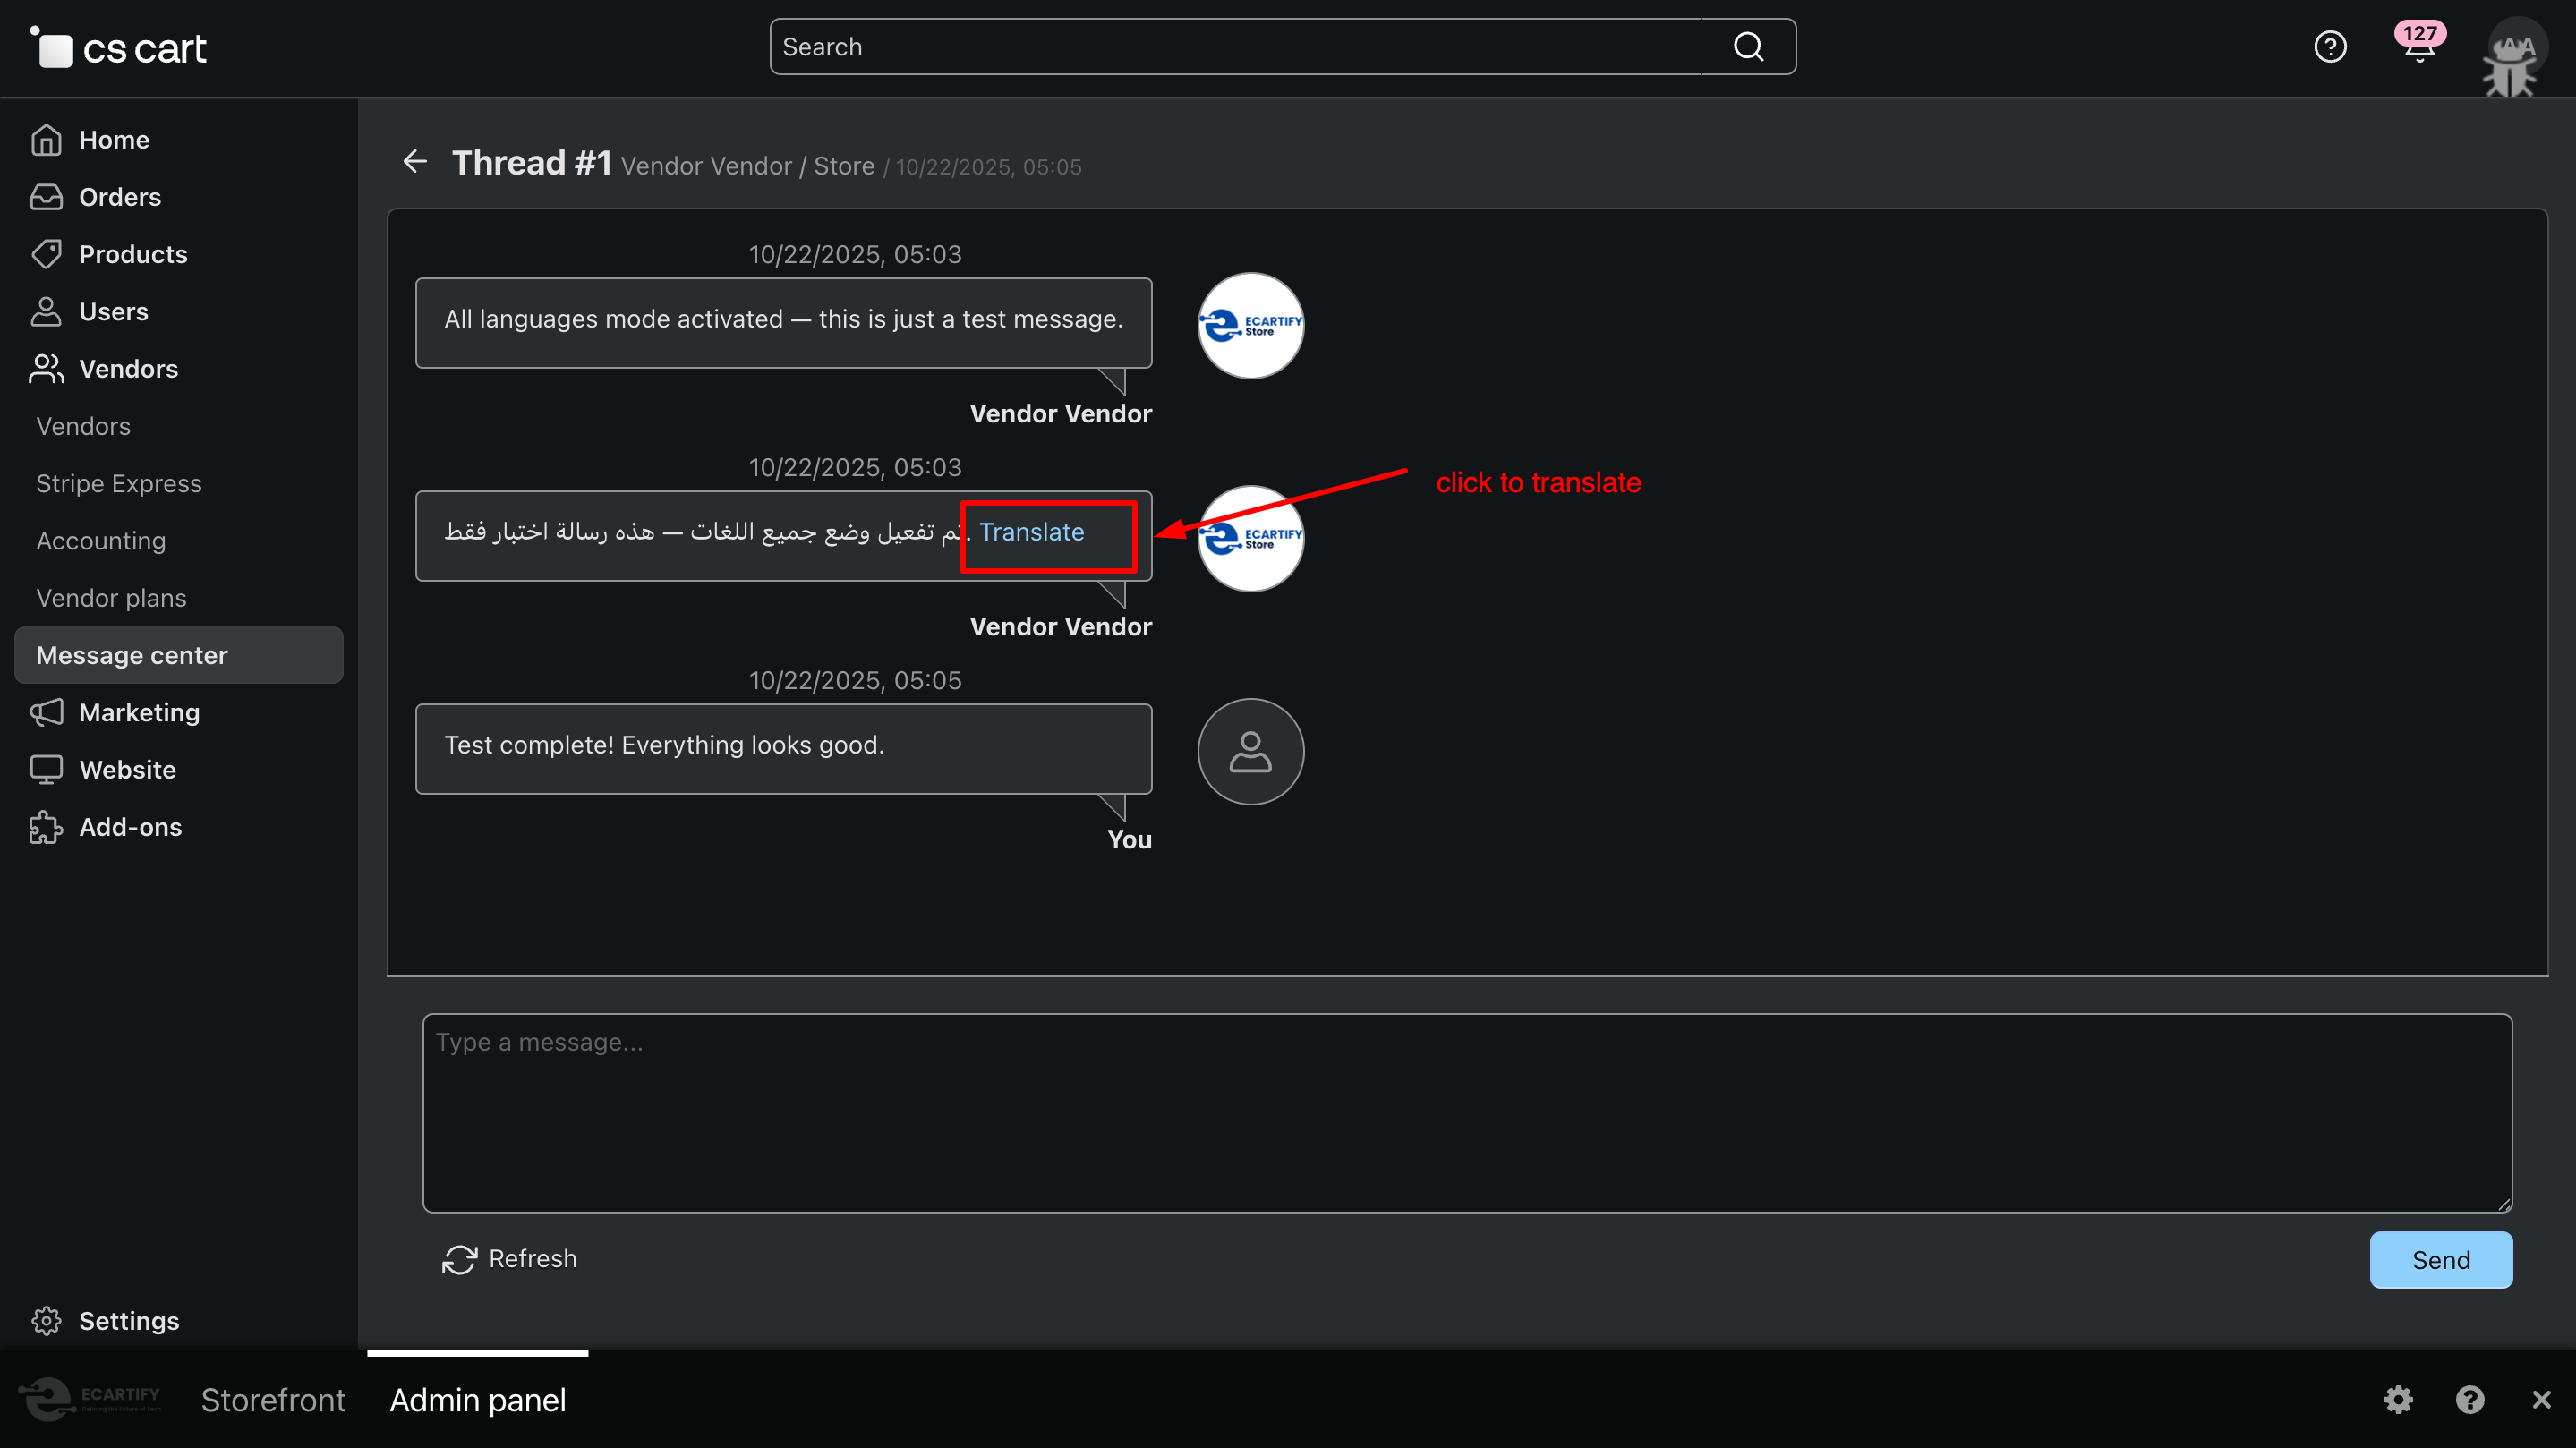
Step 4: How to translate chat and reviews
For Chat and reviews page in your CS-Cart backend and frontend.
You will see a Translate button next to the message.
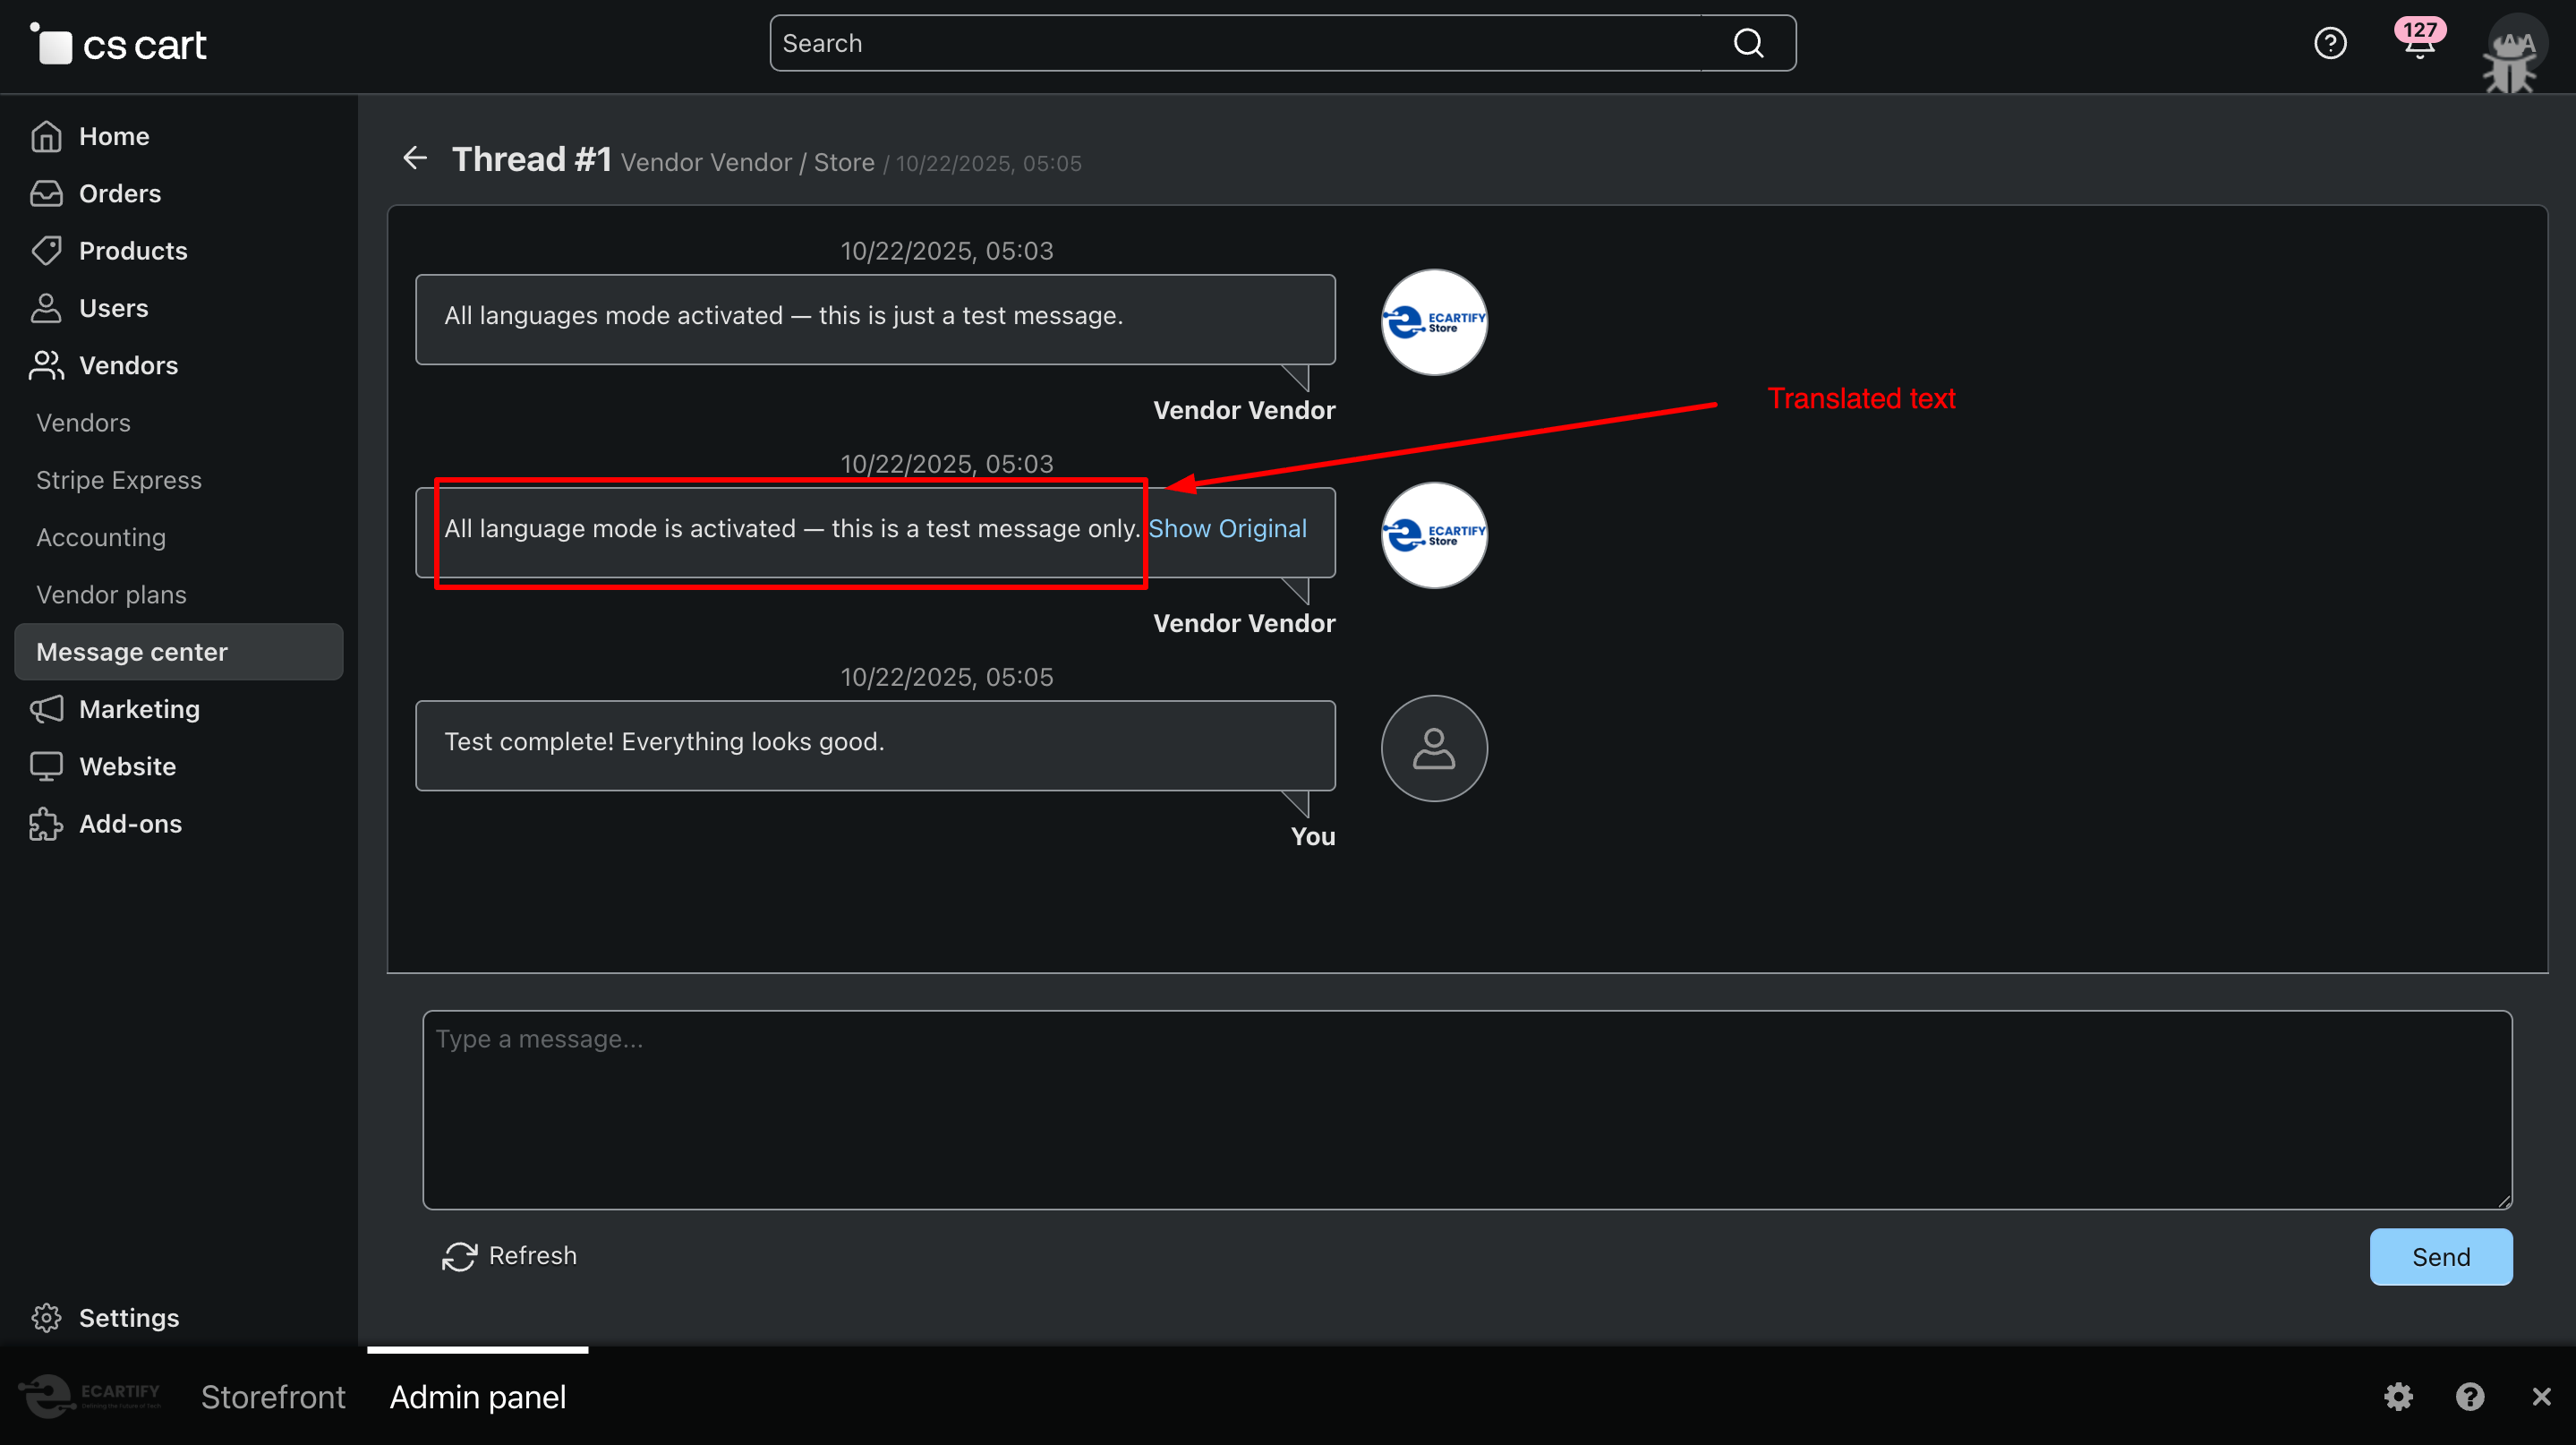
Click on translate button
Translated text
Why Choose AI Creator for Your CS-Cart Store?
AI Creator helps you instantly generate high-quality, SEO-friendly product content for new and existing products in your CS-Cart store using multiple AI engines. It also allows you to translate review and chat messages from one language to another, giving you full control over what gets updated while saving time and improving conversions and customer engagement.
Generate product titles, descriptions, and SEO-friendly content in seconds with advanced AI, and instantly translate chat and review messages across languages for seamless communication.
Multiple AI Engines, One Addon Choose between OpenAI (ChatGPT), Google Gemini, or a free translation engine anytime.
SEO-Friendly & Conversion-Focused Get optimized, keyword-rich content that ranks better and converts more.
Multilingual Content & Chat Translation Generate and translate content across multiple languages with ease.
Final Thoughts
Your AI Creator Addon is now ready to simplify product content creation and multilingual communication in your CS-Cart store. You can instantly generate SEO-friendly product content and translate customer reviews and chat messages from one language to another, making it easier to understand customer feedback and respond globally. This results in better engagement, improved trust, and higher conversions.
Pro Tip: Use the free translation API for translating reviews and chat messages to save costs, and leverage OpenAI or Google Gemini for high-quality product content and advanced translations on important pages.
Unlock Deeper Insights and Multi-Vendor Analytics in Your CS-Cart Marketplace
Running a successful marketplace requires more than just viewing basic sales numbers. You need flexible reporting, multi-vendor insights, export-ready analytics, and the ability to filter data based on business-specific conditions.
But CS-Cart's default reporting module, while useful, lacks several advanced capabilities that growing marketplaces demand.
Introducing Ecartify: Extended Sales Report — a powerful analytics extension designed to help CS-Cart admins view, filter, compare, and download advanced sales reports with ease.
What is Ecartify: Extended Sales Report?
Ecartify: Extended Sales Report enhances the existing CS-Cart "Sales Reports" module by adding powerful features that transform how you analyze your marketplace data:
Vendor-based filtering and reporting
Report export options: CSV, PDF, and Spreadsheet formats
New vendor-specific conditions for deeper insights
Clean UI integration within the CS-Cart admin panel
More meaningful breakdowns of sales data
Better control over report formats for accounting and auditing
This addon is built for marketplace owners who need more than the default "number of sales" table—especially those managing multiple vendors.
Key Features of Ecartify: Extended Sales Report
Vendor-Based Sales Conditions (Brand New Feature):
The most powerful addition: vendor-specific conditions in CS-Cart sales reports. Admins can now filter reports based on:
Specific individual vendors
Multiple vendors at once for comparison
Vendor groups or categories
Vendor performance over custom time periods
Example Reports You Can Generate:
"Show total products sold by Vendor A in 2025"
"Compare Vendor A, Vendor B, and Vendor C in a single report"
"Display the number of items sold by each vendor across months"
"Show top 10 vendors by revenue this quarter"
Download Reports in Multiple Formats:
Export your custom sales reports in professional formats that fit your business needs:
CSV Format
Perfect for accounting software and ERP system imports
PDF Format
Ideal for sharing reports or archiving documents
Spreadsheet
Excel/ODS files for deep analytics and custom editing
All export formats use clean, readable layouts similar to native CS-Cart exports, ensuring consistency and professionalism.
Enhanced Report UI Integrated with CS-Cart:
The addon seamlessly integrates into CS-Cart's existing interface with zero learning curve:
Follows CS-Cart's native design patterns for familiarity
Admins feel no learning curve—everything appears exactly where they expect it to be.
Generate More Visual & Organized Reports:
The PDF and Spreadsheet exports include professional formatting features:
Clear column separation for easy reading
Monthly and quarterly breakdowns
Automatic totals and subtotals calculation
Vendor-wise grouping and organization
Better table structure to avoid clutter
Multi-page PDF generation for large reports
Perfect for Accounting, Vendor Audits & Marketplace Insights:
This addon becomes essential for various business operations:
Finance Teams
Generate monthly vendor statements and commission reports
Vendor Relations
Provide transparent performance data to your vendors
Marketplace Audits
Create structured sales breakdowns for compliance
Business Intelligence
Get deeper insights without external BI tools
Step-by-Step Setup Guide
Step 1: Install the Addon
Installing the Extended Sales Report addon is simple and takes just a few minutes:
Download the addon from CS-Cart marketplace or Ecartify website
Login to your CS-Cart admin panel and navigate to Add-ons
Upload and install "Ecartify: Extended Sales Report"
Activate the addon from the add-ons list
No coding knowledge required - the installation is fully automated!
Step 2: How it apply vendor condition in sales report.
1. Open Sales report page and open edit report option from gear option.
2. Please select any table and select edit option.
3. Select Vendor tab and select the vendor that you want to show report for.
4. Now, the report will show according to the vendor that are selected.
Step 3: Download the Report
1. Click on the gearbox and click on Download Report to get the report in CSV format.
2. Click on the gearbox and click on Download Report in PDF to get the report in PDF format.
3. Click on the gearbox and click on Download Report in Spreadsheet to get the report in Spreadsheet format.
Perfect Companion for Multi-Vendor Stores
If your marketplace has 10, 50, or 500 vendors, this addon helps you effectively manage:
Performance Evaluations:
Track and compare vendor performance with clear metrics.
Settlement Cycles:
Generate accurate reports for vendor payment calculations.
Vendor Disputes:
Provide transparent data to resolve disagreements.
Vendor Leaderboards:
Identify top performers and incentivize growth.
Commission Audits:
Verify commission calculations with detailed breakdowns.
Growth Tracking:
Monitor vendor growth trends over time.
The addon ensures all vendors can be measured using consistent, transparent reporting—building trust and clarity in your marketplace.
Ecartify: Extended Sales Report is the missing piece for CS-Cart marketplaces that demand deeper visibility, richer analytics, and cleaner data export tools.
It transforms CS-Cart's default sales report system into a professional-grade reporting suite—with special focus on vendor-based insights that multi-vendor stores desperately need.
If you want full control over vendor analytics, professional reporting formats, and multi-condition filtering capabilities, this addon will completely transform how you manage and understand sales data inside CS-Cart.
Ready to Unlock Deeper Marketplace Insights?
Stop struggling with limited reporting. Upgrade to Ecartify: Extended Sales Report and get the vendor analytics and export capabilities your marketplace deserves.
Xero Accounting Financial Control with Seamless Xero Integration
Sync invoices, payments, and reports automatically to eliminate errors and spend more time growing your business.
Ecartify: Xero Accounting Integration
Transform your CS-Cart accounting workflow with the Xero Connector. This powerful addon automatically synchronizes orders, invoices, payments, products, and inventory between your CS-Cart store and Xero accounting software. Eliminate manual data entry, reduce errors, and maintain real-time financial visibility with secure, automated synchronization.
Key Features of Xero Connector
Automatic Invoice Creation: Orders instantly become Xero invoices with complete details, line items, and taxes.
Real-Time Payment Tracking: Payments automatically sync to Xero for accurate cash flow monitoring.
Credit Note Management: Refunds and cancellations generate credit notes automatically in Xero.
Customer Synchronization: Customer data syncs as Xero contacts, maintaining consistent records.
Product & Inventory Sync: Products and stock levels stay synchronized across both platforms.
Flexible Account Mapping: Map transactions to correct Xero accounts for accurate financial reporting.
Tax Configuration: Automatic tax calculation and recording for GST/VAT compliance.
OAuth 2.0 Security: Industry-standard secure authentication with encrypted data transmission.
API Health Monitoring: Real-time connection status and comprehensive diagnostics dashboard.
Step-by-Step Setup Guide
Step 1: Install the Addon
Installing the Xero Accounting Integration addon is simple and takes just a few minutes:
Download the addon from CS-Cart marketplace or Ecartify website
Login to your CS-Cart admin panel and navigate to Add-ons
Upload and install "Ecartify: Xero Connector"
Activate the addon from the add-ons list
No coding knowledge required - the installation is fully automated!
Step 2: Create Xero Developer App
Before connecting, you need to create a Xero Developer App to obtain API credentials:
1.Visit Xero Developer Portal: Go to developer.xero.com and log in with your Xero account
2.Create New App: Click "New App" and fill in your application details (name, company URL, etc.)
3.Get Credentials: Once created, you'll receive your Client ID and Client Secret
4.Add Redirect URIs: Add both redirect URLs provided in the addon settings to your Xero app configuration
Step 3: Connect to Xero
Configure the authentication settings to securely connect your store to Xero:
Enter Client ID: Paste your Xero OAuth 2.0 Client ID from the developer portal
Enter Client Secret: Paste your Client Secret (keep this confidential)
Add Redirect URIs: Copy both provided URLs and add them to your Xero Developer App
Click Connect to Xero: Authenticate via OAuth 2.0 secure connection
Once connected, you'll see your organization details and connection status!
Step 4: Enable Synchronization Features
Choose which data you want to sync between CS-Cart and Xero:
Invoice Sync: Automatically create Xero invoices when orders are placed or updated
Payment Sync: Record payments in Xero when orders are marked as paid
Credit Notes: Create credit notes for cancelled or refunded orders
Customer Sync: Sync customer contact information to Xero
Product Sync: Synchronize product catalog with Xero inventory items
Shipping Revenue Account: Account code for shipping revenue
Discount Account Code: Account for discounts and promotions (e.g., 429)
Payment Account Code: Bank account for received payments (e.g., 970 - Undeposited Funds)
Inventory Asset Account: Account for inventory assets (e.g., 630)
Cost of Goods Sold Account: Account for COGS (e.g., 310)
Flexible account mapping ensures proper financial categorization and simplified reporting!
Step 6: Set Up Tax Configuration
Configure tax settings to ensure accurate tax handling and compliance:
Default Tax Type: Select from Xero's predefined tax types (Output, Input, None, or Other)
Custom Tax Value: Enter custom tax codes if your required tax isn't in the standard list
Prices Include Tax: Check this box if CS-Cart prices already include tax
Accurate tax handling ensures compliance and eliminates reconciliation issues during tax season!
Step 7: Configure Order Status Triggers
Choose which order statuses trigger automatic invoice and credit note creation:
Create Invoice on Status: Select: Processed, Complete, Open, All Status
Customize Workflow: Match synchronization to your specific business processes
This flexibility allows you to control exactly when financial data is synced to Xero!
Step 8: Enable Debug Logging (Optional)
For troubleshooting and monitoring synchronization activity:
Enable Debug Logging: Get detailed sync information for troubleshooting connection issues
Log Retention: Set automatic log cleanup with configurable retention period (default: 30 days)
Comprehensive logs help with technical support and diagnostics when needed!
Step 9: Verify API Health & Connection
Monitor your Xero connection status and view important integration details:
Real-Time Status: View connection status, organization details, and tenant ID
Store Summary: See total products synchronized to Xero
Account Chart: View complete list of Xero accounts with codes, names, types, and status
Health Checks: One-click diagnostics to verify connection health
The API Health dashboard gives you complete visibility into your integration!
Step 10: Test & Start Syncing
Test the integration and begin automatic synchronization:
Manual Sync Test: Select products or orders and use "Sync to Xero" option to test
Verify in Xero: Check your Xero account to confirm data appears correctly
Enable Automatic Sync: Once tested, all future transactions sync automatically
Monitor Regularly: Check API Health dashboard and logs to ensure smooth operation
What Can You Sync?
The Xero Connector provides comprehensive synchronization across all major e-commerce and accounting entities:
Orders → Invoices
Every order automatically becomes a Xero invoice
Complete order details, line items, and taxes included
Customer information linked to Xero contacts
Payments → Bank Transactions
Payment records sync to appropriate Xero accounts
Real-time cash flow tracking
Refunds → Credit Notes
Cancelled orders generate credit notes
Declined orders create credit notes
Maintain accurate financial records for all adjustments
Customers → Contacts
Customer information syncs as Xero contacts
Billing addresses and account details included
Consistent customer data across platforms
Products → Inventory Items
Product catalog maps to Xero inventory
Automatic product mapping and SKU matching
Product information stays consistent
Stock Levels → Inventory Tracking
Real-time stock level synchronization
Automatic inventory updates when orders are placed
Accurate cost of goods sold calculations
Benefits for Your Business
Time Savings
Eliminate 10-20 hours per week of manual data entry
No more double-entry bookkeeping between systems
Focus on growing your business instead of administrative tasks
Error Reduction
Eliminate transcription errors from manual entry
Automatic data validation and synchronization
Accurate financial records for tax compliance and auditing
Real-Time Financial Visibility
Up-to-date financial data in Xero at all times
Generate reports on demand without waiting for month-end
Make informed business decisions with current data
Scalability
Handles growing order volumes automatically
Maintains accuracy whether processing 10 or 10,000 orders
Scales with your business without additional
Transform Your Accounting Workflow Today
Your Xero Connector is now ready to revolutionize how you manage your CS-Cart store finances. Say goodbye to manual data entry, reconciliation headaches, and time-consuming bookkeeping tasks. With automated synchronization, you can:
Pro Tip: Start by syncing historical orders in batches to populate your Xero account, then enable automatic synchronization for all future transactions. Use the API Health dashboard to monitor your integration and ensure everything runs smoothly!
Ready to automate your accounting? Install Xero Connector today and experience error-free, real-time financial management!
AI-Powered Chatbots That Elevate Support & store management
The AI Agent & Chatbot provides comprehensive assistance across all aspects of CS-Cart development and store management
Ecartify: AI Agent & Chatbot – Your Intelligent Development Assistant
Transform your CS-Cart development workflow with the AI Agent & Chatbot. This addon brings AI-powered assistance directly into your admin and vendor panels. Auto-generate addons, Simple debug code instantly, perform CRUD operations, and get expert CS-Cart guidance - all through natural conversation. Perfect for developers, store owners, and multi-vendor marketplaces!
Step-by-Step Setup Guide
Step 1: Install the Addon
Installing the AI Agent & Chatbot is simple and takes just minutes:
Download the addon from CS-Cart marketplace or Ecartify website
Login to your CS-Cart admin panel and go to Add-ons
Upload and install "Ecartify: AI Agent & Chatbot"
Activate the addon from the add-ons list
The addon will appear in your Products menu as "Chat Bot" for easy access!
Step 2: Configure N8N Integration
After installation, navigate to the addon settings page. You have two easy options to get started:
Option 1: Use Our Ready-Made Server (Recommended)
We provide a free N8N server that's already configured and ready to use! Live URL: You can find the URL on the addon settings page.
Simply paste this URL into the addon settings and start asking questions immediately. Note: Currently free during beta. Future subscription plans may apply.
Option 2: Host Your Own N8N Server
Prefer complete control? Set up your own N8N server:
• Install N8N on your hosting
• Go to Addon Settings and import our workflow template
• Configure Gemini or any AI model
• Get your webhook URL
• Add it to the addon settings
Both options work perfectly - choose what fits your needs!
Step 3: Configure Chatbot
Enable/Disable Widget: Turn the chat interface on or off as needed
Add N8N URL: Check step 2
Set Default Vendor for product: Limit queries to a specific vendor's data (perfect for multi-vendor stores)
Set Default Category for product: Filter results to a specific product category automatically
Step 4: Access AI Assistant
Start using your intelligent CS-Cart development assistant:
Navigate to Chat Bot: Go to Products → Chat Bot in your admin panel
View Capabilities: See what the AI can help you with (Create Addons, Debug Code, CS-Cart Help, CRUD Operations)
Start Chatting: Type your request in natural language and get instant AI-powered assistance
Access Configuration: Switch to Configuration tab to manage API settings and domain access
The AI assistant is now ready to help with all your CS-Cart development needs!
Step 5: Set Up Vendor Plans (Multi-Vendor)
Control which vendors can access the AI agents:
Navigate to Vendor Plans: Go to Vendors → Vendor plans
Edit Plan Privileges: Open any vendor plan (Gold, Silver, etc.)
Enable "Show Agent On Vendor End": Check this option to give vendors access to AI Agent
Save Configuration: Vendors in this plan will now see the AI chatbot
Multi-Tenant Security: Each vendor only accesses their own isolated data
What Can the AI Agent Do?
The AI Agent & Chatbot provides comprehensive assistance across all aspects of CS-Cart development and store management:
Create Addons
Full Addon Generation: Describe what you want, AI creates complete addon with all necessary files.
Best Practices: Code follows CS-Cart coding standards and best practices
Time Saving: What takes hours to code manually, AI generates in minutes. just need to save file.
Debug Code & Fix Files
Fetch & Fix Feature: Enter file path, AI analyses and fixes all issues
Error Detection: AI finds bugs, syntax errors, logic issues automatically
Code Optimization: Improves performance and code quality
Save Back Easily: One-click to save corrected code back to file.
Learn & Understand: AI explains what was wrong and how it was fixed
CS-Cart Expert Help
Hook System Guidance: Learn which hooks to use and how to implement them
Controller Assistance: Get help with frontend/backend controller structure
Schema Explanation: Understand addon schemas, database schemas, and configurations
CRUD Operations
Product Management: Create, update, delete products through chat
Order Operations: View, search, and manage orders with natural language
User Management: Create and manage admin, vendor, and customer accounts
Bulk Operations: Perform mass updates and changes efficiently
Benefits for Different Users
For Developers
10x Faster Development: Generate addons in minutes instead of hours
Instant Debugging: Fix errors without by selection the files path.
Learning Tool: Understand CS-Cart architecture through AI explanations
For Store Owners
No Coding Required: Manage store through natural conversation
Quick Data Access: Get inventory reports, sales data instantly
Cost Savings: Reduce dependency on developers for simple tasks
For Multi-Vendor Marketplaces
Vendor Empowerment: Give vendors AI-powered inventory management
Controlled Access: Manage AI features through vendor plans
Data Security: Complete isolation between vendor data
For CS-Cart Learners
Interactive Learning: Ask questions and get instant expert answers
Code Examples: See working code for any CS-Cart feature
Best Practices: Learn proper CS-Cart development from the star
Transform Your CS-Cart Development Today
Your AI Agent & Chatbot is now ready to revolutionize how you develop and manage CS-Cart stores. Say goodbye to time-consuming coding, manual debugging, and complex database operations. With AI-powered assistance, you can:
Pro Tip: Start with simple requests like "Show me all products" to get familiar with the AI. Then progress to addon generation and file debugging. The AI learns your coding style and preferences over time for even better results!
Grow with WhatsApp Reports | Daily, Weekly & Monthly Insights for Vendors
Automatically send business performance reports to vendors via WhatsApp.
Orders, revenue, and key metrics — delivered on time, every time.
Ecartify: Business WhatsApp Report
Keep your vendors informed with the Business WhatsApp Report addon. Automatically send daily, weekly, and monthly business reports directly to vendor WhatsApp numbers. Track orders, revenue, customers, and key metrics without manual effort. Perfect for multi-vendor marketplaces that need automated, professional reporting!
Key Features of Business WhatsApp Report
Automated Report Scheduling: Send daily, weekly (any day), and monthly reports automatically via WhatsApp.
WhatsApp Business API: Secure integration with official WhatsApp Business API for reliable delivery.
Multi-Vendor Support: Each vendor receives reports with only their isolated data and metrics.
Comprehensive Metrics: Orders, revenue, customers, products, order status, and top-selling items.
Flexible Scheduling: Choose specific days for weekly reports (Monday-Sunday).
Vendor Management: Centralized dashboard to manage WhatsApp numbers and report preferences per vendor.
Report Logs & Tracking: View complete history of sent reports with status, timestamps.
Analytics Dashboard: Monitor success rates, daily statistics, and delivery performance.
Custom Preferences: Different report schedules per vendor
Mobile-First Businesses
WhatsApp Native: Reports delivered to preferred communication channel
Instant Access: No app installation or login required
Push Notifications: Vendors notified immediately when reports arrive
Technical Features & Security
Security Features
Official API Only: Uses WhatsApp Business API, not unofficial methods
Encrypted Communication: All data transmitted securely via HTTPS
Access Token Protection: Credentials stored securely in database
Monitoring Features
Success Rate Tracking: Monitor percentage of successful deliveries
Daily Statistics: Visualize sending patterns over time
Report History: Complete audit trail of all sent reports
Transform Your Vendor Communication Today
Your Business WhatsApp Report addon is now ready to revolutionize how you communicate with vendors. Say goodbye to manual report creation, email chains, and vendor inquiries about performance. With automated WhatsApp delivery, you can:
Pro Tip: Start with daily reports enabled for all vendors to establish the routine. After vendors become familiar with the format, you can customize frequencies based on individual preferences. The analytics dashboard helps you monitor delivery success and optimize timing!
Unlock Smarter Automation with a Universal AI Agent
Learn how a flexible, adaptable AI agent can streamline processes, learn from context, and handle multi-step tasks across systems.
Ecartify: Universal AI Agent – Complete Description & Setup
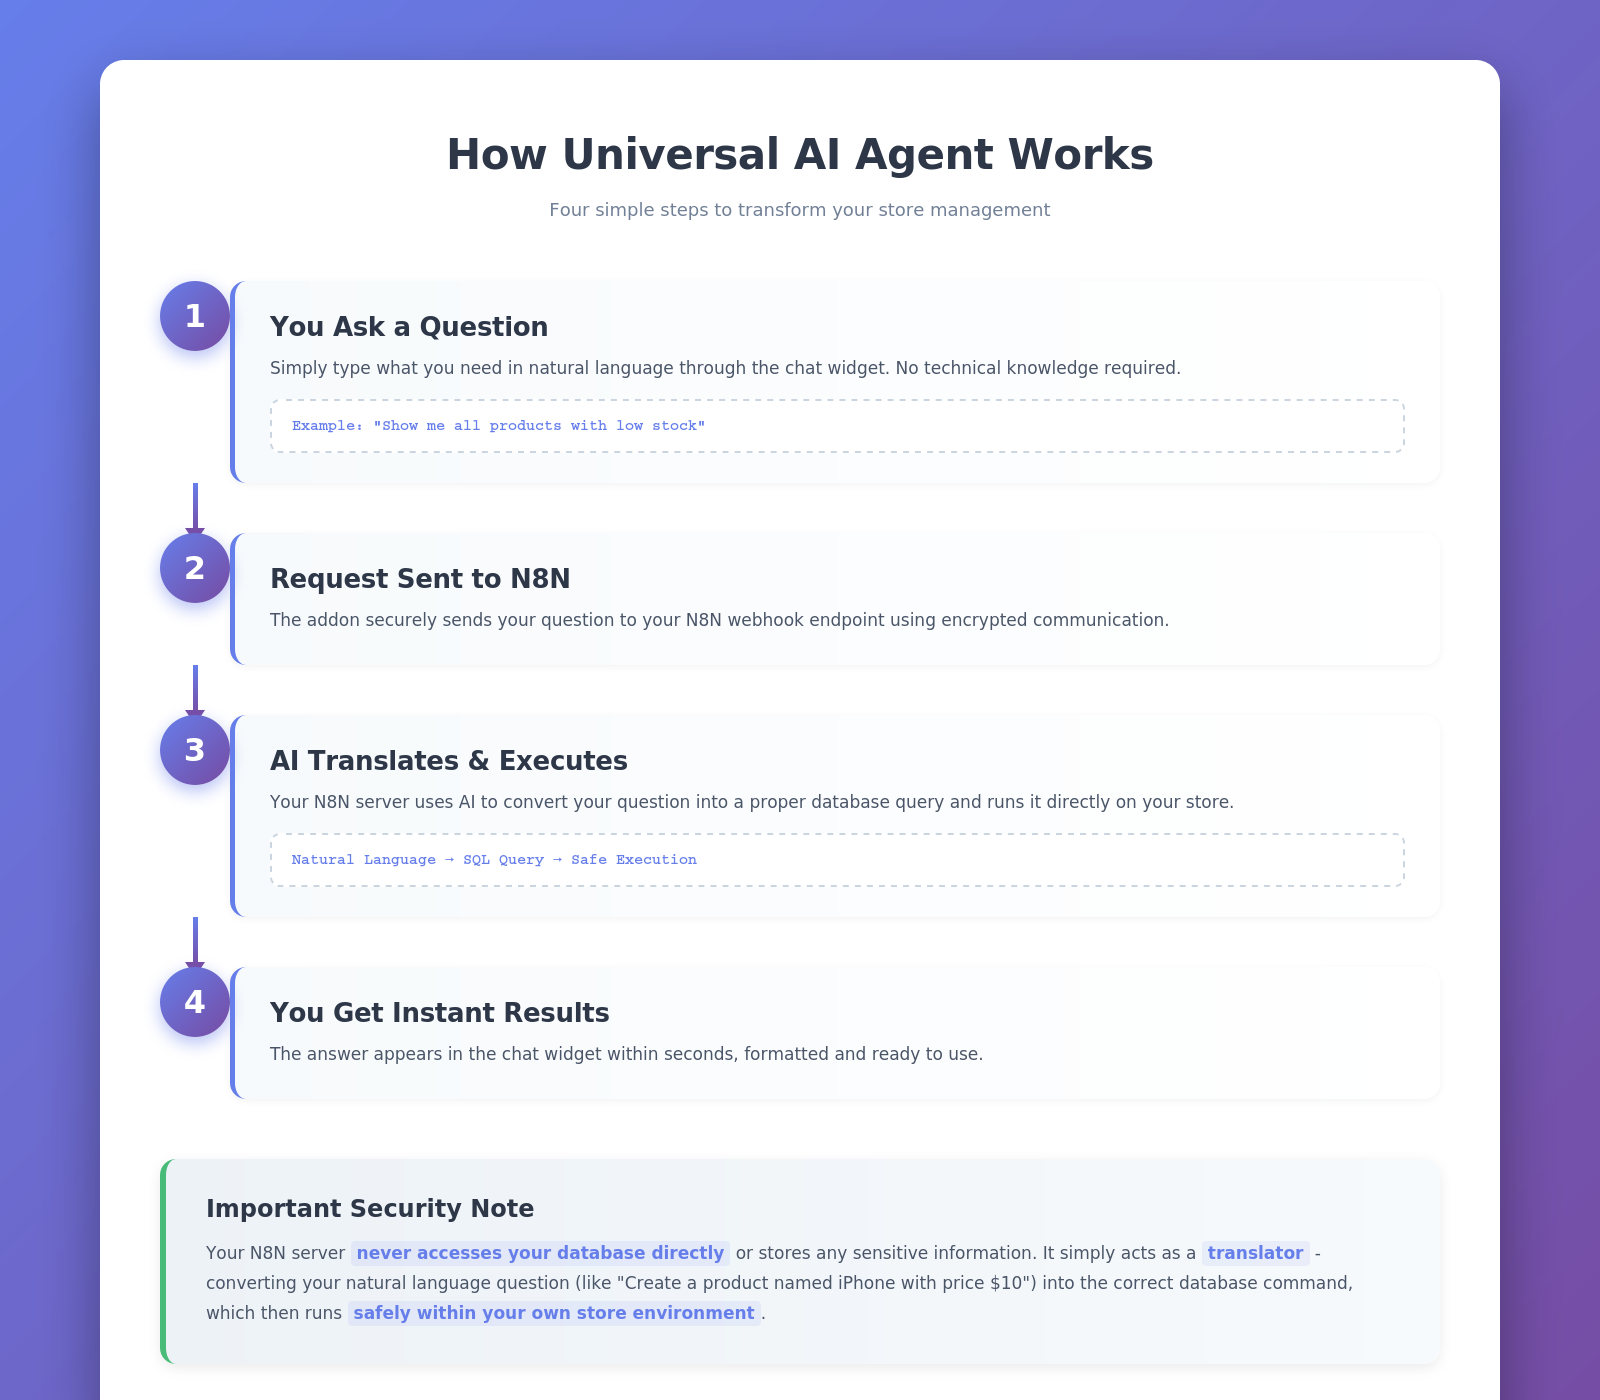
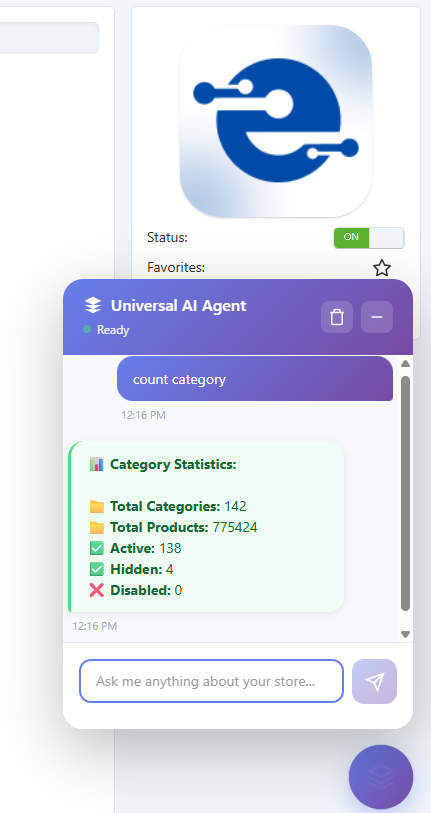
Transform your CS-Cart store management with the Universal AI Agent. This revolutionary addon enables you to interact with your store's database using natural language - no SQL knowledge required! Simply ask questions like "Show me products with low stock" or "What were today's sales?" and get instant, accurate answers. Manage inventory, analyze sales, create products, and track orders - all through simple conversation.
Key Features of Universal AI Agent
Natural Language Interface: Ask questions in plain English - no technical knowledge required.
Comprehensive CRUD Operations: Create, Read, Update, and Delete products, categories, orders, and users.
Instant Analytics: Get real-time insights on sales, inventory, and customer behavior.
Granular Security Controls: Control what operations the AI can perform with approval workflows.
Multi-Vendor Support: Perfect for marketplaces with vendor-specific access controls.
Conversation Memory: Maintains context across multiple queries for natural interactions.
Rate Limiting: Built-in protection against abuse with customizable request limits.
SQL Preview: See the actual database query before execution for complete transparency.
Easy N8N Integration: Use our free server or host your own.
Step-by-Step Setup Guide
Step 1: Install the Addon
Installing the Universal AI Agent addon is simple and takes just a few minutes:
Download the addon from CS-Cart marketplace or Ecartify website
Login to your CS-Cart admin panel
Navigate to Add-ons → Manage add-ons
Upload the provided ZIP file
Click Install & Activate
No coding knowledge required - the entire process is automated!
Step 2: Configure N8N Integration
After installation, navigate to the addon settings page. You have two easy options to get started:
Option 1: Use Our Ready-Made Server (Recommended)
We provide a free N8N server that's already configured and ready to use! Live URL: You can find the URL on the addon settings page.
Simply paste this URL into the addon settings and start asking questions immediately. Note: Currently free during beta. Future subscription plans may apply.
Option 2: Host Your Own N8N Server
Prefer complete control? Set up your own N8N server:
• Install N8N on your hosting
• Go to Addon Settings and import our workflow template
• Configure Gemini or any AI model
• Get your webhook URL
• Add it to the addon settings
Both options work perfectly - choose what fits your needs!
Step 3: Configure Chat Widget
Customize how the AI assistant appears in your admin panel:
Enable/Disable Widget: Turn the chat interface on or off as needed
Position Anywhere: Choose from bottom-right, bottom-left.
Set Default Vendor: Limit queries to a specific vendor's data (perfect for multi-vendor stores)
Set Default Category: Filter results to a specific product category automatically
The widget provides one-click access to AI assistance - always there when you need it, hidden when you don't!
Step 4: Configure Security Settings
Control exactly what the AI can do with your database for maximum safety:
Auto-confirm Read Operations: Automatically execute SELECT queries without manual approval
Require Confirmation for Write Operations: Manual approval needed for INSERT, UPDATE, DELETE operations
Enable Direct SQL Execution: Allow or block direct SQL query execution (use with caution)
Rate Limiting: Set maximum requests per user per hour (recommended: 100)
Excluded Tables: Specify which database tables to hide from the AI (e.g., sessions, api_sessions)
Maximum Search Results: Limit results to improve performance (recommended: 50)
Step 5: Configure Conversation Settings
Maintain context and transparency across multiple queries:
Conversation Memory: Set how many previous messages to remember (default: 20 messages) This allows the AI to understand follow-up questions and maintain context
Conversation Logging: Enable logging for analytics and debugging purposes Review past conversations to improve efficiency
Log Retention: Auto-delete logs older than specified days (default: 90 days) Keeps your database clean and compliant
SQL Preview: Show users the actual SQL query before execution Complete transparency for what's happening in your database
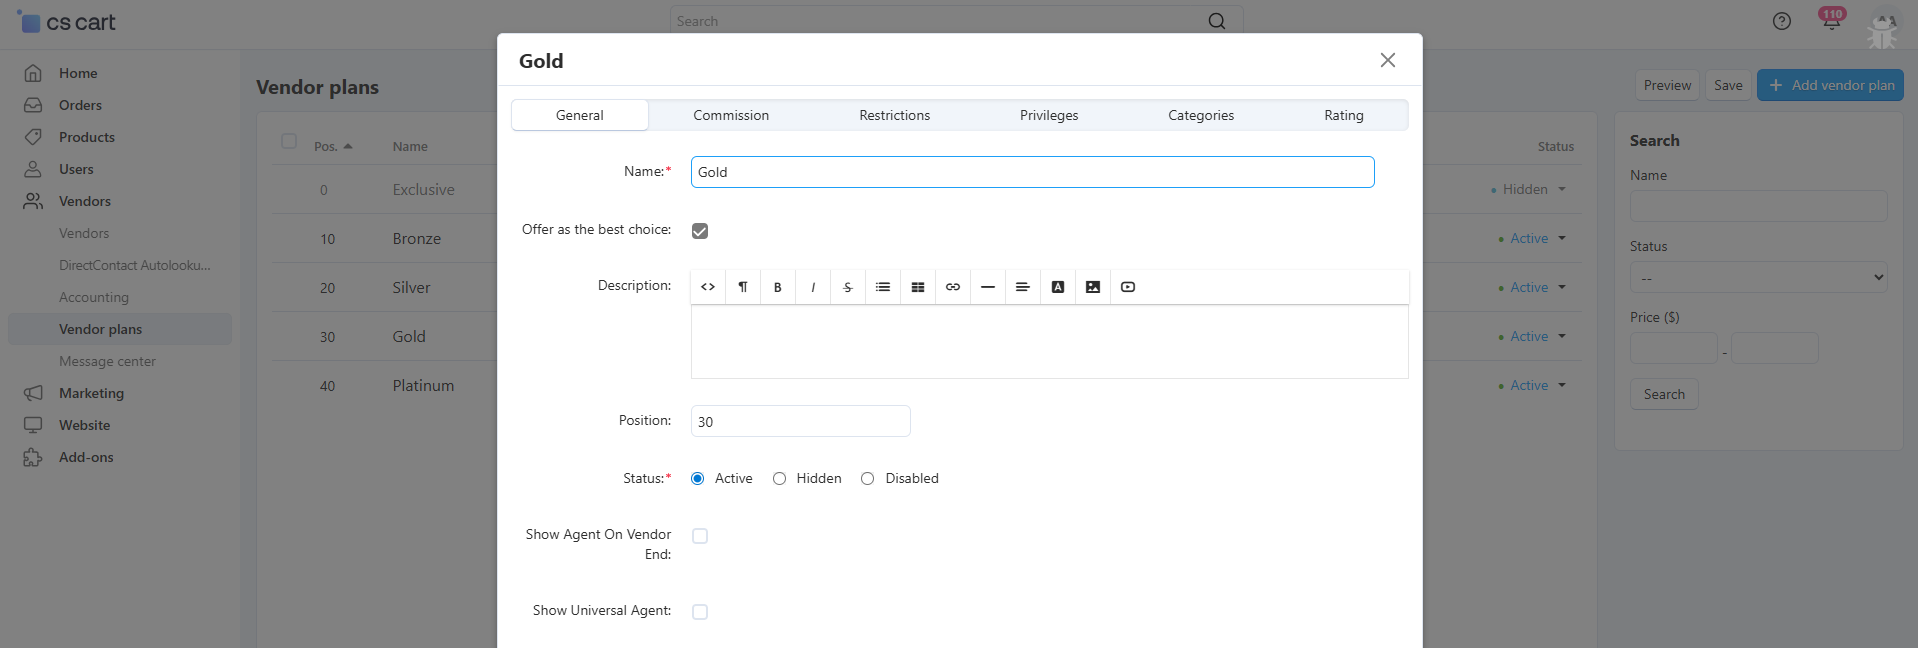
Step 6: Set Up Vendor Permissions (Optional)
Running a multi-vendor marketplace? Give vendors controlled access to the AI agent:
Administrator Control: Go to Vendors → Vendor plans Edit or create a vendor plan Check "Show Agent On Vendor End" Vendors with this plan can use the AI agent in their panel
Automatic Data Isolation: Each vendor sees only their own data No access to other vendor's information Admins get full marketplace analytics Perfect for secure multi-vendor operations
What Can You Do with Universal AI Agent?
The AI agent can perform comprehensive CRUD (Create, Read, Update, Delete) operations on all major store entities:
Products
Create single or multiple products with all details
Update product prices, inventory, and descriptions
Search and filter products by any criteria
Find low stock items and out-of-stock products
Identify profitable products and best sellers
Delete test products or discontinued items
Categories
Create category hierarchies effortlessly
Update category information and structure
Count products per category instantly
Find empty categories that need attention
Reorganize category structure with simple commands
Users
Create new users (Admin/Vendor/Customer)
Update user information and profiles
Search users by type, status, or activity
Count active and disabled users
Manage user permissions and roles
Orders
View detailed order information
Search orders by status, date, or customer
Calculate revenue (daily, weekly, monthly)
Find top-selling products
Identify best customers and VIPs
Track unpaid orders and pending payments
Perfect For Every Store Size
Small Store Owners
Quick Inventory Checks: No need to navigate multiple pages - ask and get instant answers
Simple Analytics: Get insights without complex reporting tools or technical knowledge
Fast Product Updates: Change prices, update stock, or modify details in seconds through conversation
Multi-Vendor Marketplaces
Vendor Access Control: Give vendors limited AI access through customizable vendor plans
Automatic Data Isolation: Each vendor sees only their own data - complete security and privacy
Admin Oversight: Administrators get full marketplace analytics and control
Final Thoughts
Your Universal AI Agent is now ready to revolutionize how you manage your CS-Cart store. Say goodbye to complex SQL queries, tedious navigation, and time-consuming manual tasks. With natural language commands, you can: Pro Tip: Start with read-only operations to get comfortable with the AI, then gradually enable write operations as you build confidence. Use the SQL preview feature to learn how your natural language queries translate to database commands!